Welcome back to this series on using MISP for threat intelligence!
MISP (Malware Information Sharing Platform and Threat Sharing) is an open-source threat intelligence platform that allows you to share, collate, analyze, and distribute threat intelligence. It is used across industries and governments worldwide to share and analyze information about the latest threats. This series aims to give you the knowledge you need to get up and running with MISP as quickly as possible.
If you have followed this series, you will now have events and attributes (IOCs) in your MISP instance and know how to interact with these using MISP’s API. Today, you learn to use the API to export attributes in your MISP instance as IOCs that you can upload to security solutions for detection and blocking.
Let’s get started making MISP data actionable by exporting IOCs!
The Value of Exporting IOCs
MISP is designed to hold all types of cyber threat intelligence, from strategic to operational intelligence. One of the fundamental benefits of cyber threat intelligence is the consumption and distribution of Indicators of Compromise (IOCs) that can be used to proactively defend your environment from the latest cyber threats (operational intelligence).
- You can create detections to alert you when one of your hosts connects to a malicious domain.
- You can hunt for a hacking tool in your environment using the tool’s file hash
- You can automatically block known malicious IP addresses from connecting to your network.
All of these measures, whether they fall under threat hunting or detection engineering, are the most basic way to defend against cyber threats, and you need to be utilizing them.
You need an easy way to consume, analyze, and distribute IOCs to do this. You have already seen in this series how to store and consume IOCs using MISP events and feeds. The final piece of the puzzle is learning how to distribute these IOCs effectively to your security operations team so they can take action and perform threat hunting or detection engineering to defend your environment from threats.
Let’s examine how you can distribute IOCs by exporting them from your MISP instance, first using the web interface and then through the powerful MISP API.
Exporting IOCs Using the Web Interface
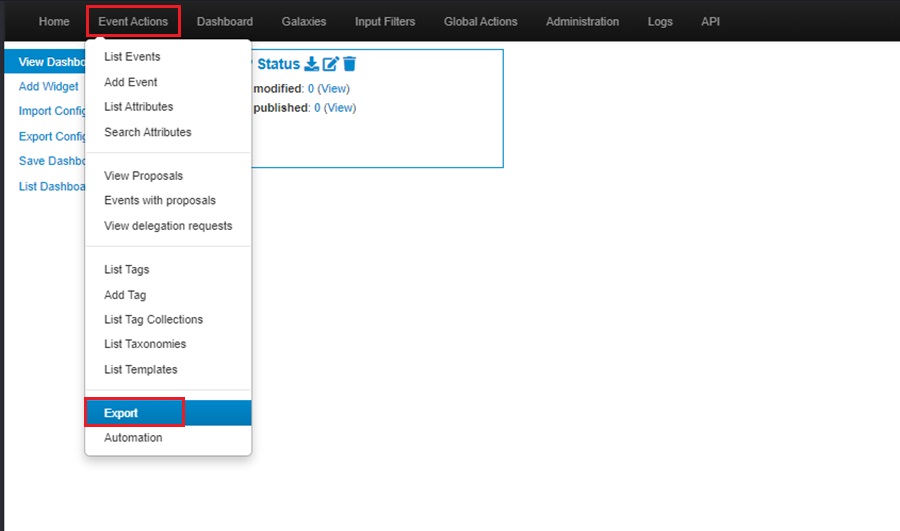
The simplest way to distribute IOCs using MISP is to export them via the web interface. Navigate to the Export page under the Event Actions menu.
The Export page lets you download all your MISP instance’s attributes (IOCs) in various formats listed under the Type column. To download IOCs, select the Generate button under the Actions column to create a list to download. You will see this happening as the Progress field displays Adding.
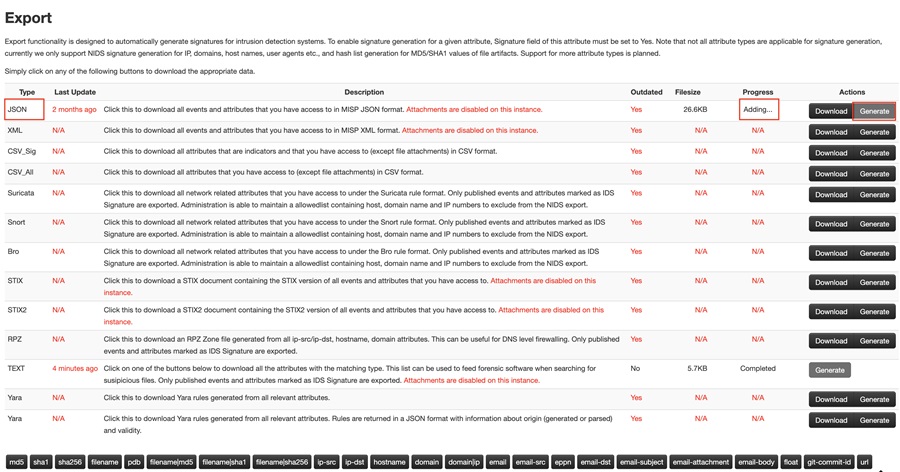
Once the list is generated (the Progress field shows Completed), select the Download button to download the IOCs in your chosen format.

This will start the download. You can view the IOCs once complete. Here, I have downloaded the IOCs in JSON format.
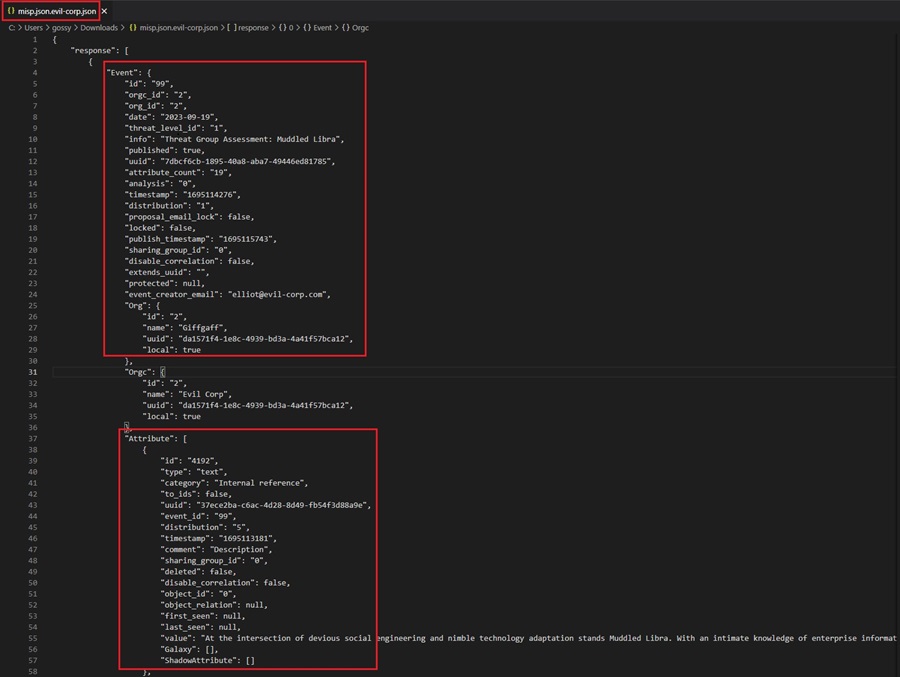
You can see each IOC grouped by its associated Event. You now need to parse this data to extract the IOCs and upload them to your security solution for blocking or detection.
You can also download specific IOC types by selecting them from the attribute types at the bottom of the page
Exporting IOCs Using the MISP API
The web interface method for exporting IOCs is clunky and slow. It requires you to log into the web server, manually choose which IOCs you want to export and in which format, and then parse the output to extract IOCs. This method is not ideal for a modern security operations team that needs to move fast and optimize for efficiency. In fact, this method is considered deprecated by the MISP project and will be removed in the near future.
The better way to export IOCs is through the powerful MISP API. This method lets you choose which IOCs you export, manipulate them, and adjust the format they are exported as, all programmatically. You can automate the entire process of pulling down IOCs and uploading them to your security solutions using the API!
Connecting to the API
To begin with, you need to create an API key for your MISP instance. You will use this key to connect to the API and run queries. Creating a key is easy. Go to Administration > List Auth Keys and click the Add authentication key button in the MISP web interface.

You can then add the following code to a Python script to connect to the API. Remember to replace the variables MISP_URL and MISP_KEY with the IP address of your MISP server and your API key, respectively. You can set MISP_VERIFYCERT to false.
from pymisp import PyMISP
from config import config

MISP_URL = config.MISP_URL
MISP_KEY = config.MISP_KEY
MISP_VERIFYCERT = config.MISP_VERIFYCERT
misp = PyMISP(MISP_URL, MISP_KEY, MISP_VERIFYCERT, debug=False)
Here, I have used an external Python file called config.py to separate sensitive data, like the IP address of my MISP server and API key, from the Python script itself. This is important so you don’t leak confidential information. You can learn more about the MISP API in Threat Intelligence with MISP Part 6 - Using the API.
You are now ready to use the MISP API to export IOCs!
Exporting IOCs
The MISP API object you created in the previous code block (misp) authenticates to your MISP server and returns a Python object you can use to perform API queries, such as adding and retrieving data.
In MISP, attributes with the Intrusion Detection System (IDS) flag set can be uploaded to IDS or other security solutions for blocking or detection. It is these attributes that you will want to export as IOCs which your security team can take action on (operational intelligence). To export all attributes with the IDS flag set, add the following code to your Python script:
attributes = misp.search(controller='attributes', to_ids=1, pythonify=True)This code uses the misp object’s search() method to do the following:
- Return all attributes with the IDS flag set to 1 (
true). - Returns the data as a Python dictionary rather than the default JSON format.
You can now use regular Python code to interact with this dictionary of IOCs, parse out specific IOCs, and prepare this data to upload it to your chosen security solution.
Uploading IOCs to Your Security Solution
The data returned by the MISP API will be in a Python dictionary. However, you must do some parsing to get this data into a format your security solution can use.
You have two options:
- Parse the data into a format you manually upload to your security solution. For instance, you could parse it into text or CSV, generate a file, and manually upload it using the security solution’s web GUI. Most solutions allow you to bulk upload IOCs in text or CSV format. You just need to ensure you follow their file template to include the right data for the solution to parse your list of IOCs and add them to its database.
- Use the security solution’s API to upload your IOCs for detection or blocking automatically. This is the better option as it saves you time and is less error-prone. However, your solution might not have an API you can interact with programmatically.
Let’s look at how to do both of these options in code.
Option #1: Creating a CSV File to Manually Upload
To create a CSV file to upload, you first need to open a new CSV file to write your IOCs too. The following code creates a file named iocs.csv, ready for you to write your IOCs too. In this demo, we will assume your security solution takes IOCs in the form of value followed by type, with the first row being a header row containing value and type.
Remember to import the csv library into your Python script to create a CSV file.
field_names = ["type", "value"]

# create CSV to write IOCs to
with open('iocs.csv', mode='w', newline='') as file:
    # create a csv writer object
    writer = csv.DictWriter(file, fieldnames=field_names)
    # add a header row
    writer.writeheader()
Next, we can loop through each IOC in the Python dictionary we returned in the attributes object from the previous code example. The following code loops through each IOC returned, creates a new dictionary containing only the IOC value and type, and writes this data to the CSV file.
# get all IOCs with IDS flag set to true
attributes = misp.search(controller='attributes', to_ids=1, pythonify=True)

# write IOCs to csv file
for row in attributes:
  # create a new dictionary with only IOC value and type
  selected_row = {key: row[key] for key in field_names}
  writer.writerow(selected_row)
The final code looks like this. Note I have added a try / except block in the final code. This is because sometimes your IOC may generate a UnicodeEncodeError exception if it includes weird characters (i.e., Russian domains or URLs).
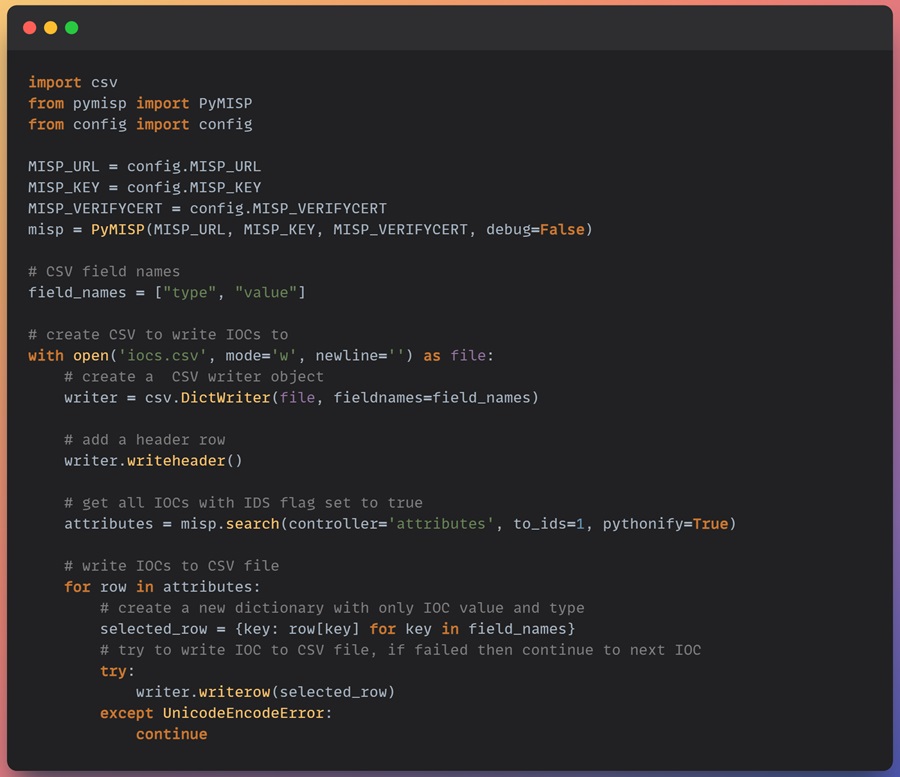
Here is the CSV file generated. Ready to be uploaded to your security solution.
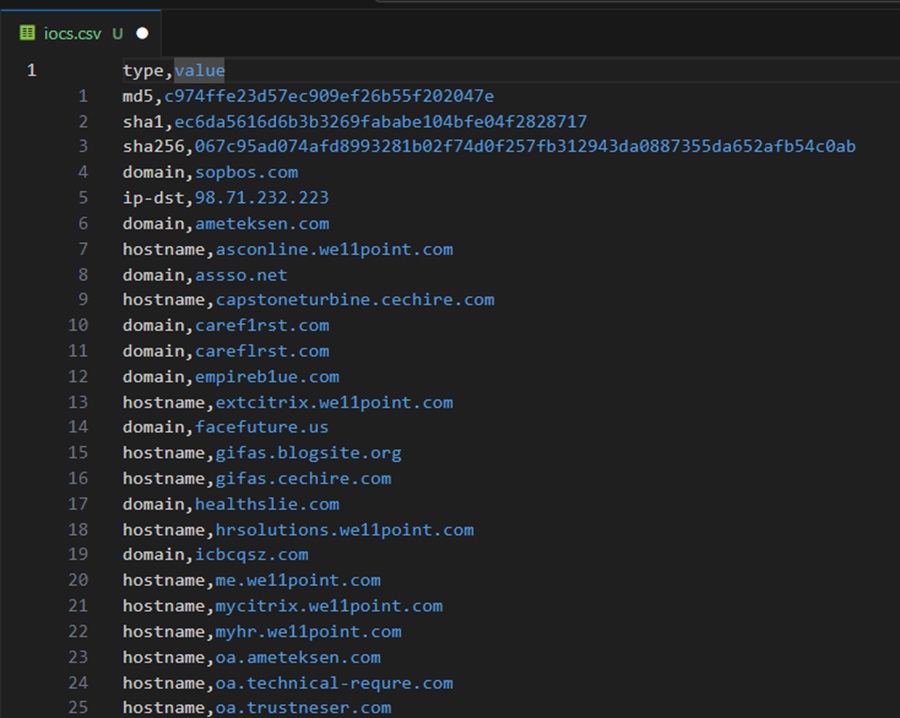
You can find this code example as misp-to-csv.py on my GitHub page.
Option #2: Automating Upload with an API
If your security solution has an API that you can use to upload IOCs for blocking or detection, you can skip creating a CSV file and manually uploading it. Instead, you can automate the entire process from pulling IOCs from your MISP instance to uploading them to your security solution!
The Endpoint Detection and Response (EDR) security solution CrowdStrike Falcon has an API you can use to automatically upload custom IOCs to its IOC Management feature for detection or blocking. The following code uploads a single IOC to CrowdStrike Falcon for detection and checks to see if this was successful.
# Step 1: authenticate to the CrowdStrike Falon API
from falconpy import IOC
falcon = IOC(client_id=CLIENT_ID, client_secret=CLIENT_SECRET)

# Step 2: define platforms to upload indicators to
ioc_platforms = ["Mac", "Windows", "Linux"]

# Step 3: create an expiry time for the IOCs (current date + 90 days in UTC format)
now = datetime.now() + timedelta(days=90)
ioc_expiry_date = now.isoformat() + "Z"

# Step 4: create IOC to upload
ioc = “bad-site.com”

# Step 5: define the IOC type
ioc_type = “domain”

# Step 6: use the CrowdStrike API to upload the IOC
response = falcon.indicator_create(action="detect", value=ioc, type=ioc_type,
                               severity="high", platforms=ioc_platforms, applied_globally=True,
                               retrodetects=True, description="IOC from MISP Database",
                               expiration=ioc_expiry_date)

# Step 7: check the API response to see if the IOC was uploaded successfully
if (response['status_code'] == 201):
  print(f"Upload of {ioc} successfull!")

elif (response['status_code'] == 400):
  try:
     print("[FAIL] - " + response['body']['resources'][0]['message'])
  except:
    print(response)
The code above performs several actions:
- Imports the falconpy Python module to connect to the CrowdStrike API using Python code. It then connects to the API using a client ID and secret. Change the
CLIENT_IDandCLIENT_SECRETvariables to match your environment. - Creates a list of the platforms (operating systems) that this IOC should be detected on.
- Creates an expiry date for the IOC so that it is automatically removed from CrowdStrike’s IOC Management feature when it becomes outdated. This is in UTC format and is 90 days.
- Create the IOC to upload.
- Define the IOC type. CrowdStrike only detects certain IOCs, such as domains, IPv4 / IPv6 addresses, and MD5 / SHA256 hashes.
- Use the CrowdStrike API to upload the IOC created using your previously defined configuration parameters.
- Check the response returned by the CrowdStrike API to determine if the IOC was uploaded successfully and print relevant output.
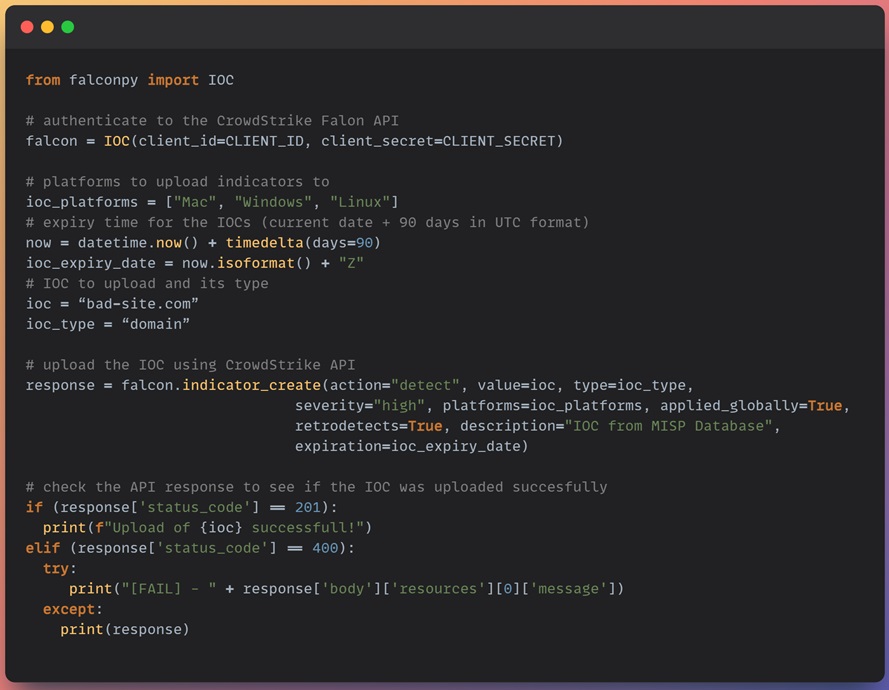
You can use this code to loop through the indicators you export from your MISP instance to add them to the CrowdStrike Falcon IOC Management feature. CrowdStrike will then detect if an IOC is seen in your environment and generate an alert for your security operations team to respond to.
The retrodetects option seen in the code above will even go back in time to trigger detections if an IOC has been seen in the past. By default, CrowdStrike retains 90 days of logs.
Summary
This installment of the MISP series explored how to operationalize MISP and use the IOCs you collect for practical threat detection. You saw how to export IOCs from your MISP instance using the web GUI and the API. This led you to discover the power of using the API with a basic Python script to export IOCs, manipulate them using Python code, and then upload them to your security solution for detection.
You learned about two ways to upload IOCs to a security solution. First, you saw how to create a CSV file using your MISP IOCs for you to upload them manually. Secondly, you learned how to use the CrowdStrike Falcon API to upload them automatically to an EDR tool. Either way works. It depends on the capabilities of your security solution.
If you were unable to follow along with the code examples using the CrowdStrike Falcon API, don’t worry. I have coded a complete misp-to-crowdstrike.py script hosted on my GitHub that automates the entire process, from exporting IOCs from MISP and uploading them using the CrowdStrike Falcon API. You can use this script to automatically export IOCs from your MISP instance and upload them to CrowdStrike Falcon. Additionally, I will provide a walkthrough of this script in Python Threat Hunting Tools: Part 12 – MISP and CrowdStrike Falcon Integration.
The next installment in this series explores how to share intelligence by connecting your MISP instance to someone else’s instance. Information sharing is a fundamental feature of MISP that will allow you to become part of the wider intelligence community.
Discover more in the Threat Intelligence with MISP series!


