Welcome back to this series on using MISP for threat intelligence!
MISP (Malware Information Sharing Platform and Threat Sharing) is an open-source threat intelligence platform that allows you to share, collate, analyze, and distribute threat intelligence. It is used across industries and governments worldwide to share and analyze information about the latest threats. This series aims to give you the knowledge you need to get up and running with MISP as quickly as possible.
Today, you will learn how to add open-source threat intelligence feeds to your MISP instance so you can begin rapidly populating the threat intelligence platform with the latest data. You will see the default feeds that come with MISP, how to enable these, and how to use Decaying Models to remove outdated intelligence.
Let’s get started using our MISP instance!
What are Feeds?
Cyber threat intelligence (CTI) feeds are sources of timely and relevant information about cyber security threats and vulnerabilities. They often contain a list of indicators of compromise (IOCs) that a company will use to generate detections or alerts using their security solutions to enhance their security posture.
There are two main types of CTI feeds:
- Free and open-source CTI feeds that are curated by the community for the benefit of the community. Examples include AlienVault OTX, FBI: InfraGard Portal, and ThreatFox by abuse.ch.
- Closed and prosperity feeds that are curated by commercial cyber threat intelligence providers, which you have to pay to get access to. Examples include Intel471 Titan, Recorded Future, and CrowdStrike Falcon Intelligence.
MISP comes installed with a range of free and open-source CTI feeds, although you can also choose to add your own closed and prosperity feeds if you want.
Although IOCs are not the best way to track new and emerging threats, they still play an important role in defending an organization from known bad, and their ingestion and detection can be automated. Learn how to automate IOC threat hunting in Threat Intelligence vs Threat Hunting: What is the Perfect Pipeline?
How do Feeds Work in MISP?
MISP Feeds are “remote or local resources containing indicators that can be automatically imported into MISP at regular intervals.” These CTI feeds can expose their data in MISP, CSV, or free-text formats and can be imported by querying a remote or local URL. They can also be protected by authentication or freely accessible.
Feeds offer a simple way to gather intelligence from various external sources without needing programming skills or scraping the Internet. Additionally, you don’t need to set up or configure your own CTI feeds to begin working with feeds in MISP. MISP comes installed with several default feeds that you can use immediately. All you have to do is enable them.
To use feeds in MISP, you must be logged in as an Administrator user. Once logged in, you will find feeds under the Sync Actions menu as Feeds.
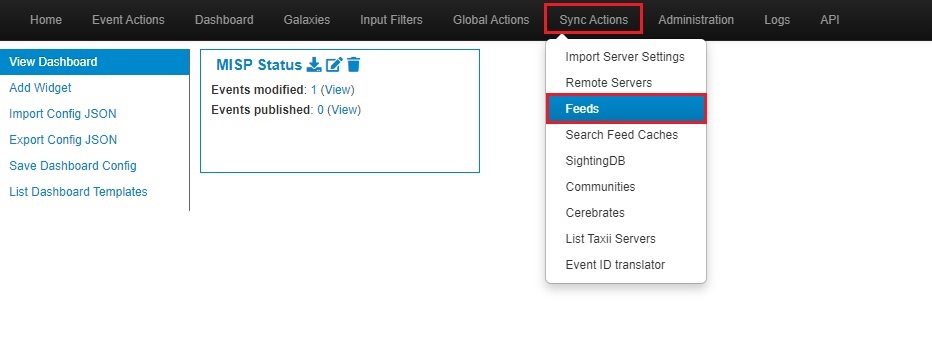
Clicking Feeds will bring you to the Feeds screen. Here, you will see the default feeds listed.
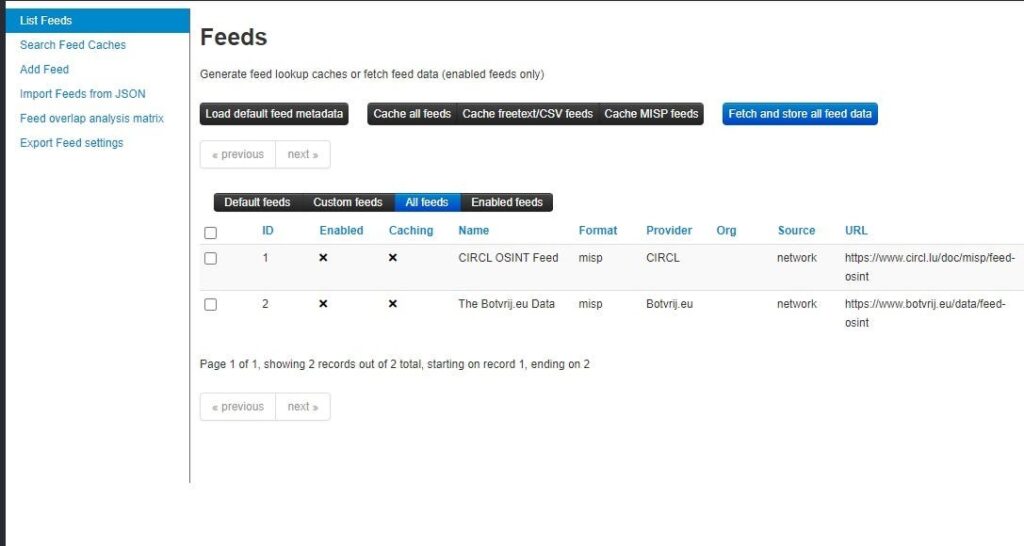
Loading Default Feeds
Click the Load default feed metadata button to load all the default feeds. This will populate the Feeds screen with all the default threat intelligence feeds that come with your MISP instance.
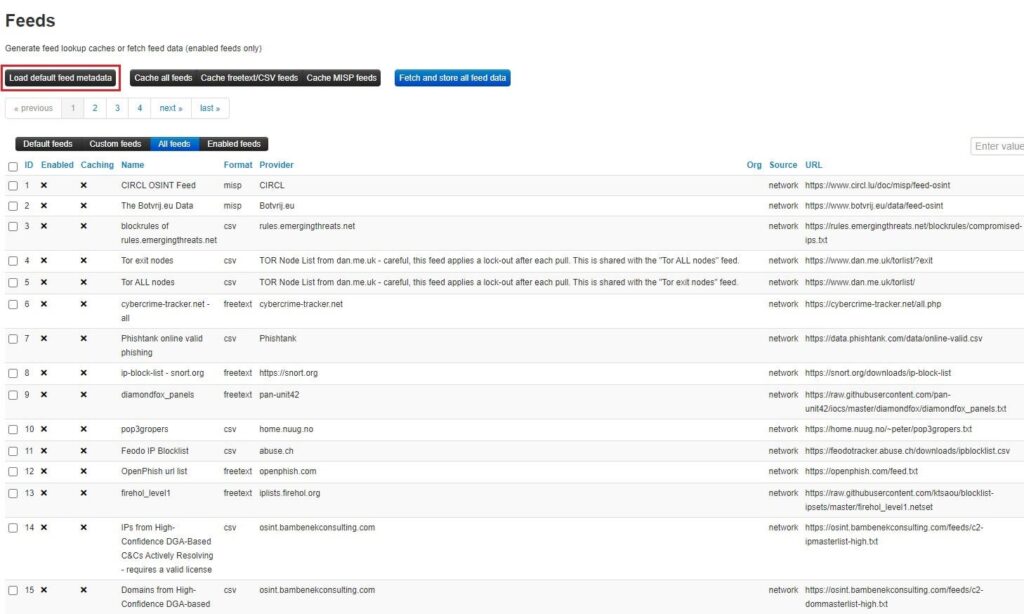
Using a Feed
To use a feed, you need to enable it and enable caching for said feed. Caching a feed will download all the feed’s IOCs as attributes onto your MISP instance’s Redis server. You can search these attributes and see correlations between data published in your MISP instance and that stored in your cache. To do this, select the feed(s) you want to use and click the Enable selected and Enable caching for selected buttons.

You can cache all the feeds, all the feeds that use the freetext/CSV format, or all feeds that use the MISP Events format to your Redis server using the options at the top of the Feeds screen. This will give you a lot of threat intelligence to search through.
Once you have enabled a feed, you can view it by clicking the Enabled feeds view.

To use the feed, select one of the Caching or Actions buttons. Going from left to right, the buttons let you:
- Cache feed: Cache feed data in your MISP’s Redis database to correlate with your MISP attributes and search through.
- Explore the events remotely (search icon): Search through a feed’s data to find IOCs. Useful for investigations and threat hunting.
- Fetch all events (download icon): Ingest the data into your MISP instance as events.
- Edit: Edit configuration details about a feed, such as the metadata, authentication parameters, how data is distributed, the default tag, and filter rules.
- Delete (trash bin icon): Remove a feed from your MISP instance.
- Download feed metadata as JSON: Download a feed’s metadata, including its name, URL, filter rules, configuration details, etc.
Adding New Feeds
If you have your own CTI feed you want to ingest data from, you can add a new feed into MISP.
First, click the Add Feed option on the left-side menu.
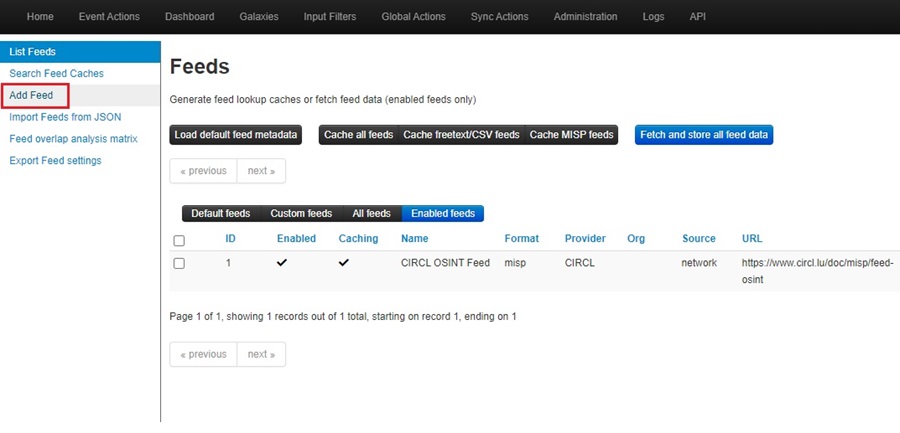
This will bring up the Add MISP Feed dynamic web form where you can fill in data about the new feed you want to add to your MISP instance.
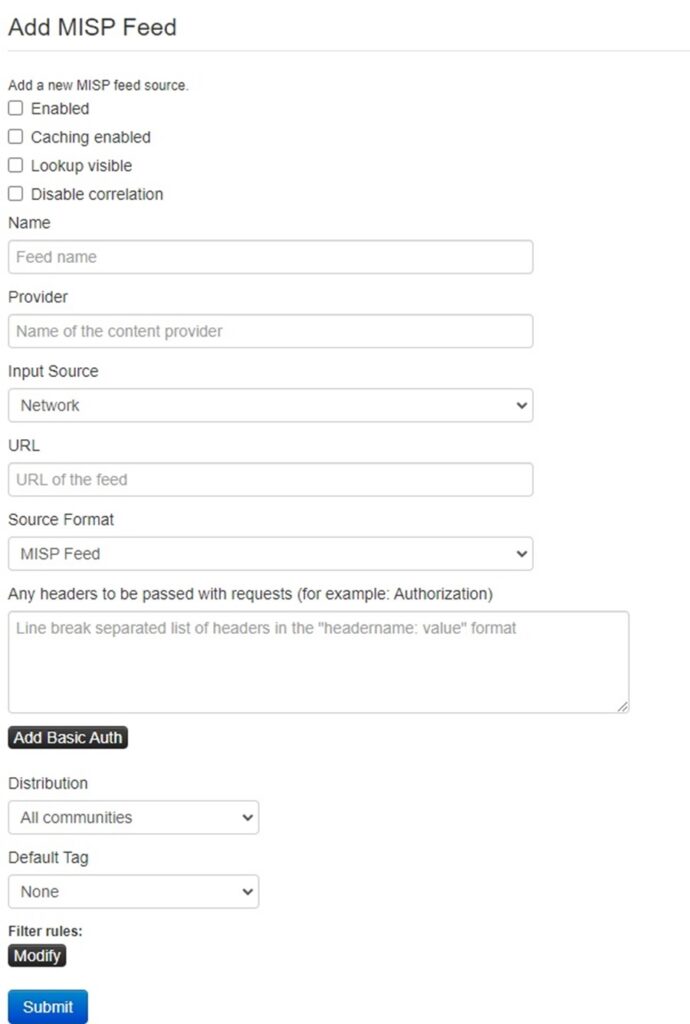
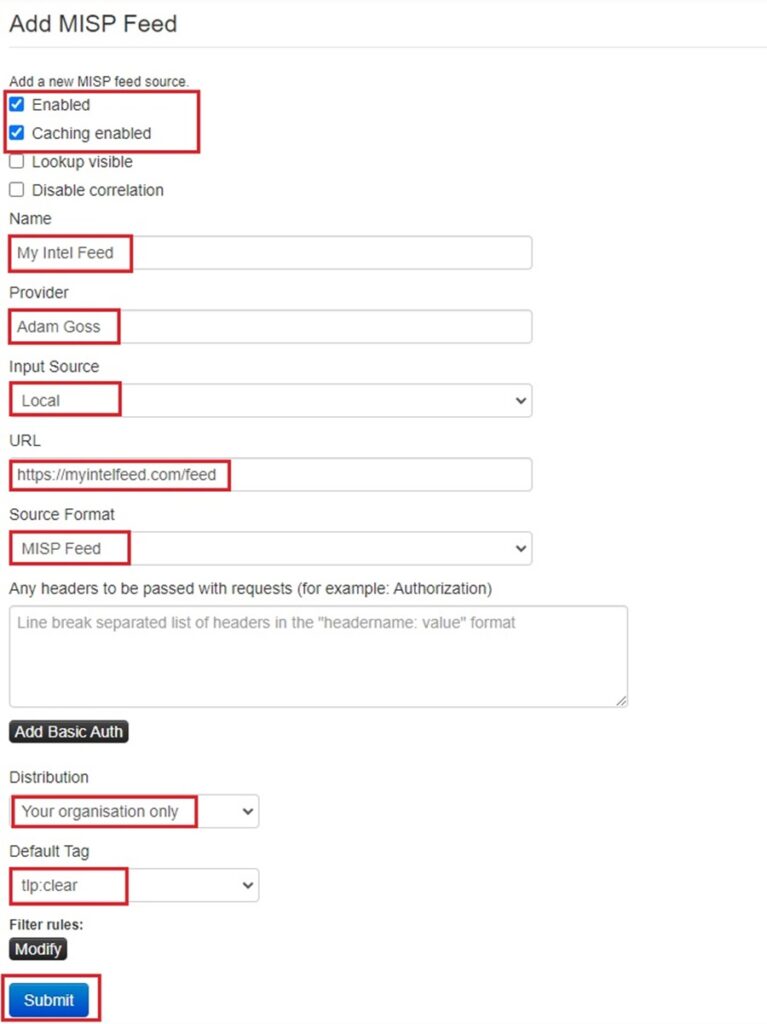
At a minimum, you should enable and cache the feed, provide a Name and Provider, define the Input Source (local or remote), give a URL to pull data from, define the format this data will be in (MISP, freetext, or CSV), set the distribution rules for Events that are automatically created using this feed, and add a default tag. You may need to add other information, such as filter rules (if you want to exclude certain data) or how to parse the freetext/CSV format. Click Submit once you are done.
This will bring you back to the Feeds screen. You can find your newly created feed by clicking the Enabled feeds button. Now you can use this feed like you did a regular default feed.

Best Practices for Working with Feeds in MISP
Now you know how to work with MISP feeds, here are some common pitfalls you should avoid and useful tips that will let you make the most of feeds in MISP.
Setting up a Scheduled Task
So far, to fetch or cache feed data, you have done this manually by going to Feeds in the Sync Actions menu. This is a tedious, repetitive task that can be alleviated with the power of automation. To do this, you can create a Scheduled Task in MISP!
You can create a scheduled task in MISP to automatically fetch and/or cache feeds by going to the Administration menu and selecting the Scheduled Tasks option from the dropdown list.
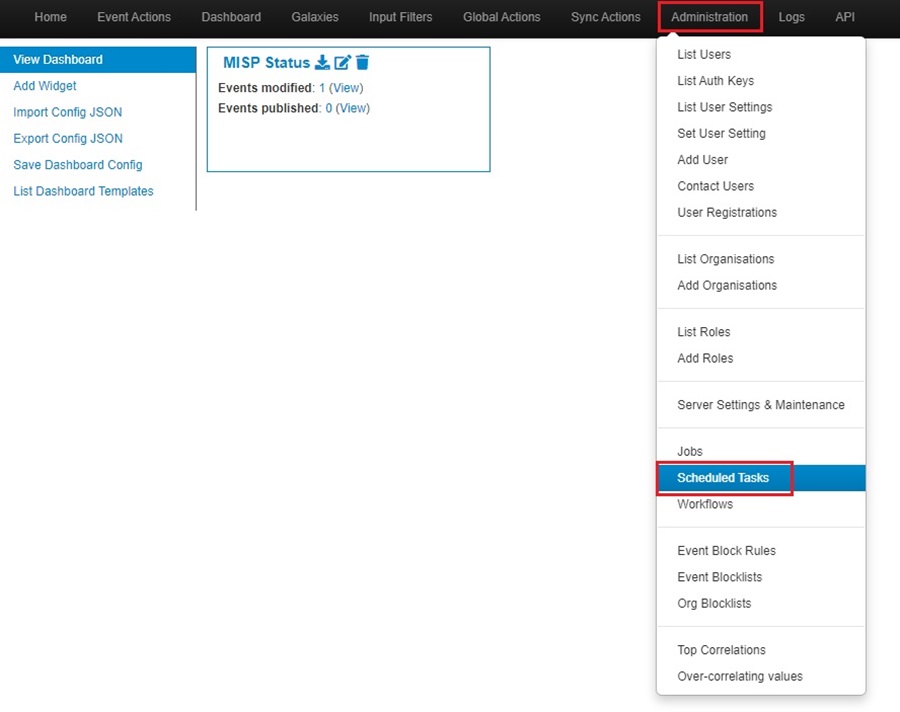
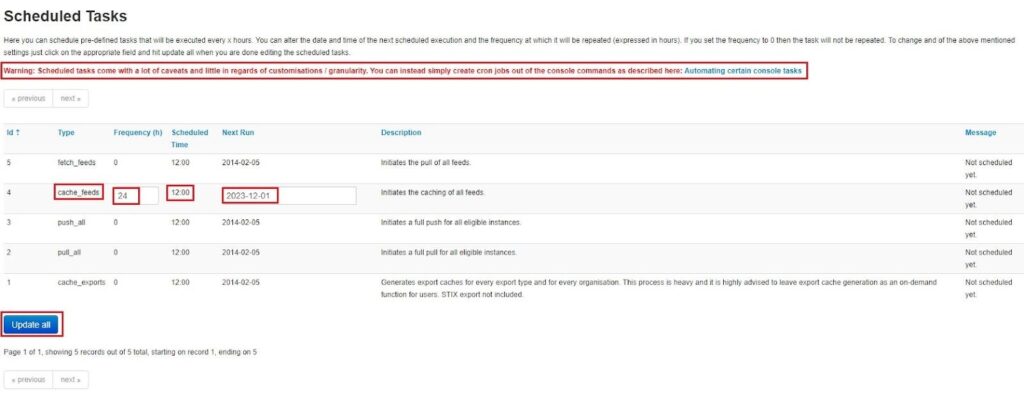
You will be presented with the Scheduled Tasks screen. Here, you can edit the default scheduled tasks your MISP instance creates when first installed.
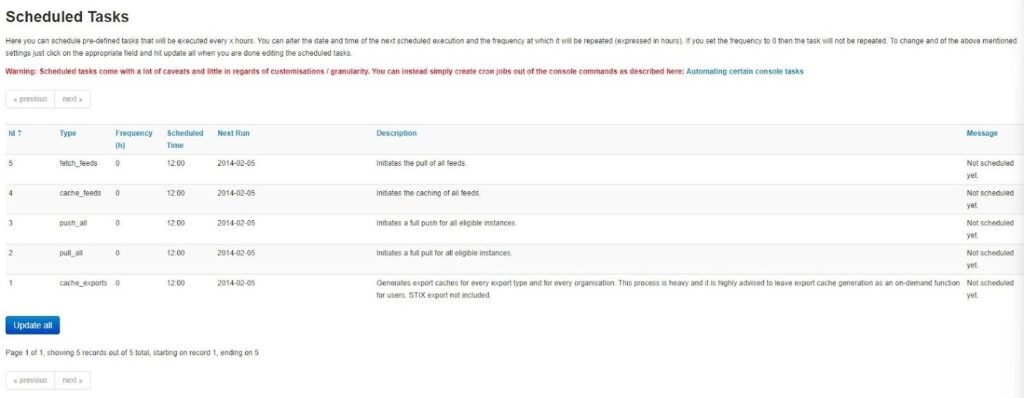
To edit a scheduled task, click and edit the Frequency, Scheduled Time, and Next Run time options for the task you want to edit. Below, I have edited the cache_feeds task to run every 24 hours at 12:00, with the next run scheduled for December 1st, 2023, and it will then run once every day at 12:00. Click Update all to finalize your choice.
You can also use cron jobs to automate tasks on your MISP instance. These provide further customization options and granularity as you can either write simple bash scripts yourself or use one that comes with your MISP instance. See the Automating certain console tasks MISP documentation for a list of scripts you can schedule to run.
Ingesting vs. Caching Feed Events
MISP lets you work with feed data in two ways:
- You can ingest the data into your MISP instance and automatically create MISP events from the CTI feed data.
- You can cache the feed data in your MISP instance’s Redis database to search through and correlate your MISP attributes with external CTI data (see matching “Feed hits”).
There are pros and cons to both of these methods. For instance, creating events from feed data lets you easily share and export the IOCs. However, it will fill your MISP instance with data that might not be relevant to your organization. On the other hand, choosing to cache feed data allows you to search open-source CTI feeds and correlate attributes (IOCs) in your MISP instance with these external data sources.
I personally chose the latter option. I manually review everything I put in my MISP instance to ensure it is legitimate intelligence and is relevant to the organization I am protecting. I then use external CTI feeds to correlate this data (i.e., has it been seen in other attacks) and to search for IOCs when threat hunting.
Using Decaying Models to Limit the Lifetime of Indicators
Indicators (IOCs) have a limited shelf life as adversaries change hash values, URLs, domains, IP addresses, and more. You can reflect this IOC lifetime in your MISP instance by using decaying models that assign a score to MISP attributes and decrease this score over time to reflect the importance of an IOC. This lets you “expire” old IOCs and place less importance on them as they age. You can then remove them from your MISP instance to avoid wasting space with old/expired data.
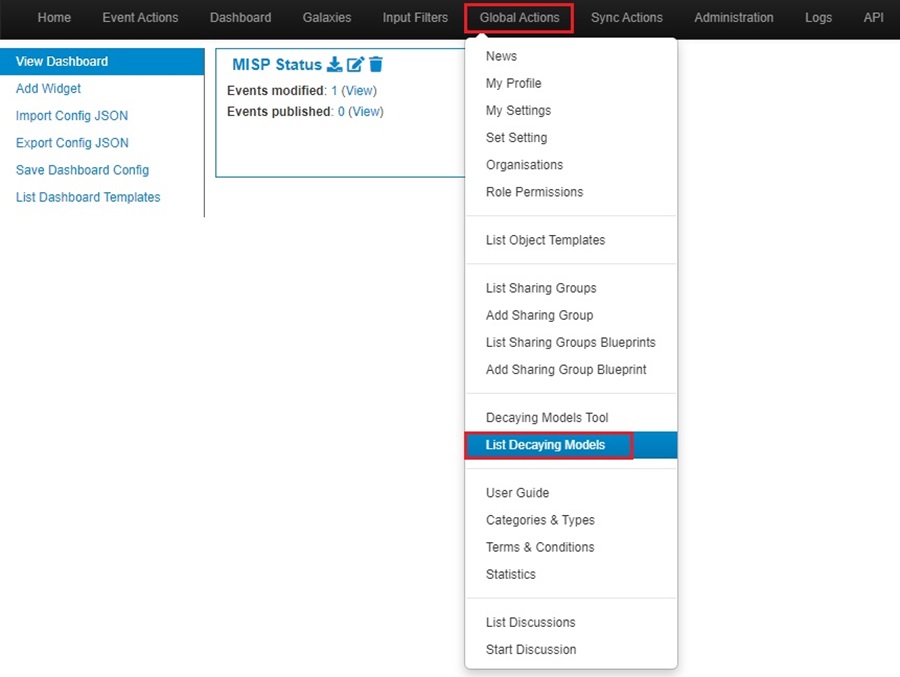
To use decaying models in MISP, go to the Global Actions menu and select the List Decaying Models option.
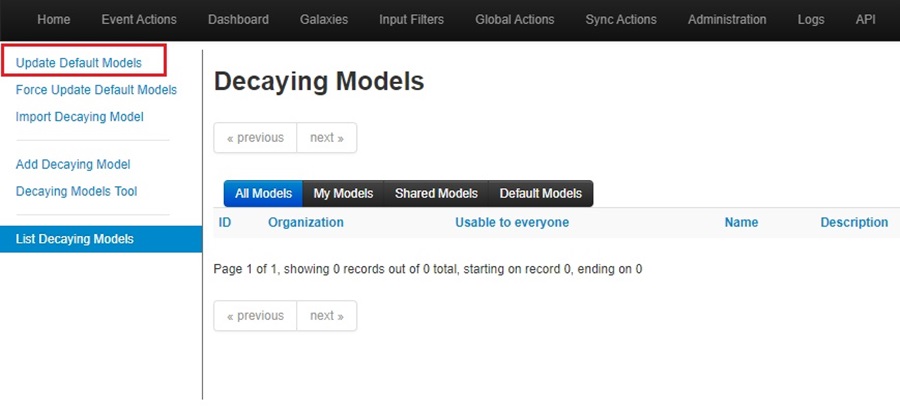
This will bring up the Decaying Models screen. Click the Update Default Models options from the left-side menu to load the default decaying models that come with MISP.
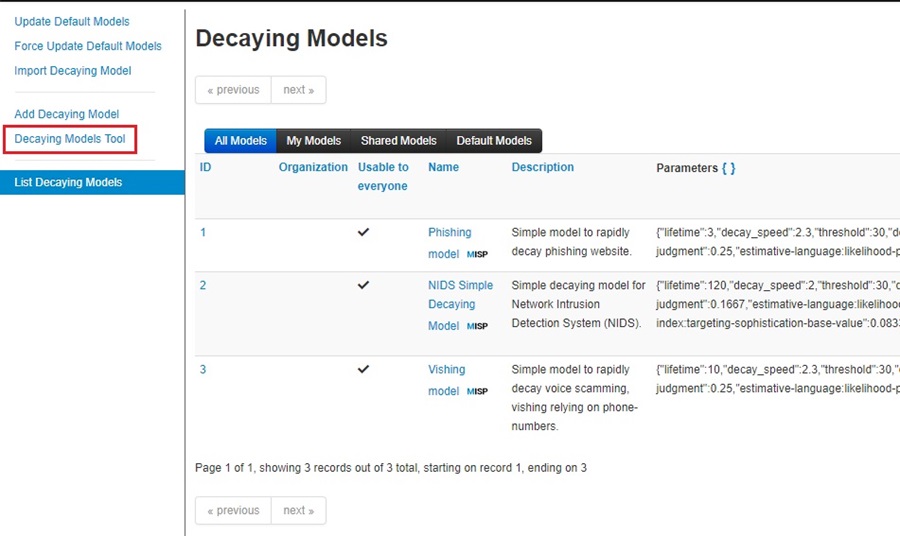
This will populate the Decaying Models screen with a list of the default models that come with every MISP install. You can use the buttons under the Actions column to view, download, edit, and enable the models.

You can add your own decaying model or import one using the options on the left-side menu. However, for now, we will just apply a default one to our MISP attributes. To do this, first select the Decaying Models Tool option in the left-side menu.
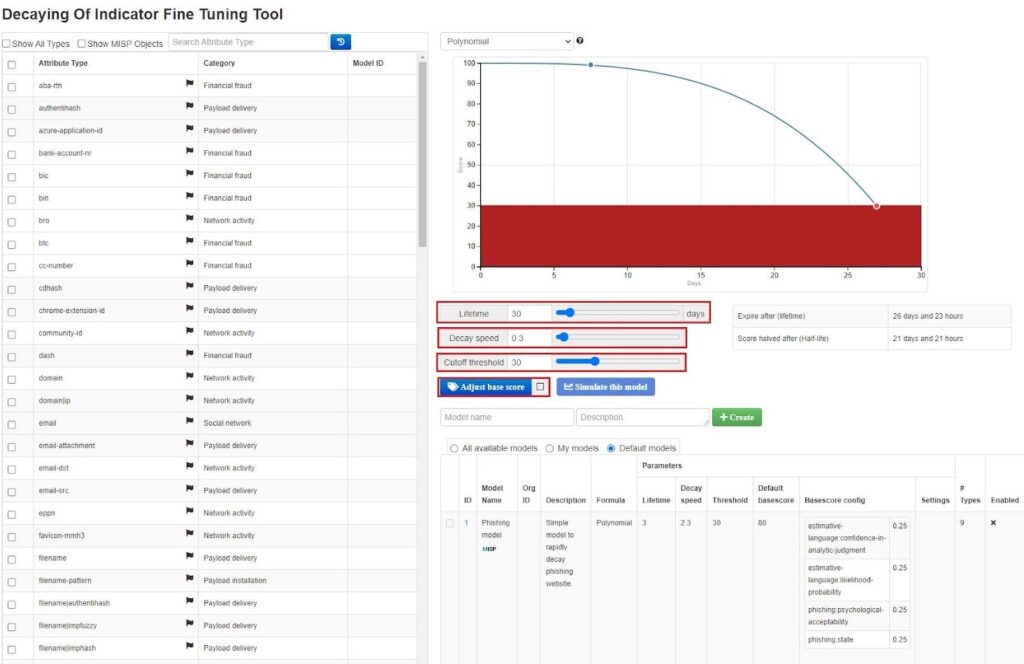
This will bring you to the Decaying Of Indicator Fine Tuning Tool screen. Here, you can tune how MISP attributes decay over time by giving them a lifetime, decay speed, cutoff threshold, and base score when added to your MISP instance. These factors will, ultimately, start an attribute at a score and gradually decrease this score to 0, at which point the attribute can be considered expired.
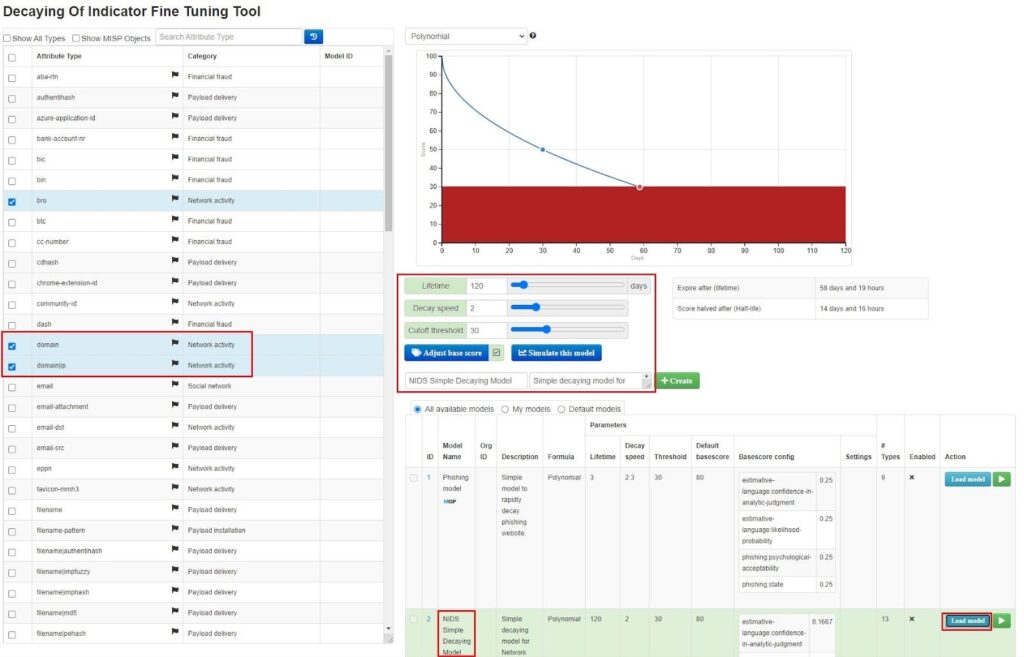
You can choose to select multiple attributes, assign these factors to them, and then create your own decaying model using the Create button. However, using one of the default decaying models MISP provides is the easiest way. To do this, scroll down to the model you want to use and select Load model. This will load the model into the fine tuning tool, where you can see which attributes it affects and how it affects them. Here, I have selected the NIDS Simple Decaying Model, which affects network indicators.
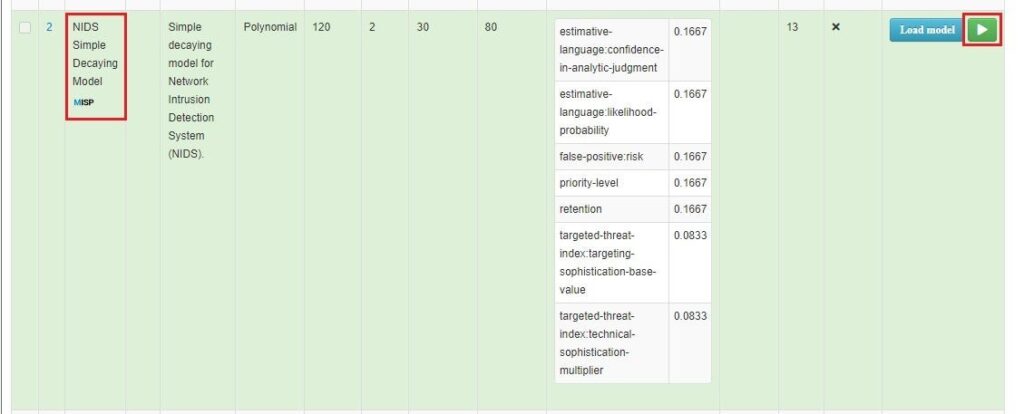
If you are happy with the model, select the Enable model button to start using it.
Once enabled, you will now see a Score field next to the MISP attributes that relate to the decaying model you enabled. This reflects the current value an attribute has, and it will decrease over time. Navigate to an Event and click the Decay score button to see this.

Decaying models are a great way to manage the data in your MISP instance and apply a measure of importance to your IOCs.
Summary
You should now know how to use MISP feeds to gather intelligence from various external CTI sources and use this data to generate MISP events or cache it for searching and correlation. You also saw some of the best practices for working with MISP feeds, such as setting up a scheduled task, ingesting vs. caching feeds, and using a decaying model to limit the lifetime of IOCs by setting them to expire.
I recommend exploring feeds in your own MISP instance. Start using one of MISP’s default CTI feeds, then move on to creating your own threat intelligence feed either locally or by pulling from a well-known open-source feed. You can then test if ingesting or caching feed data works best for you and how to automate this with a scheduled task.
The next installment in this series will look at efficiently searching and filtering MISP events and attributes to look up information in your MISP instance. This will empower you to use MISP as an investigation tool during your incident response, threat hunting, or security research activities.
Discover more in the Threat Intelligence with MISP series!


