Malware analysis is an essential skill for any cyber security professional performing technical work. To become good at it, you need a safe, secure, and controlled malware analysis environment to detonate your malware. This comprehensive guide will show you how to create one.
You will discover why being able to analyze malware is so important and how to create an environment where you can practice this skill using virtualization, infrastructure as code (IaC), and freely available malware analysis tool suites. The hands-on demonstration will show you how to use Terraform, Proxmox, and Apache Guacamole to create the ultimate malware analysis environment from the comfort of your own home.
Let’s start by answering the following questions: Why bother learning malware analysis?
Why Create a Malware Analysis Environment?
Malware analysis is a crucial skill if you work in cyber security. Even the basics, like analyzing a file type, extracting strings, and hashing a binary, can provide valuable information to help you defend against attacks.
The list of reasons to learn malware analysis is plentiful, but here are some main ones:
- Deepen your understanding of threat detection and prevention by recognizing how malware works.
- Gaining essential digital forensics and incident response (DFIR) skills that help you efficiently investigate intrusions.
- Providing you with the knowledge and skills to perform security research so you can discover new threats and bolster defenses.
- Identify indicators of compromise (IOCs) and tactics, techniques, and procedures (TTPs) that malware exhibits so you can build detection rules and perform threat hunting.
- Generate intelligence from malware sources so you can gain a better understanding of attack kill chains seen in intrusions, cluster malicious activity, link intrusion campaigns, and perform attribution.
To perform malware analysis, you need a safe, secure, and controlled environment. Some online platforms allow you to perform some analysis, such as Intezer Analyze, any.run, or malcore. These automated sandbox tools are great for quickly analyzing binary files during an investigation but lack human intuition and are often detected by advanced malware.
When faced with new or sophisticated malware, you often need a legitimate malware analysis environment to detonate it, extract IOCs, and investigate the TTPs it exhibits. Here are the main reasons to create your own environment.
Reasons to Create Your Own Malware Analysis Environment
- Safety: Perform analysis in a safe, secure, and sandboxed environment that prevents malware from infecting your host system or leaking data to third-party providers.
- Control: Ultimate control over how you analyze malware, what tools you use, and the automations that run. This will allow you to circumvent anti-analysis protections built into most modern malware.
- Reverse engineering: Have the capability to reverse engineer malware, unpack sophisticated samples, and gain a deeper understanding of malware internals.
- Research: Run your own research laboratory to perform experiments and extract useful insights that can benefit the entire cyber security community.
- Learning: Building, maintaining, and using your own malware analysis environment will teach you cyber security skills, cloud technologies, DevOps, server administration, automation/scripting, and many more skills than running malware in an automated sandbox does not.
These reasons are why this guide explores how to create your own malware analysis environment and shows you powerful technologies that can automate the entire process for you in a matter of minutes!
If you are just starting out in malware analysis or want to learn more. Check out these excellent resources:
- Practical Junior Malware Researcher (and the accompanying Practical Malware Analysis & Triage course available with the TCM All-Access Membership pass).
- The Malware Analysis and Detection Engineering book
- YouTube channels like Dr Josh Stroschein – The Cyber Yeti, John Hammond, and Husky Hacks.
Deployment Options
There are several options to choose from when creating your malware analysis environment. Let’s look at some main reasons, including cloud, containers, or on your own local server.
Cloud
The cloud is a great option for deploying a malware analysis environment. It is cost-effective, lets you scale easily, and has relatively low risk. Cloud providers like AWS, Azure, and GCP also have solid integrations with provisioning tools like Terraform (or even provide their own), allowing you to easily create and destroy cloud resources on demand.
You can learn how to set up your own cloud infrastructure for malware analysis in this excellent YouTube video by Husky Hacks. He walks you through the advantages and disadvantages of using the cloud for malware analysis. His GitHub repository has all you need to get started.
Don’t just focus on the big cloud providers when considering your options for deploying a malware analysis environment in the cloud. Look at smaller providers like Linode (Akamai), DigitalOcean, and Vultr. These are often more cost-effective.
Container
Containers are a way to package software along with its dependencies so that it runs consistently across different computing environments. Many modern applications are deployed within containers so organizations can scale their products and provide a consistent experience for a user, no matter the platform.
You can use containers to create a safe space for malware analysis. They can be detached from your main operating system, have restricted network connectivity, and be created or destroyed nearly instantly. This makes them perfect candidates to host your malware analysis experiments.
A great technology to use for this is Kasm Workspaces. This is a container streaming platform you can run locally or in the cloud to use and manage container desktops from your web browser. There are workspaces for Windows and Linux systems, or you can choose to build your own workspaces tailored to your malware analysis needs. I highly recommend playing around with this project and seeing if it’s a good fit for you.
Local
The option demonstrated in this article involves creating a malware analysis environment on a local server. This is the perfect option if you want to keep your data local, have complete control of your environment and its underlying infrastructure, and want to learn valuable DevOps and IT skills along the way.
To learn more of these skills, check out How to Create a Local Kubernetes Cluster: Terraform and Ansible. This article shows you how to create and deploy a Kubernetes cluster on your own Proxmox server.
To achieve the ease of use of the other two options, you can use technologies like Terraform and Apache Guacamole. These allow you to automate the creation of your environment and interact with it through a web browser.
Terraform
Terraform is an open-source infrastructure as code (IaC) tool developed by HashiCorp that allows you to create, provision, and destroy infrastructure resources using declarative configuration files (code). It will enable you to create cloud resources, virtual machines, networking components, containers, and more across cloud and on-premise platforms.
Guacamole
Apache Guacamole is an open-source remote desktop gateway that allows you to access and manage remote machines using a web-based interface. It supports remote desktop protocols like RDP, VNC, and SSH and does not require client-side software. Just a web browser.
In the following demonstration, you will see how to create a local malware analysis lab that you can spin up and destroy with a single command.
- Proxmox will be the virtualization software to manage and run your malware analysis virtual machines.
- Terraform will be used with the Proxmox API to provision the infrastructure.
- Apache Guacamole will be used to interact with the lab through any web browser on your local network.
Let’s get started!
Walkthrough: Creating a Local Malware Analysis Environment
In Creating a Virtualized Malware Analysis Lab Environment, you can learn how to create a basic environment for playing around with malware. That article walks you through how to set up Proxmox and pfSense so you can run the popular malware analysis operating systems, FLARE-VM and REMnux.
However, this setup was not dynamic, took time to create, and the only way to get a clean install was by using snapshots. This is fine if you are just starting out, but ideally, you want an environment you can reproduce automatically with little effort and provides a fresh environment ready for testing. You also want an easier way to interact with these machines, ideally through a web browser rather than a standalone remote desktop tool. These are the objectives of this local malware analysis environment.
Proxmox and Network Overview
The lab environment for this demonstration will use Proxmox and pfSense to host the underlying architecture. To learn how to set this up, read How to Create a Home Lab: Virtualise all the Things! It will show you how to install Proxmox, configure pods to separate your virtual machines and resources, and set up pfSense to manage your network connectivity.
Once you have Proxmox and pfSense set up, you want to achieve the network setup below.
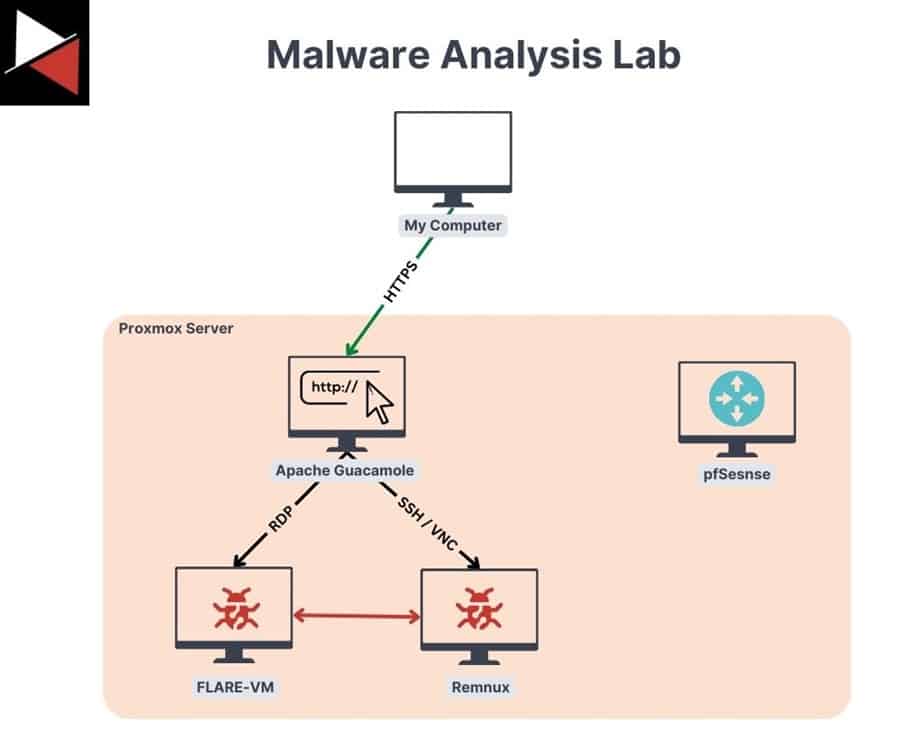
You will use your machine (My Computer) to connect to an Apache Guacamole web interface over HTTPS. This web interface lets you connect to your two malware analysis machines (FLARE-VM and Remnux) over RDP, SSH, and VNC. These two machines can only communicate with machines inside their subnet (10.0.5.0/24) and not the outside world. This ensures you can detonate malware safely without affecting other machines. Proxmox is used to run virtual machines and pfSense controls network access.
To achieve this network configuration, you can create a separate Pool for your malware analysis environment (malware) and attach a new Network Device (bridge) to your pfSense virtual machine.
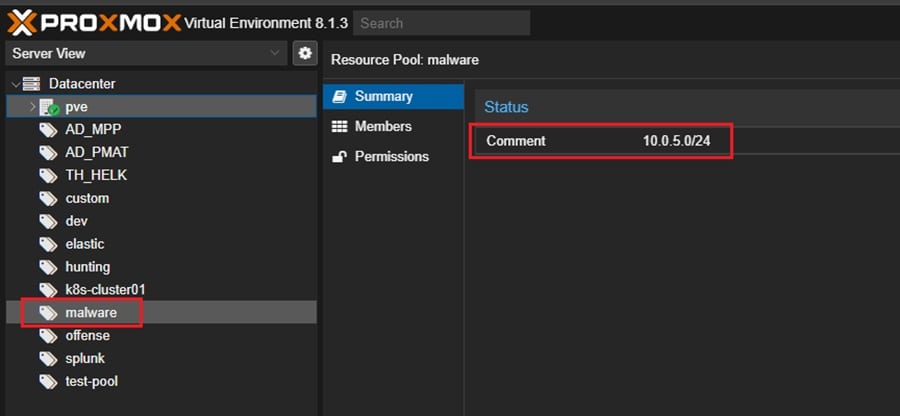
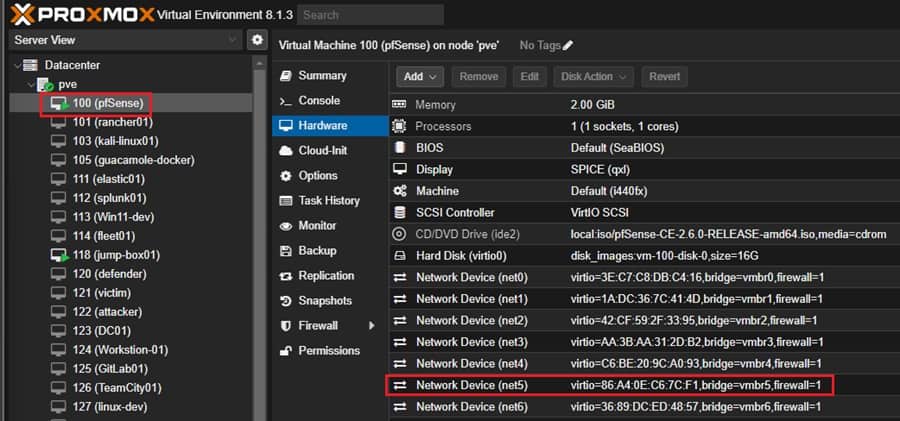
You can then manage this network device in your pfSense dashboard. I have attached vmbr5 and configured it in the pfSense. The previously mentioned article shows you how to do this.
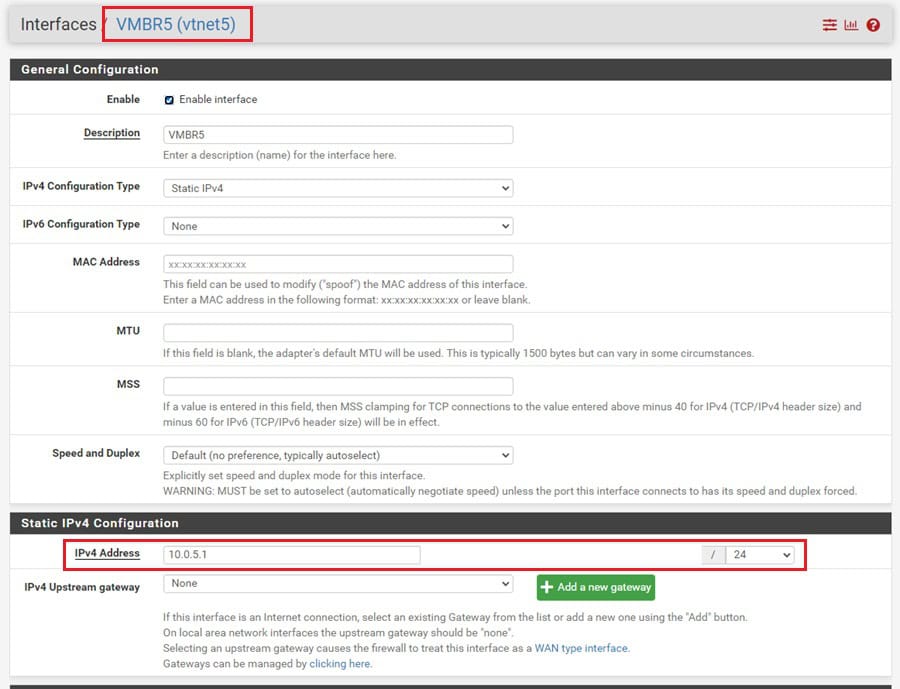
Managing your network through pfSense allows you to add network services (DHCP, DNS, etc.) and firewall rules to your Proxmox virtual machine networks. For this malware analysis network, I have added the following rules:
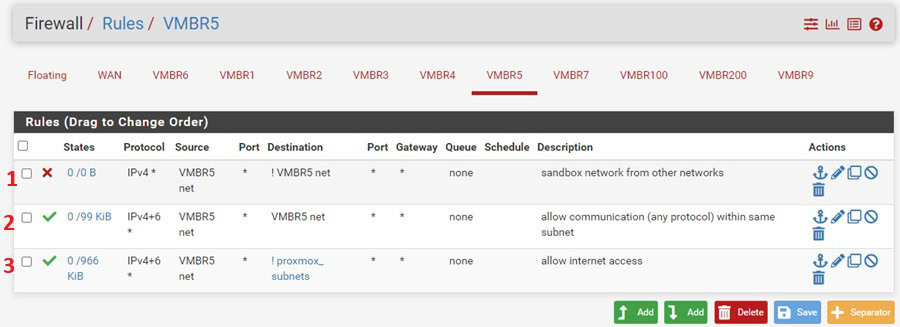
From the top down:
- Allow only traffic to an IP address within the subnet. This sandboxes the network from other networks.
- Allow traffic between machines on the subnet.
- Allow traffic to subnets that are not other Proxmox subnets. This rule comes into play when the first rule is disabled. It provides Internet access for downloading malware samples.
These rules allow the FLARE-VM machine to connect to the REMnux machine so you can analyze network traffic. However, traffic is limited to the 10.0.5.0/24 subnet, so the malware does not impact other machines.
With Proxmox and pfSense setup, you can move on to creating machine templates. These are images of virtual machines that you will clone to build a fresh malware analysis environment automatically every time you use Terraform code.
Machine Templates
This malware analysis environment consists of three machine templates:
- Guacamole template: To create the Guacamole machine that you connect to via your web browser to interact with the machines inside the malware analysis environment.
- REMnux template: This is for performing reverse engineering and analyzing Linux malware or creating a fake network that malware connects to using INetSim.
- FLARE-VM template: This will be your main malware analysis machine. It has tools for dissecting, reverse engineering, and analyzing malicious software.
Guacamole
To create your Guacamole machine template, you need a clean install of Ubuntu, such as the minimal version of Ubuntu 20.04 server. Once you have installed your base operating system, you can install Apache Guacamole by following this guide.
In this article mentioned earlier, you can learn how to create a virtual machine using Proxmox.
With Guacamole installed, you will want to install the QEMU guest agent on this machine so that Terraform can interact with the machine. Run the following commands:
sudo apt update && sudo apt install qemu-guest-agent
sudo systemctl start qemu-guest-agent
sudo systemctl enable qemu-guest-agent
This will install, start, and enable the agent on your Guacomale machine. Next, check that you can interact with the machine by navigating to https://<ip-of-machine>:8081/gaucamole in your web browser. Then login with the default admin credentials guacadmin:guacadmin (unless you created your own during installation).
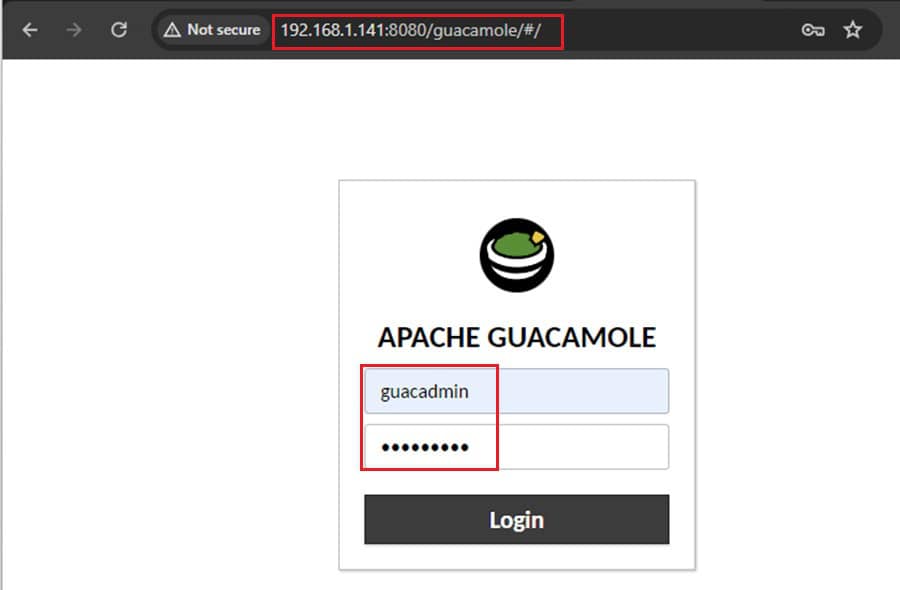
When creating your Guacamole machine in Proxmox, make sure to give it two network devices. One is for your local network to reach it from a web browser, and the other is for the malware analysis environment. In my case, these are vmbr0 and vmbr5.
Once you confirm everything is working, you can convert this virtual machine into a machine template using the dropdown menu at the top right of the machine’s page.
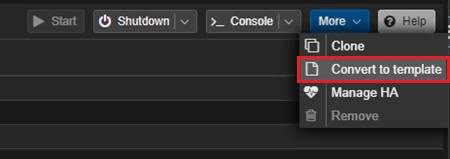
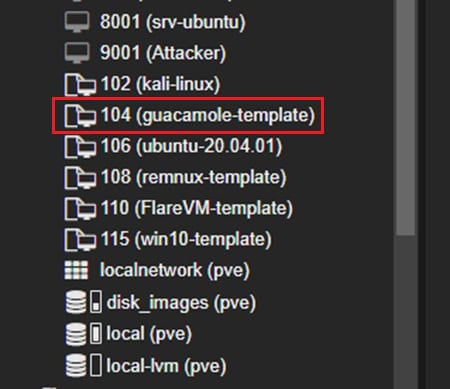
You should see it appear at the bottom of your Proxmox Datacenter view under any virtual machines you have previously created.
REMnux
REMnux is a “Linux Toolkit for Malware Analysis” that comes pre-installed with various tools for performing reverse engineering and malware analysis. To install REMnux, you can download the OVA image and import it to a Proxmox virtual machine. Read this article to learn how to do that.
You may also install it from scratch on an Ubuntu 20.04 ISO, as you previously saw with Apache Guacamole. The documentation provides instructions on running the REMnux installer on a Linux machine.
Once installed, remember to install the QEMU guest agent before by running the commands:
sudo apt update && sudo apt install qemu-guest-agent
sudo systemctl start qemu-guest-agent
sudo systemctl enable qemu-guest-agent
You may also want to install a VNC server on this machine so you can interact with the GUI through Apache Guacamole. This can be done by executing the commands:
sudo apt update && sudo apt install tigervnc-standalone tigervnc-common tigervnc-xorg-extension packagesNext, create a start VNC script so you can turn this VNC server on when you want to. Open a text edit, enter the following, and save it as vncRun.sh.
#!/bin/bash
vncserver -localhost no -geometry 1920x1080 -depth 24
vncserver -list
Now make this file executable by running sudo chmod +x vncRun.sh.
You may encounter issues connecting Guacamole to your REMnux machine via SSH. This is because Guacomle uses an older cipher algorithm by default. To resolve this, add the following lines to the /etc/ssh/sshd_config file on your REMnux machine:
HostKeyAlgorithms +ssh-rsa
PubkeyAcceptedKeyTypes +ssh-rsa
After installing REMnux and the QEMU agent, make sure you enable SSH on the machine so that you can connect to it remotely from the Guacamole machine later on. Read this tutorial if you are unsure how to do this. Finally, power down the machine and convert it into a machine template.
FLARE-VM
FLARE-VM is a “Windows-based security distribution designed for reverse engineers, malware analysts, incident responders, forensicators, and penetration testers.” It is a freely available project built and maintained by the security company Mandiant. You can use this suite of tools to perform malware analysis on a Windows system.
To install FLARE-VM, you must meet the following prerequisites:
- Windows Machine >= 10.
- PowerShell >= 5 installed.
- Disk capacity of at least 60 GB and memory of at least 2GB.
- Usernames without spaces or other special characters.
- Internet connection.
- Tamper Protection and any Anti-Malware solution (e.g., Windows Defender) Windows Defender should be disabled, preferably via Group Policy.
- Windows Updates Disabled.
The full installation guide and resources on fulfilling these requirements are available on FLARE-VM’s GitHub page.
Before beginning the installation, remember to add the appropriate network interface (e.g., vmbr5) to the machine so it is located within your malware analysis environment subnet, and install the necessary Proxmox utilities so the virtual machine functions correctly. For a Windows machine, this includes the appropriate Windows VirtIO drivers and the Windows QEMU agent, both available in the Virtio Win ISO file.
The easiest way to install the drivers and agent is to download the ISO file to your Proxmox machine and attach it when you create your Windows virtual machine. Then, you can navigate to the drive in File Explorer and execute the appropriate Windows installer executables. Don’t forget this step. You need the VirtIO drivers and agent for Terraform to work.
Another key consideration is the size of your virtual machine’s hard disk. The FLARE-VM install takes up a lot of storage, so make sure you have enough storage to hold all the tools, libraries, and frameworks that need to be installed. This process also takes quite a while. I recommend giving your virtual machine more power to speed up the installation. After creation, you can always reduce the resources you give (RAM, CPU, etc.).
For a guided tutorial on how to install FLARE-VM, check out this YouTube video.
After installing FLARE-VM, enable RDP and add your user account to the RDP user’s group. This can be done by going to the Remote desktop settings page. To finish, power down the machine and convert it into a machine template as before.
Once you have created your machine templates (arguably the hardest part of this project), you can move on to writing the Terraform code that will automatically provision and deploy your malware analysis environment.
Terraform Code
The code for this project consists of five main files. These are:
credentials.auto.tfvars: A file to hold sensitive credential information that allows you to connect to your Proxmox server and machines.provider.tf: The provider configuration file where you describe the Terraform provider you will use to connect to your Proxmox server and pass your credentials.main.tf: The project’s main configuration file that creates and provisions the Terraform resources for your malware analysis environment.output.tf: A file describing output variables to display to the user once the Terraform script completes. In this case, the IP addresses of the three machines.01-netplan.yaml: A network configuration to set the IP address of the Apache Guacamole machine.
I go over the credentials.auto.tfvars and provider.tf file in How to Create a Local Kubernetes Cluster: Terraform and Ansible article, so I won’t rehash that here. It’s exactly the same. Where things change are in the main.tf file and outputs.tf file. Let’s look at the main configuration file first.
main.tf
The first machine this file creates is guacamole using the Apache Guacamole template created earlier. Here is what that looks like
resource "proxmox_vm_qemu" "guacamole" {
  # 1: Top level variables provision the machine.
  name        = "guacamole"
  target_node = "pve"
  clone       = "guacamole-template"
  desc        = "Guacamole Controller"
  full_clone = false
  agent      = 1
  cores      = 2
  sockets    = 1
  cpu        = "host"
  memory     = 4096
  scsihw     = "virtio-scsi-pci"
  os_type    = "ubuntu"

  # 2: Two network cards so you can connect to sandboxed network
  network {
    bridge = "vmbr0"
    model  = "virtio"
  }

  network {
    bridge = "vmbr5"
    model  = "virtio"
  }

  disks {
    scsi {
      scsi0 {
        disk {
          storage = "disk_images"
          # size cannot be less than the image template (25G)
          size = 25
        }
      }
    }
  }

  # 3: Create SSH connection to provision network information
  connection {
    type     = "ssh"
    user     = "adam"
    password = var.ssh_pass
    host     = self.default_ipv4_address
  }

  # 4: Setup network custom information
  provisioner "file" {
    source      = "./01-netplan.yaml"
    destination = "/tmp/00-netplan.yaml"
  }

  provisioner "remote-exec" {
    inline = [
      "echo adam | sudo -S mv /tmp/00-netplan.yaml /etc/netplan/00-netplan.yaml",
      "sudo netplan apply && sudo ip addr add dev ens19 ${self.default_ipv4_address}",
      "ip a s"
    ]
  }
}
This configuration has four main parts:
- Top level variables that configure the provisioning of the Terraform resource (Proxmox virtual machine). This includes the name of the machine, the machine template to clone, and hardware resources.
- This machine has two network interfaces. One so you can connect to it from your local network and another so it can connect to machines within the malware analysis environment.
- An SSH connection is configured so the machine’s network interfaces can be configured through the
01-netplan.yamlfile. - The
01-netplan.yamlfile is copied to the machine and applied using thefileandremote-execprovisioners.
Next is the flare-vm machine. This is a slightly simpler configuration.
resource "proxmox_vm_qemu" "flare-vm" {
  name        = "flare-vm"
  target_node = "pve"
  clone       = "FlareVM-template"
  desc        = "Flare VM Machine"
  full_clone = false
  agent      = 1
  cores   = 2
  sockets = 2
  cpu = “host”
  memory  = 6144
  scsihw = "virtio-scsi-pci"

  network {
    bridge = "vmbr5"
    model  = "e1000"
  }

  disks {
    scsi {
      scsi0 {
        disk {
          storage = "disk_images"
          size = 80
        }
      }
    }
  }
}
The top-level variable provision the machine, a network device is added so it can connect to the malware analysis environment subnet (vmbr5), and a larger disk size is specific to account for all the tools.
Finally, the remnux machine is created with a configuration similar to that of the flare-vm one.
resource "proxmox_vm_qemu" "remnux" {
  name        = "remnux"
  target_node = "pve"
  clone       = "remnux-template"
  desc        = "REMnux Machine"
  full_clone = false
  agent      = 1
  cores   = 2
  sockets = 1
  cpu     = "host"
  memory  = 4096
  scsihw  = "virtio-scsi-pci"
  os_type = "ubuntu"

  network {
    bridge = "vmbr5"
    model  = "virtio"
  }
  disks {
    scsi {
      scsi0 {
        disk {
          storage = "disk_images"
          size = 60
        }
      }
    }
  }
}
I strongly recommend naming your machines something different than the machine template they are cloned from. If they have the same name, Terraform can get confused and delete the machine template, making you go through the whole installation process again! (Yes, this happened to me twice; don’t be like me).
The next file to create is outputs.tf. This file will tell the user of your Terraform script what the IP addresses are for your machines, which will be very useful later when you need to add them to your Guacamole machine to connect to.
output "guacamole-public-ip" {
  description = "Public IP of gaucamole machine"
  value       = proxmox_vm_qemu.guacamole.default_ipv4_address
 }

output "remnux-ip" {
  description = "IP of REMnux Machine"
  value       = proxmox_vm_qemu.remnux.default_ipv4_address
}

output "flare-ip" {
  description = "IP of Flare VM"
  value = proxmox_vm_qemu.flare-vm.default_ipv4_address
}
This file has three output variable; one for the public IP address of your Guacamole machine (you will connect to this using your web browser) and one for the REMnux machine and FLARE-VM machine.
You need Terraform installed before running the next commands. To do this, check out their excellent documentation.
Now it’s time to execute your Terraform files! Run the following commands from the terminal.
terraform init
terraform plan
terraform apply
This will initialize the directory and download the appropriate Terraform packages, tell you what it plans to do, and then provision your machines. Once complete, you should see the following terminal output (IP addresses will change).

With your machines up and running, it’s time to get your hands dirty!
Navigate to a web browser and enter the IP address of your Guacamole machine (e.g., https://<ip>:8080/guacamole). Then login with the default admin credentials (or any other credentials you configured during installation). Once logged in, you will be greeted by the default home screen.
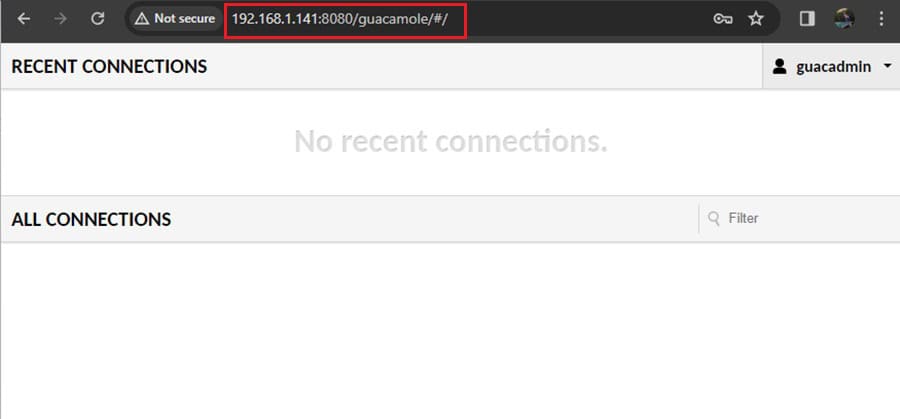
To connect to the machines within your virtual malware analysis environment, click the guacadmin dropdown menu and select Settings.

Now, navigate to the Connections tab and click the New Connection button.
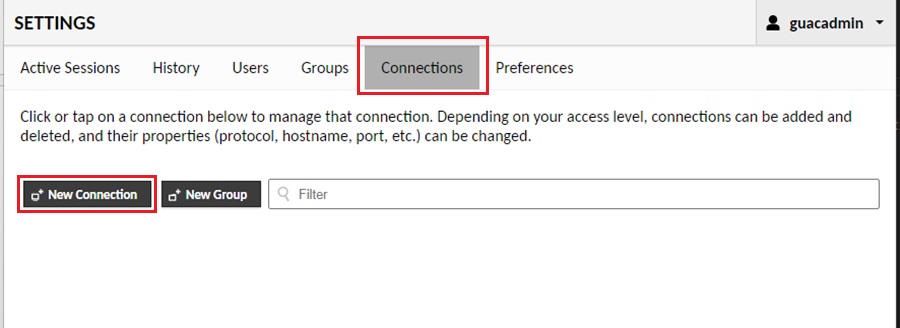
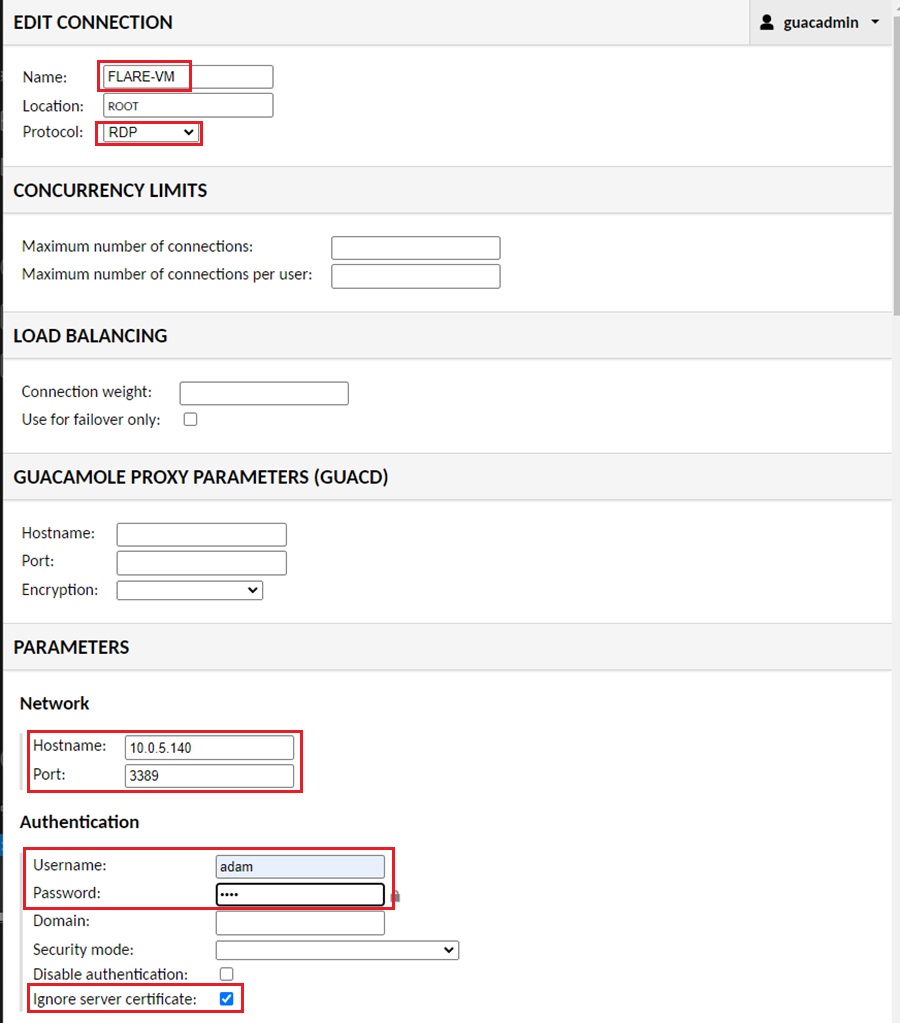
Next, fill out the connection information for your machines. For your FLARE-VM machine, use RDP and tick the Ignore server certificate option. For your REMnux machine, use SSH. You can also add a VNC connection to your REMnx machine once you SSH into the machine and execute the vncRun.sh script created earlier.
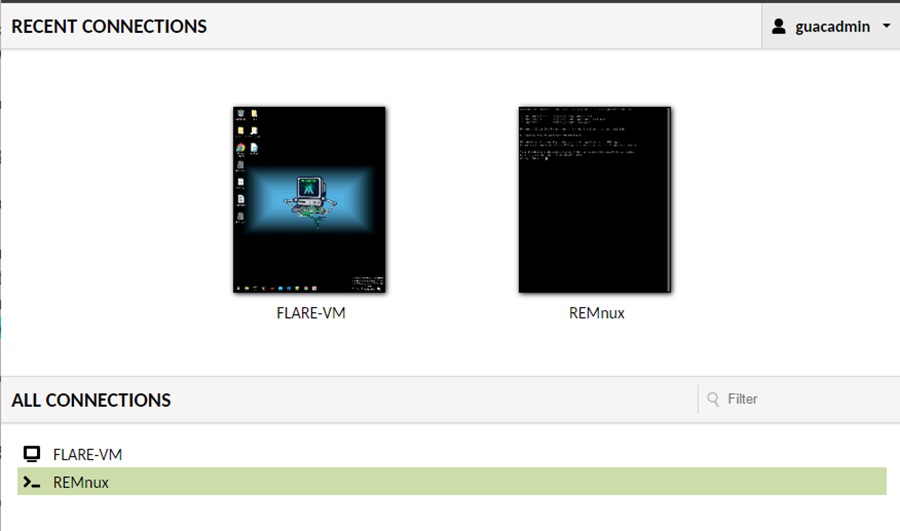
Once you have added both machines, navigate back to the home page using the guacadmin dropdown menu and click on them to enter an RDP or SSH session in your web browser.
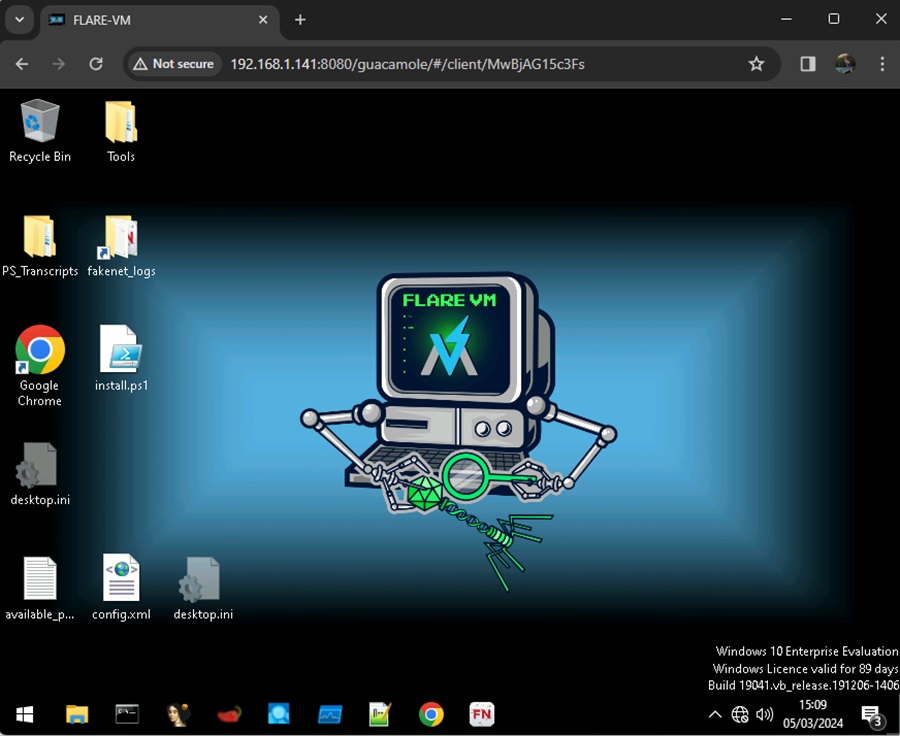
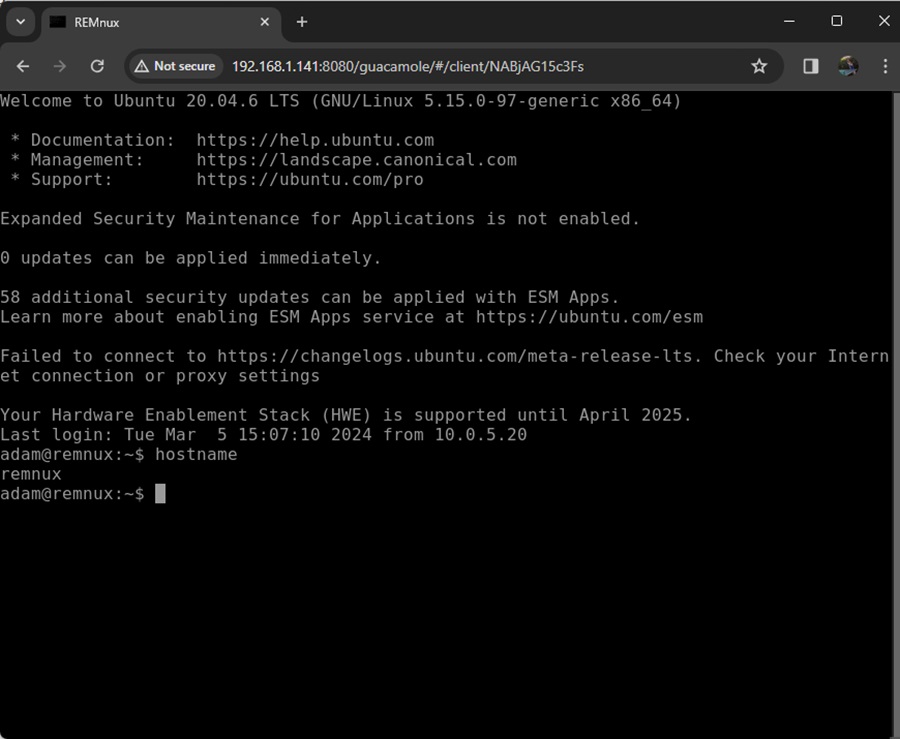
Congratulations! You have a fully operational malware analysis environment to play around with (or do serious work). To bring your malware analysis environment down, run the command terraform destroy from the same terminal you brought up the environment.
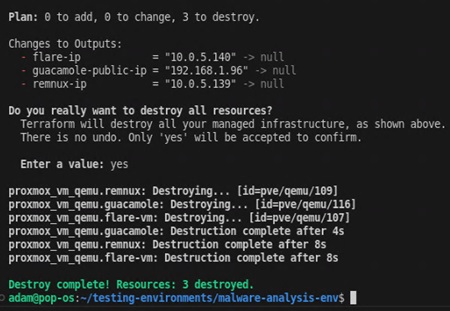
In my Proxmox setup, I am running the Terraform script from a jump box that is running on my Proxmox server and attached to both my local network (vmbr0) and the malware analysis environment network (vmbr5). This makes deploying and provisioning virtual environments considerably easier than running Terraform on my main workstation. I recommend setting up your own jump box.
Summary
You have just seen how to create the ultimate malware analysis environment using Terraform, Proxmox, and Apache Guacamole. All the code showcased can be found on this GitHub page. I highly recommend playing around with it, setting up your own automated malware analysis environment, and enjoying the many benefits of infrastructure as code (IaC).
The awesome power of IaC means you can spin up an entire suite of malware analysis tools in a matter of minutes, allowing you to get straight to business without worrying about configuring tools. However, IaC can be used for much more malware analysis. You can use it to provision Kubernetes clusters or other cloud technology, create threat hunting labs, or build an Active Directory environment to practice your hacking skills against.
These ideas are explored in other articles in this series. For now, try to get this malware analysis environment up and running. Remember, you don’t need a home lab or local Proxmox server to follow along here. You can use cloud technologies like AWS, Azure, or GCP. Just change the Terraform script as needed. Good luck!
Frequently Asked Questions
Where Can I Practice Malware Analysis?
Malware analysis needs to be practiced in a safe and controlled environment. This can include:
- Online security labs and training platforms that offer hands-on exercises focused on developing your malware analysis skills, like SANS Institute or INE Security.
- Capture-the-flag (CTF) challenges hosted in gamified online environments, such as Hack The Box and Try Hack Me.
- Personal malware analysis environments as showcased in this article using tools like REMnux, FLARE-VM, or Cuckoo Sandbox.
What Is a Sandbox Environment in Malware Analysis?
A sandbox environment in malware analysis is one that is controlled and isolated from other computers or network resources. It provides a safe space for security researchers to execute malware and analyze it, without it potentially harming other systems or networks. Whenever you perform malware analysis you should perform it in a sandbox environment to reduce the risk of the malware infecting unintended victims and spreading beyond your control.
What Environment Is Needed to Test Malware?
To safely analyze malware, you need an environment that is fully under your control and isolated from other systems or networks. This is often called a sandbox. It provides you a safe space to detonate and analyze malware without it potentially infecting other systems or networks and spreading. You can create a malware analysis environment using virtualization software, cloud technology, and network firewalls as shown above.

