Kubernetes is a magical technology that can provide your applications scalability, high availability, and resource efficiency across cloud and local environments. In this article, you will learn how to deploy your own local Kubernetes cluster using Terraform and Ansible, mastering some common DevOps practices along the way.
But why learn about Kubernetes if you are in security? Beyond needing to secure containerized workloads and cloud infrastructure, learning the basics of Kubernetes empowers you to deploy your own custom tooling at scale, whether to the public or your local team. It also acts as a gateway to learning powerful automation technologies like Terraform and Ansible that will completely change how you deploy and configure infrastructure.
Let’s begin exploring the mystical arts of DevOps and Infrastructure as Code to create our local Kubernetes cluster!
What is Kubernetes?
Kubernetes is an open-source container orchestration platform originally developed by Google and now maintained by the Cloud Native Computing Foundation (CNCF). It is a popular tool used in cloud engineering and DevOps to automate the deployment, scaling, and management of containerized applications.
Containers
Containers are a way to package software along with its dependencies to run consistently across different computing environments. Modern applications are often deployed within containers so organizations can scale their products on cloud platforms like Amazon AWS, Microsoft Azure, Google Cloud (GCP), or another platform.
Docker
Docker is the defacto tool for developing, packaging, deploying, and running containers. It allows you to package an application and its dependencies inside a container that can be run locally or in the cloud.
Kubernetes can be seen as a level-up from Docker. While Docker is primarily a containerization platform focused on building and running containers, Kubernetes is a container orchestration platform focused on automating the deployment and management of containers at scale. Kubernetes will typically be used to manage Docker containers alongside other container runtimes like containerd, CRI-O, rkt, and Garden.
Containers are the modern way to run applications. They provide lightweight, isolated environments for running application and their dependencies that can be easily scaled. Docker allows you to build and run containers at a small level, typically locally, and Kubernetes allows you to automate container deployments at scale.
A great resource for learning about Docker, Kubernetes, and the cloud is KodeKloud. They have great courses, hands-on labs, and even a free plan! We have no affiliation with KodeKloud. It’s just a great DevOps resource.
You may now wonder, “Why deploy a Kubernetes cluster and not just use Docker for all your container needs?” Let’s find out.
Why Deploy a Kubernetes Cluster?
Docker is a great technology for deploying and managing single-container applications and is used primarily for testing. When you deploy containerized workloads in production at scale, you need container orchestration tools like Kubernetes or Docker Swarm.
You can also use a cloud-native container orchestration platform like Amazon Elastic Kubernetes Service (Amazon EKS), Azure Kubernetes Service (AKS), or Google Kubernetes Engine (GKE). However, these are tied to specific cloud providers, lock you in with their technology stack, and are commercially managed services.
Container orchestration tools allow you to manage containerized applications efficiently and at scale using features like self-healing, load balancing, service discovery, declarative configuration, stateful applications, and storage orchestration. If you choose not to use a container orchestration platform, you must build all the networking, storage, and scaling components yourself. Making deploying containerized applications significantly more difficult.
But why do you need a Kubernetes cluster? Well, you probably don’t just yet. If you are just beginning to build your own cyber security tools, a containerized application managed with Docker will probably be enough.
That said, when it comes time to deploy this application at scale, it is good to know how to do this. How to make it highly available, how to make it resource efficient, and how to integrate it with DevOps best practices like continuous integration/continuous deployment (CI/CD) workflows. With this in mind, here are the key benefits of a Kubernetes cluster.
Key Benefits of a Kubernetes Cluster
- Scalability: Can scale applications horizontally by automatically deploying pods and containers as traffic and workload demands increase. This simplifies managing complex distributed systems.
- High Availability: Built-in mechanisms for detecting and recovering from failures, such as automatically restarting failed containers, managing node health, load balancing, and minimizing downtime using different deployment strategies.
- Resource Efficiency: Optimizes resource utilization by efficiently scheduling containers onto nodes and pods based on resource requirements and availability. This reduces costs and improves overall efficiency.
- Portability: You can run your cluster across different computing environments, including on-premises data centers, public clouds, and hybrid cloud environments. There is no vendor lock-in.
- Flexibility: Supports a wide range of container runtimes, storage options, networking configurations, deployment strategies, and configuration options. Allowing you to tailor your infrastructure to your specific requirements.
- DevOps Enablement: Offers a unified platform for developing, testing, and deploying containerized applications using CI/CD workflows
- Ecosystem and Community: Supported by a large community and active ecosystem of tools, plugins, and integrations to support your specific needs.
Deployment Options
So you have decided to build a Kubernetes cluster, congrats. Now, you must choose an infrastructure deployment strategy. There are several paths you can take. Let’s look at each, along with their advantages and disadvantages.
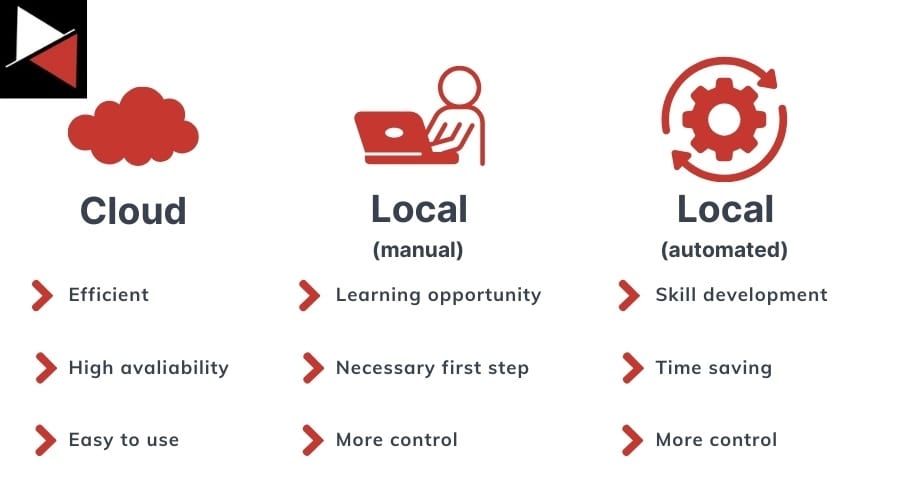
Cloud
Deploying Kubernetes in the cloud is a great option. It means you can take advantage of elastic scalability (scaling up and down based on the workload), use managed service offerings so you don’t need to worry about administration or maintenance, optimize cost savings, and easily achieve high availability using cloud infrastructure.
Cloud deployments mean you only need to worry about the initial setup, allowing you to spend your time building and delivering your application rather than worrying about managing infrastructure. The only downside is price, as large vendors like AWS, Azure, and GCP charge a premium for using their services. If this is an issue, look at smaller cloud platforms like Linode (Akamai), DigitalOcean, and Vultr.
If I were to host a Kubernetes cluster publicly, I would strongly recommend deploying it in the cloud. It offers the most benefits and will make your life a lot easier.
Local (manual)
Kubernetes is not just for the cloud. You can deploy Kubernetes locally using virtual machines or containers hosted on your own server running a type I hypervisor like Proxmox, VMware vSphere, or XCP-ng.
This requires you to create and manage the nodes hosting your Kubernetes pods (which run your containers) but offers more flexibility around what software you use, allows you to develop offline, and lets developers iterate quickly on their code and configurations. However, the greatest benefit is learning how Kubernetes works through hands-on experience.
Local (automated)
Once you manually set up a local Kubernetes cluster, you can learn to automate your deployment using tools like Terraform and Ansible. This will save you a lot of time and teach you even more DevOps skills!
Terraform
Terraform is an open-source Infrastructure as Code (IaC) tool that allows you to define and provision infrastructure resources such as virtual machines, networks, storage, and other components using code.
Code defines the desired state of the infrastructure, specifying the resources, their attributes, dependencies, and relationships. Terraform takes the code and interacts with provider APIs to create the infrastructure. A provider could be a cloud platform or virtualization technology.
Ansible
Ansible is an open-source automation tool used for configuration management, application deployment, orchestration, and task automation. It uses an agentless architecture to perform IT operations and manage enterprise environments using code.
In the following demonstration, you will see how to use Terraform and Ansible to fully automate the deployment of a local Kubernetes cluster on a Proxmox server. Terraform will be used with the Proxmox API to provision the infrastructure (nodes) our local Kubernetes cluster will run on, while Ansible will be used to configure the individual nodes. Let’s get started!
Walkthrough: Creating a Local Kubernetes Cluster
To deploy a local Kubernetes cluster, you can use an open-source type I hypervisor like Proxmox or XCP-ng. I have chosen Proxmox because it is easy to set up and integrates well with Terraform.
A type I hypervisor like Proxmox allows you to run and manage virtual machines (VMs) and containers on a single platform, providing a comprehensive solution for building and managing virtualized infrastructure. Unlike type II hypervisors (Oracle’s VirtualBox or VMware Workstation Player), type I hypervisors are installed on bare metal and are optimized for performance, scalability, and resource efficiency. They are typically used in enterprise environments or home labs.
The Kubernetes infrastructure will be created within a Proxmox server, with nodes being individual virtual machines. On these nodes, Kubernetes pods will host containerized applications. There will be one master node (master01) and two worker nodes (worker01 and worker02). The master node manages and orchestrates the workloads run on the worker nodes.
If that sounds confusing, don’t worry. The point of the demo is to showcase how you can provision and manage complex infrastructure using Terraform and Ansible through code. Learning Kubernetes is just a bonus.
Proxmox Server Setup
Hopefully, you already have a home lab to run this project within. If not, follow this article on setting up a Proxmox server from scratch. It walks you through installing Proxmox, creating a network with pfSense, and deploying your first virtual machine.
If you don’t want to go down the home lab route and favor a cloud-based approach, you can easily convert the Terraform code shown in this walkthrough for your favorite cloud platform. Terraform can integrate with all major cloud providers and was originally designed for deploying cloud infrastructure. You will just need to consult your Terraform Providers documentation to make the code alterations.
Terraform Infrastructure
To use Terraform with Proxmox, select a Proxmox provider from the Terraform Provider Registry. Providers provide an abstraction layer that allows you to write simple code to work with your infrastructure provider’s API and provision resources effectively.
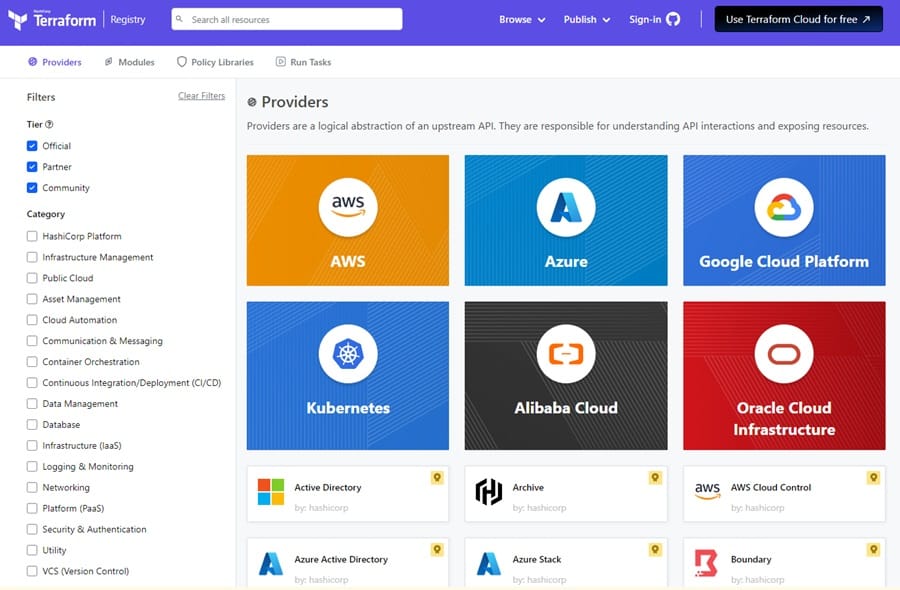
There are tons of providers that Terraform supports. To find one for Proxmox, use the search menu at the top.
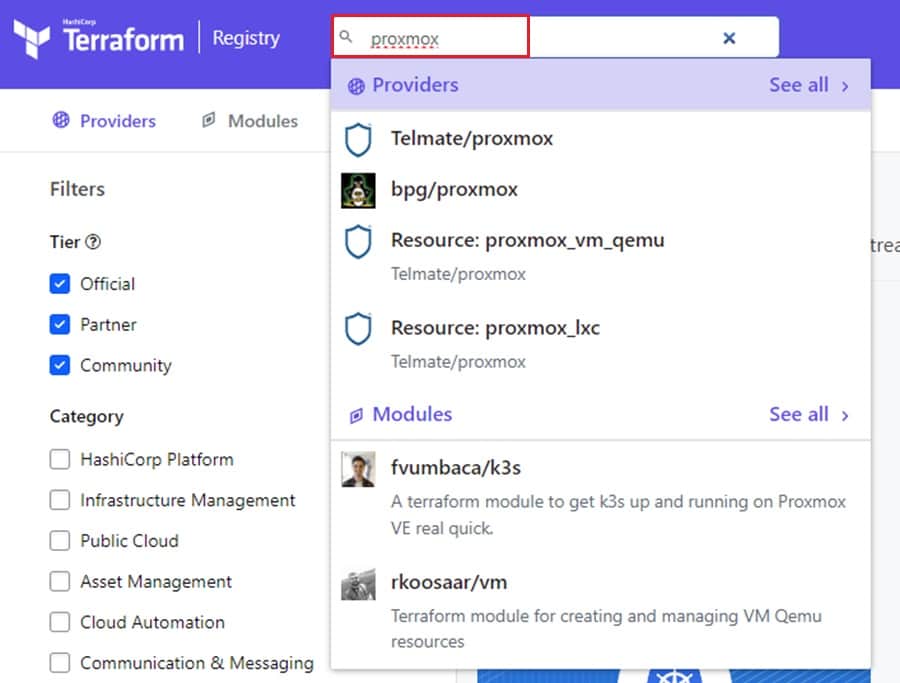
One of the best providers to use for Proxmox is Telmate/proxmox. This provider is up-to-date, supports many features, and provides extensive documentation. Once you select a provider, consult the Documentation to learn how to get started using them.
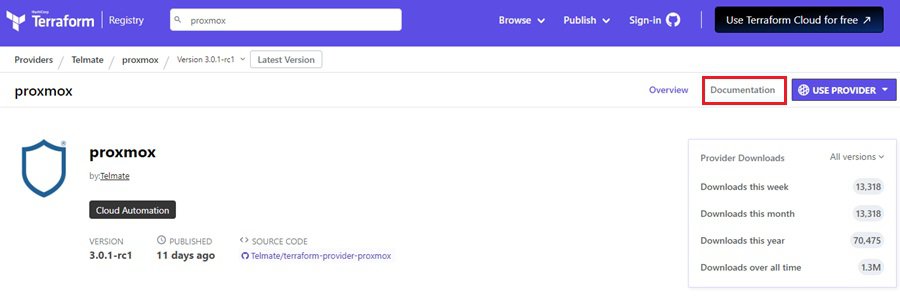
The first task is to connect your Terraform code to the infrastructure provider. The Telmate/proxmox provider lets you connect to your Proxmox server using a username and password or API token and token secret. Either way, you must create the role and assign the appropriate privileges to programmatically provision infrastructure. Consult the documentation to see how to do this based on the version of Proxmox you have installed.
With your credentials created, you can create your first two Terraform files:
credentials.auto.tfvarsfor your connection credentials.provider.tffor your provider settings.
// File: credentials.auto.tfvars
proxmox_api_url = "https://192.168.1.41:8006/api2/json"
proxmox_api_token_id = "<token-id>"
proxmox_api_token_secret = "<token-secret>"
You will need to create the credentials.auto.tfvars yourself using the code. It is not included in the GitHub repository for obvious reasons.
// File: provider.tf
// connect to providers
terraform {
  required_version = ">= 0.13.0"

  required_providers {
    proxmox = {
      source  = "telmate/proxmox"
      version = "3.0.1-rc1"
    }
  }
}

// define Proxmox variables
variable "proxmox_api_url" {
  type = string
}
variable "proxmox_api_token_id" {
  type      = string
  sensitive = true
}
variable "proxmox_api_token_secret" {
  type      = string
  sensitive = true
}

// create SSH variable
variable "ssh_pass" {
  type      = string
  sensitive = true
}

// connect to Proxmox server through API
provider "proxmox" {
  pm_api_url          = var.proxmox_api_url
  pm_api_token_id     = var.proxmox_api_token_id
  pm_api_token_secret = var.proxmox_api_token_secret
  pm_tls_insecure     = true
  pm_parallel         = 1
}
It helps to use an IDE that supports a Terraform plugin for syntax highlighting and linting, such as Visual Studio Code.
Next, you can create your main.tf file. This file holds all your Infrastructure as Code (IaC). It declares what resources need to be created, how they need to be provisioned, and any commands you want to run on the host after it is created.
// Snippet from file: main.tf
resource "proxmox_vm_qemu" "master" {
  name        = "master01"
  target_node = "pve"
  clone       = "ubuntu-20.04.01"
  desc        = "Master Node"
  full_clone = true
  agent      = 1
  cores      = 2
  sockets    = 1
  cpu        = "host"
  memory     = 2048
  scsihw     = "virtio-scsi-pci"
  os_type    = "ubuntu"

  network {
    bridge = "vmbr6"
    model  = "virtio"
  }
  disks {
    scsi {
      scsi0 {
        disk {
          storage = "disk_images"
          size = 25
        }
      }
    }
  }

  // 1 - define SSH connection to use to provision after boot
  connection {
    type     = "ssh"
    user     = "adam" 		#change this to your username
    password = var.ssh_pass
    host     = self.default_ipv4_address
  }

  //2 - move netplan file to the machine to setup networking
  provisioner "file" {
    source = "./01-netplan.yaml"
    destination = "/tmp/00-netplan.yaml"
  }

  // 3 - commands to run after boot, including setting up networking
  provisioner "remote-exec" {
    inline = [
      "echo adam | sudo -S mv /tmp/00-netplan.yaml /etc/netplan/00-netplan.yaml",
      "sudo hostnamectl set-hostname master01",
      "sudo netplan apply && sudo ip addr add dev ens18 ${self.default_ipv4_address}",
      "ip a s"
     ]
  }
}

...
In this example, you see one out of three virtual machines being defined (master01). The three machines are almost identical. They have the same system resources, are connected to the same network, and are cloned from the same virtual machine template. The only difference is their network configuration and hostname. To set these details, an SSH connection is provisioned with the connection setting (1), a netplan file is transferred to the machine (2), and several commands are run once the machine has been created (3).
// Snippet from main.tf on machine: master01
provisioner "file" {
    source = "./01-netplan.yaml"
    destination = "/tmp/00-netplan.yaml"
  }

  provisioner "remote-exec" {
    inline = [
      "echo adam | sudo -S mv /tmp/00-netplan.yaml /etc/netplan/00-netplan.yaml",
      "sudo hostnamectl set-hostname master01",
      "sudo netplan apply && sudo ip addr add dev ens18 ${self.default_ipv4_address}",
      "ip a s"
     ]
  }


// Snippet from main.tf on machine: worker01
  provisioner "file" {
    source = "./02-netplan.yaml"
    destination = "/tmp/00-netplan.yaml"
  }

  provisioner "remote-exec" {
    inline = [
      "echo adam | sudo -S mv /tmp/00-netplan.yaml /etc/netplan/00-netplan.yaml",
      "sudo hostnamectl set-hostname worker01",
      "sudo netplan apply && sudo ip addr add dev ens18 ${self.default_ipv4_address}",
      "ip a s"
     ]
  }


// Snippet from main.tf on machine: worker02
  provisioner "file" {
    source = "./03-netplan.yaml"
    destination = "/tmp/00-netplan.yaml"
  }

  provisioner "remote-exec" {
    inline = [
      "echo adam | sudo -S mv /tmp/00-netplan.yaml /etc/netplan/00-netplan.yaml",
      "sudo hostnamectl set-hostname worker02",
      "sudo netplan apply && sudo ip addr add dev ens18 ${self.default_ipv4_address}",
      "ip a s"
     ]
  }
This allows you to create a unique network configuration for each machine. Setting network configuration details is slightly easier with cloud providers like AWS, GCP, and Azure because they define network resources to do this, but this workaround will do the job. The netplan files the following code, each with a unique IP address for the given machine they relate to.
# File: 01-netplan.yaml
network:
  ethernets:
    ens18:
      dhcp4: false
      addresses:
        - 10.0.6.200/24
      nameservers:
          addresses: [8.8.8.8, 8.8.4.4]
      routes:
      - to: 0.0.0.0/0
        via: 10.0.6.1
        metric: 99
    ens19:
      dhcp4: true
      dhcp-identifier: mac
  version: 2
Now, you are ready to run Terraform! To begin with, download and install Terraform. Then run the command terraform init from inside the directory you have created your Terraform files. This will initialize the directory and create a .terraform sub-directory.
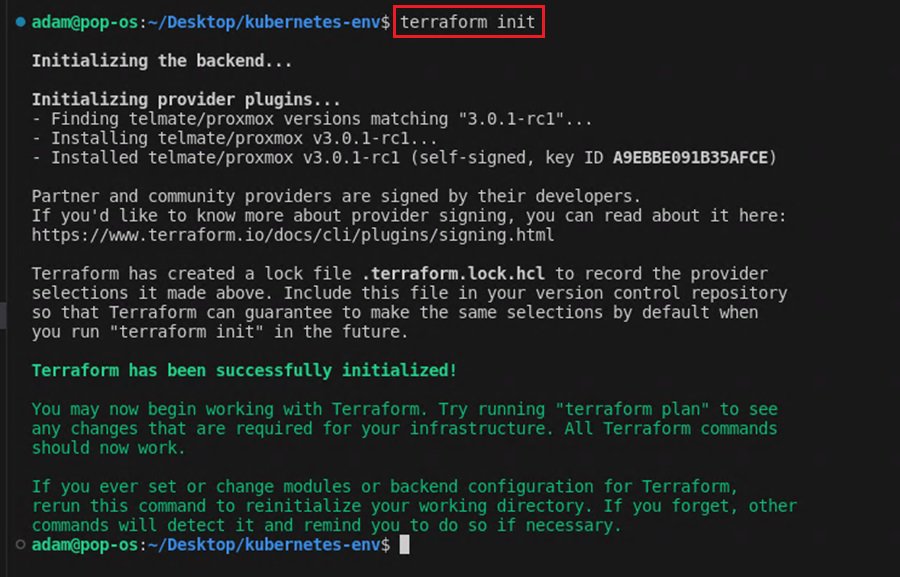
Next, run the command terraform plan to create a plan of the resources you want to provision and confirm everything looks okay.
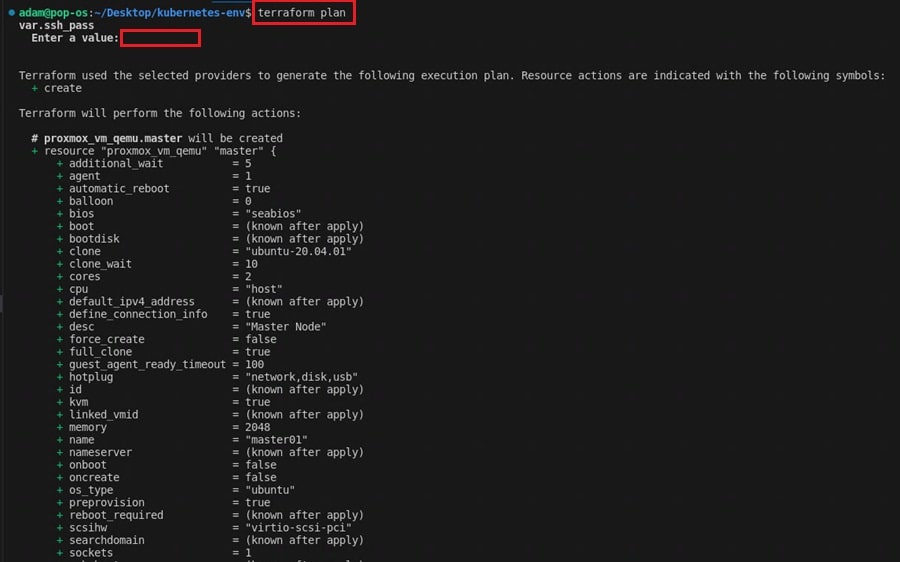
This command produces a lot of output!
The command asks for the SSH password to connect to machines. This is because we defined an SSH username and password connection in the main.tf file so we can execute commands on the machine after it boots up. You could also use SSH keys or specify this password in the code.
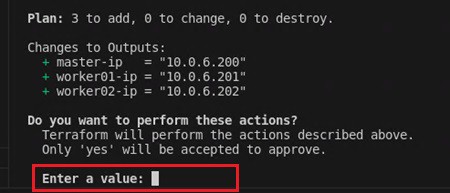
Finally, run the command terraform apply and type yes to execute your Terraform files and build your infrastructure.
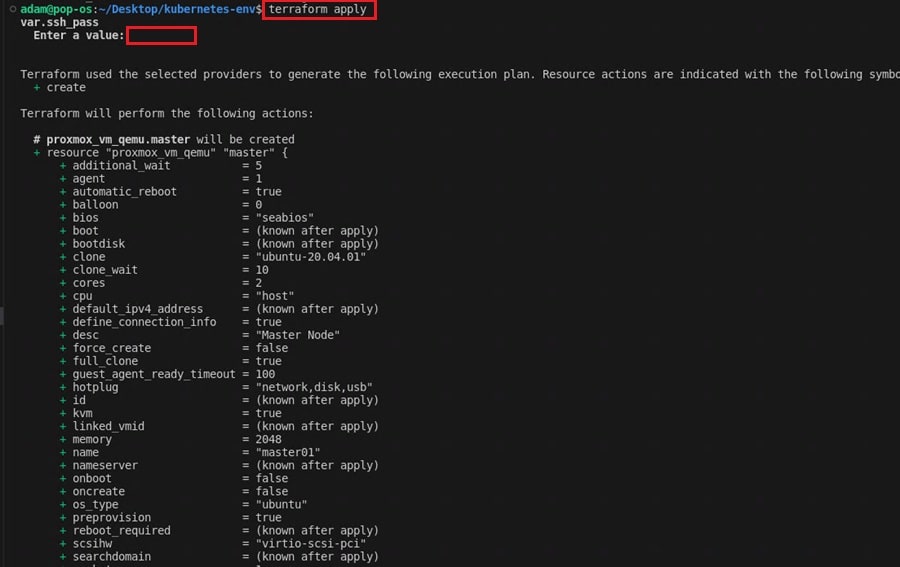
Again, this command will ask for your SSH password and if you want to proceed.
If all goes to plan, you should now have three shiny new virtual machines deployed on your Proxmox server to use as the backbone of your local Kubernetes cluster.

If you want to tear it down, run the terraform destroy command. To make changes, simply alter your code and execute terraform apply again. So simple!
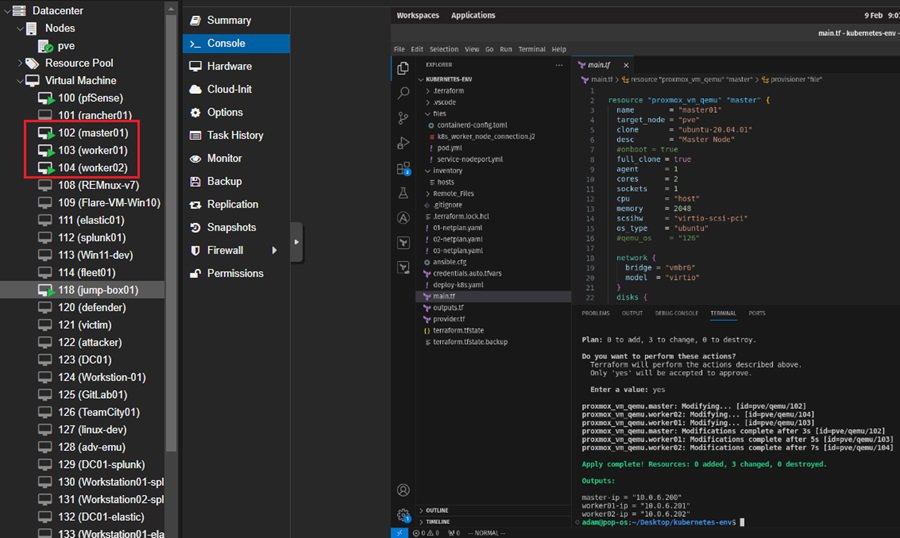
These machines were created from a virtual machine template previously created on the Proxmox server. You must manually create a virtual machine, build it how you like (e.g., add packages, SSH users, etc.), and then select the Clone to Template option on the machine’s dashboard (top right). This will create a template to build other virtual machines. For more details, read How to Create a Proxmox VM Template.
I updated the packages on my machine template and created an SSH user named adam with a basic password.
Ansible Playbook
The next step is turning your infrastructure into a local Kubernetes cluster. To do this, you can use a configuration management and task automation tool like Ansible. You can install software packages, change configuration settings, and connect machines using Ansible. Perfect for creating a local Kubernetes cluster.
You need two things to start:
- Ansible installed on your management machine. Read here to learn how.
- The ability to connect to your Kubernetes machines (nodes) using SSH.
Once these two requirements are met, you can create an ansible.cfg file that holds your configuration settings.
# File ansible.cfg
[defaults]
remote_user = adam	              # SSH user to connect as
inventory = ./inventory/hosts     # path to hosts file
Also, a hosts file that tells what hosts Ansible should try to connect to. This groups your hosts into master and worker nodes, which will be useful later when you start writing your Ansible playbook.
# File: hosts
[master]
10.0.6.200

[worker]
10.0.6.201
10.0.6.202
With these files created, you can test that you can connect to your Kubernetes nodes using Ansible with the following commands:
ansible all -m ping --ask-pass: Checks you can connect to nodes (--ask-passwill ask you for the SSH password to connect to the nodes)ansible all -m ansible.builtin.setup: Gathers facts about the machines Ansible connects to (e.g., operating system, software versions, etc.).ansible all -a "/sbin/reboot": Reboots your Kubernetes nodes.
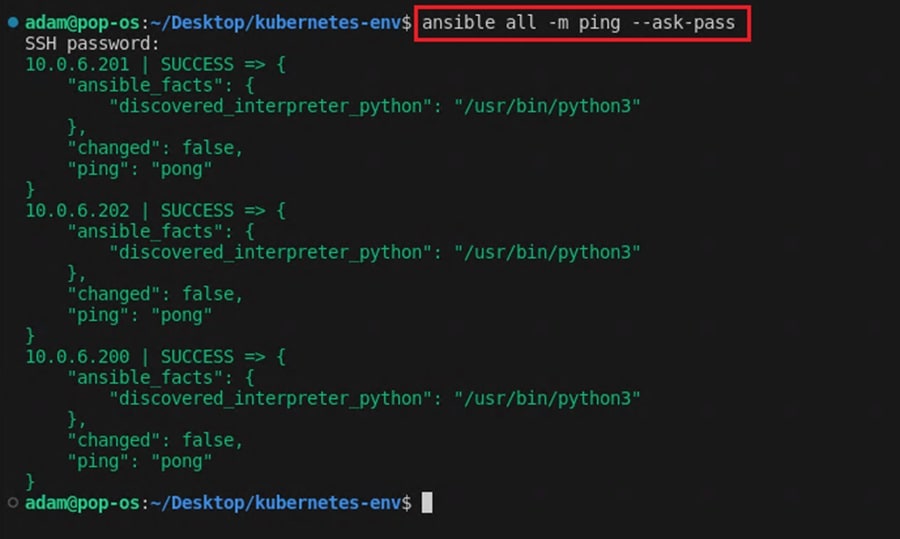
These are examples of Ansible ad hoc commands that you can use to perform tasks you repeat rarely. They follow the syntax ansible [pattern] -m [module] -a "[module options]".
You can learn more about them in the Ansible documentation.
Once you confirm you can connect to all your hosts, you can create an Ansible playbook that transforms them into a local Kubernetes cluster using declarative YAML code!
Going through the nuances of Ansible and playbooks is outside the scope of this article. However, if you’ve ever worked with Linux before, you should be able to quickly pick up what is happening from the provided deploy-k8s.yaml file. That’s the beauty of declarative code!
# Snippet from file: deploy-k8s.yaml
- name: Setup Prerequisites To Install Kubernetes
  hosts: all
  become: true
  vars:
    kube_prereq_packages: [curl, ca-certificates, apt-transport-https]
    kube_packages: [kubeadm, kubectl, kubelet]

  tasks:
    - name: Test Reacheability
      ansible.builtin.ping:

    - name: Update Cache
      ansible.builtin.apt:
        update_cache: true
        autoclean: true

    - name: 1. Upgrade All the Packages to the latest
      ansible.builtin.apt:
        upgrade: "full"

    - name: 2. Install Qemu-Guest-Agent
      ansible.builtin.apt:
        name:
          - qemu-guest-agent
        state: present

    - name: 3. Setup a Container Runtime
      ansible.builtin.apt:
        name:
          - containerd
        state: present

    - name: 4. Start Containerd If Stopped
      ansible.builtin.service:
        name: containerd
        state: started

    - name: 5. Create Containerd Directory
      ansible.builtin.file:
        path: /etc/containerd
        state: directory
        mode: '0755'

...
When looking at the code, an important thing to note is that different tasks (commands, package installs, and configuration file editing) will be run against different hosts. Some tasks will run against all hosts, while others are specific to master or worker nodes. Try spotting these differences in the code as you read through.
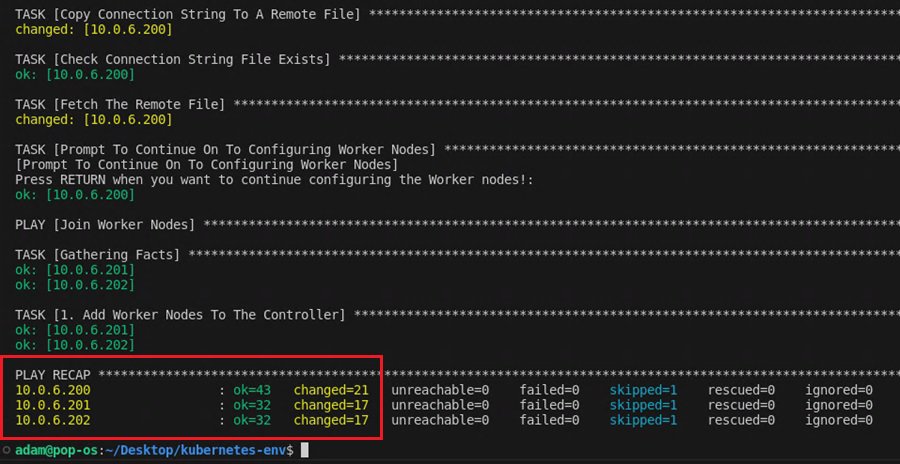
To execute the Ansible playbook and create the local Kubernetes cluster, run the command ansible-playbook deploy-k8s-2.yaml --ask-pass --ask-become. This will ask you for the SSH and root passwords (the same for each machine), then run the playbook.
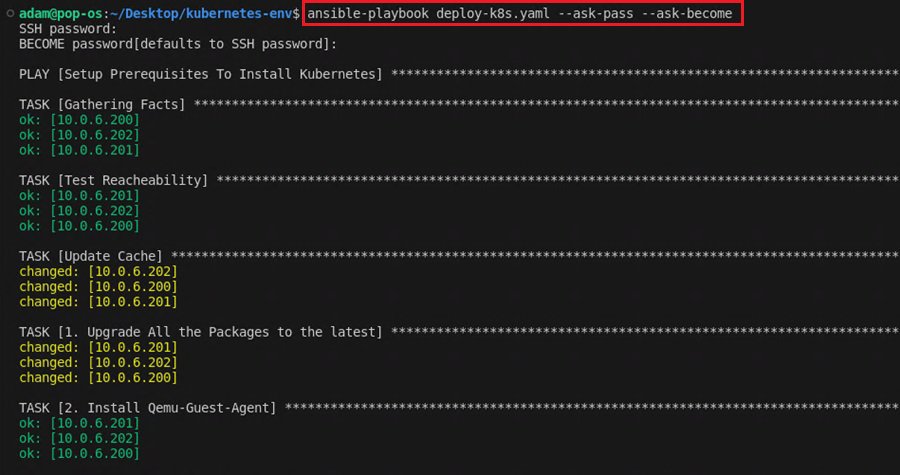
The script will also prompt you to confirm you want to configure the control nodes (master01) and connect the worker nodes (worker01 and worker02) to the local Kubernetes cluster. You can add as many of these nodes as you want. Just add them to your Ansible hosts file.
To check everything worked, SSH into your master node and run the command kubectl get pods -A.
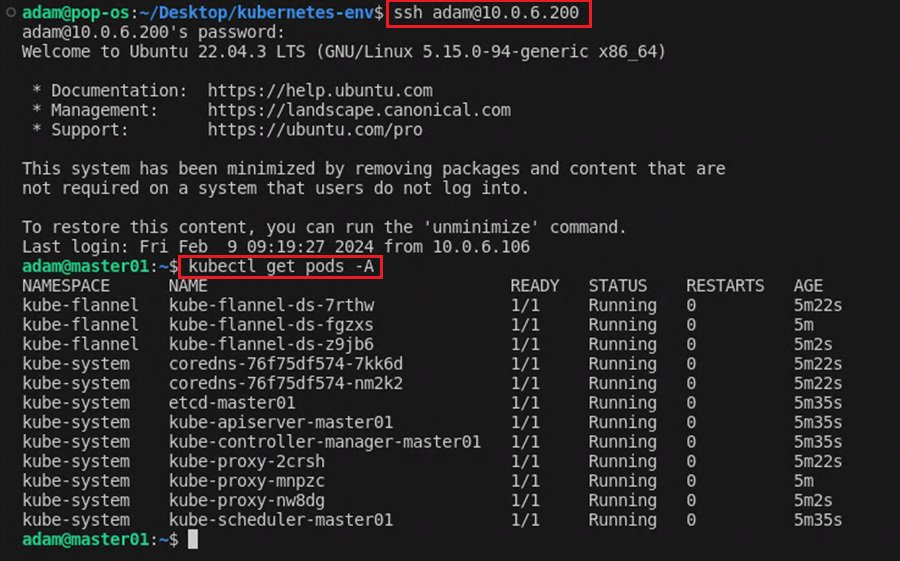
You should see the default Kubernetes pods (kube-system) and our local Kubernetes cluster network pods (kube-flannel) running. Now, you have a complete local Kubernetes cluster setup ready to use, all through the power of code!
A better design choice would be to use SSH keys rather than a username and password to authenticate, but I will leave that up to you to implement.
Deploying an Application
You are now ready to deploy an application on your new local Kubernetes cluster. This means you need to create two files:
pod.ymlfor creating a Kubernetes pod that hosts your containerized application.service-nodeport.ymlfor creating a NodePort service that allows your application to be accessible outside the local Kubernetes network.
You can choose to create these files yourself or use the ones provided. To move them to your master node for deployment. Run the following commands from your management machine:
scp ./files/pod.yml adam@10.0.6.200:/home/adam/
scp ./files/service-nodeport.yml adam@10.0.6.200:/home/adam/
This uses SCP to copy the files from your management machine to the master node using SSH.
Your home directory may differ based on the machine template image you used to create your nodes.
With these files on your Kubernetes master node, you can use the kubectl command to deploy your Kubernetes pod (and application) across your local Kubernetes cluster, while also making it accessible on port 30080 of your master node. In a real-world deployment, you would use a proxy or load balancer to forward traffic to this node.
kubectl apply -f pod.yml
kubectl apply -f service-nodeport.yml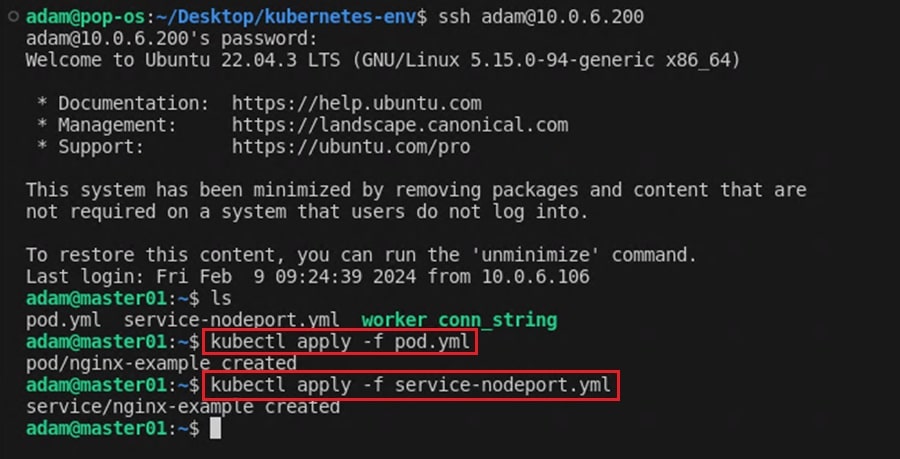
To check if the pod and NodePort service were successfully deployed, run the command kubectl get pods and kubectl get services.

Finally, open your web browser and navigate to port 30080 on your master node to confirm the application is running as expected.

Summary
Congratulations. You have seen how to deploy a local Kubernetes cluster using only code through the power of Terraform and Ansible! All the code for this infrastructure and deployment can be found on the kubernetes-env GitHub page.

These two incredibly powerful tools can provision and configure your entire IT infrastructure and be used to build Active Directory deployments, threat hunting labs, and secure malware analysis environments. Inspiration for this project goes to mttaggart, Christian Lempa, and LearnLinuxTV. Check out their awesome projects to discover more ways to use Terraform, Ansible, and Kubernetes.
This is not the only time you will be seeing Terraform and Ansible. Next time, you will learn how to create your own malware analysis environment that you can automatically deploy and destroy using these two awesome tools.
Frequently Asked Questions
Are Kubernetes and Docker the Same?
No. Kubernetes and Docker are not the same. Kubernetes is a container orchestration platform that automates the deployment, scaling, and management of containerized applications across clusters of machines (nodes). Docker is a platform for developing, packaging, deploying, and running applications inside containers.
Kubernetes is used to manage Docker containers (and other container runtimes), allowing you to scale containerized applications, provide high availability, and manage your environment using Infrastructure as Code (IaC). Usually, in a cloud environment or as a local Kubernetes cluster.
What is Kubernetes Used For?
Kubernetes is used for container orchestration, which involves automating the deployment, scaling, and management of containerized applications. It is primarily used in two fields:
- DevOps uses it to build and manage microservices-based architecture and automate the testing and deployment pipeline for applications (CI/CD).
- Cloud engineering uses it for hybrid and multi-cloud deployments to provide workload portability and flexibility when deploying infrastructure or when deploying and managing machine learning (ML) and Artificial Intelligence (AI) workloads at scale.
Most modern applications use Kubernetes in some way or another.
Why Use Terraform With Kubernetes?
Terraform is a powerful tool that makes it very easy to automate infrastructure provisioning. Its strong integration with cloud providers and virtualization technology means you can write Infrastructure as Code (IaC) to build, manage, and destroy networks, virtual machines, and other resources. This ability makes it ideal when building infrastructure to host local Kubernetes cluster, where you must provision many master and worker nodes.

