Welcome back to this series on using MISP for threat intelligence!
MISP (Malware Information Sharing Platform and Threat Sharing) is an open-source threat intelligence platform that allows you to share, collate, analyze, and distribute threat intelligence. It is used across industries and governments worldwide to share and analyze information about the latest threats. This series aims to give you the knowledge you need to get up and running with MISP as quickly as possible.
Today, you will learn how to start using MISP. You will learn about MISP events, how to create them, and how to add context to them using MISP’s galaxies and taxonomies. This will teach you the fundamentals of using MISP to fulfill your threat intelligence needs.
Let’s get started using our MISP instance!
Creating an Event
MISP events are “encapsulations for contextually related information represented as attribute and object.” They can be threat intelligence articles, malware analysis reports, threat research, or any other way you can think of representing threat intelligence. Events are the individual containers that group your atomic pieces of threat intelligence with contextual information so analysts can actually use it. They are the main way of interacting with data in MISP.
Let’s go through the process of adding an Event to MISP using a recent threat intelligence from Cyble titled Covert Delivery of Cobalt Strike Beacon via a Sophos Phishing Website.
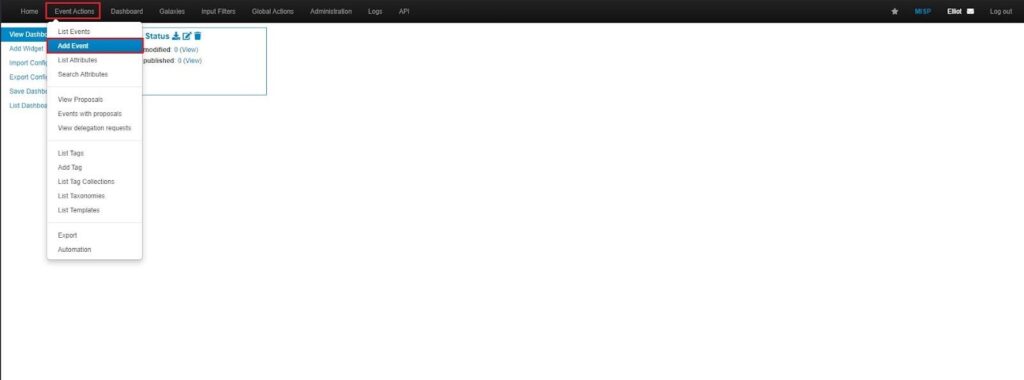
First, to add an Event in MISP, go to Event Actions > Add Event:
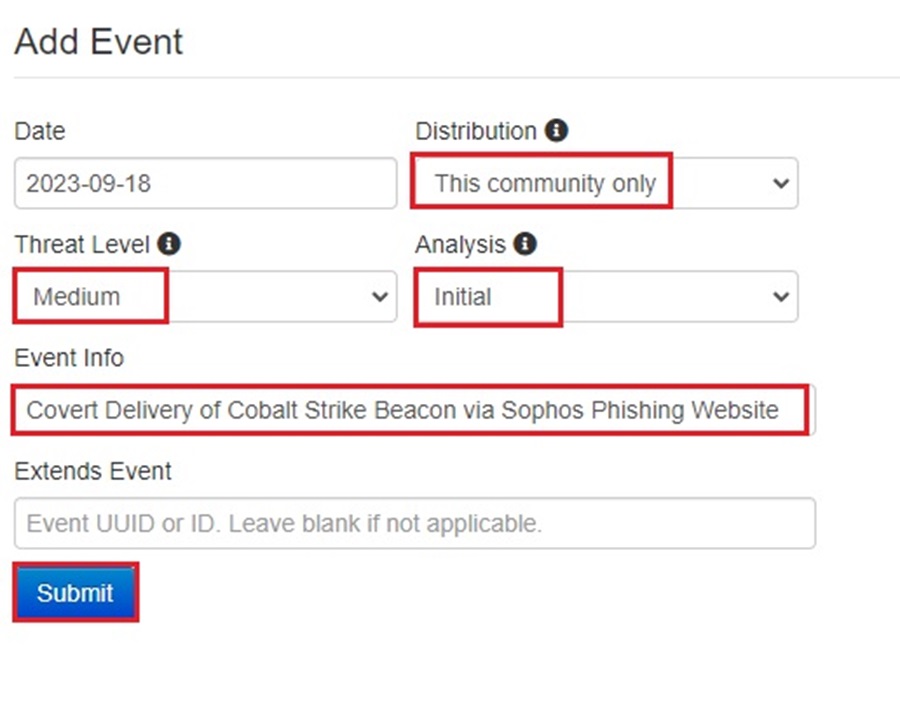
Next, fill out the metadata about the Event:
- Distribution: How you want your event to be shared across MISP instances (your organization only, this community only, connected communities, or all communities). See the documentation on Synchronization/Sharing for more information.
- Threat Level: The sophistication or danger the threat poses (high, medium, low, or undefined).
- Analysis: Which stage of analysis this event is at currently (initial, ongoing, or complete).
- Event Info: A title, brief description, or identifier to track the event.
- Extends Event: If the Event is related to a previous Event, you can link it by the UUID or ID of that previous Event. See the documentation on Extending Events for more information.
You can then click Submit to begin adding data to the Event.
If you are unsure of what a field represents, hover over the information icon to reveal a description of your selection.

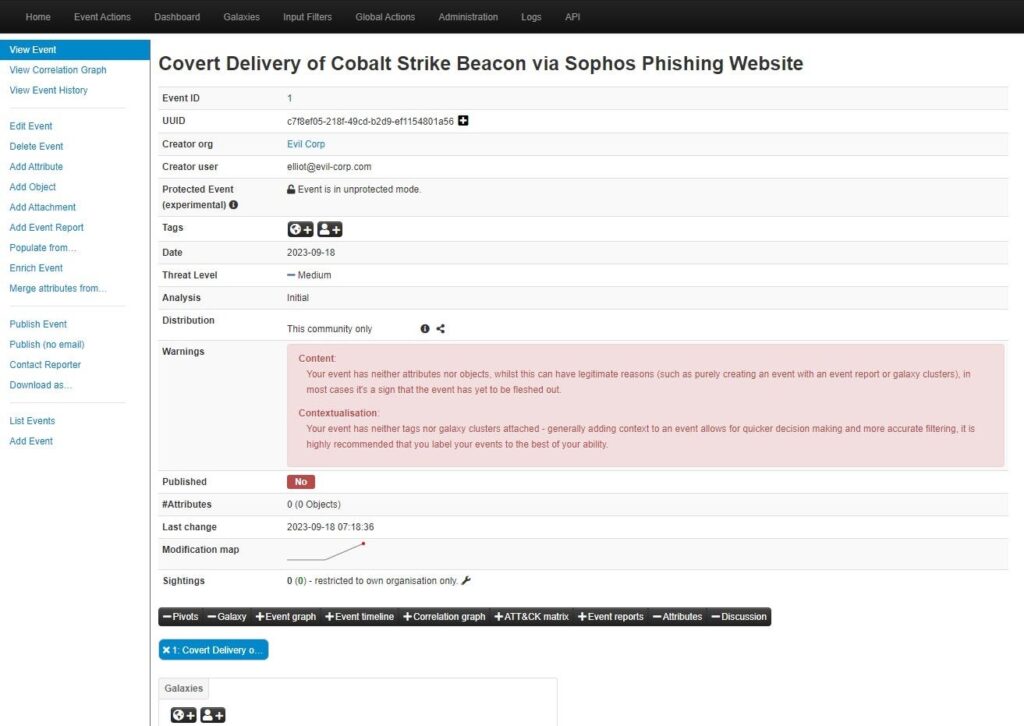
You can now begin adding intelligence to your Event through tags, galaxy clusters, attributes, and objects. Let’s see how.
Adding Tags
Tags represent the MISP taxonomies used to classify Events and add context. For example, in the previous installment in this series, you enabled the Traffic Light Protocol (TLP) taxonomy, which describes how data should be shared. You can add the TLP tag to this event by clicking the Add a tag button (world icon) in the Tags field.
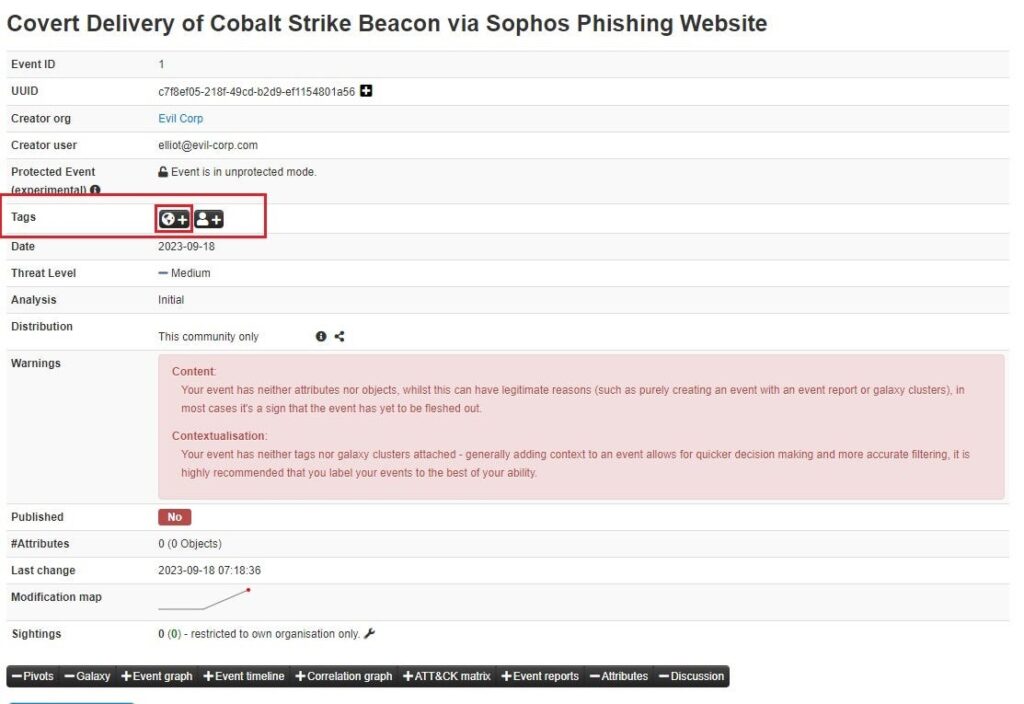
Next, select the tag you want to add. This can be a custom tag you created (see Tagging for more information) or a MISP taxonomy you have enabled. Here, you can see we have the option of adding the TLP tag.
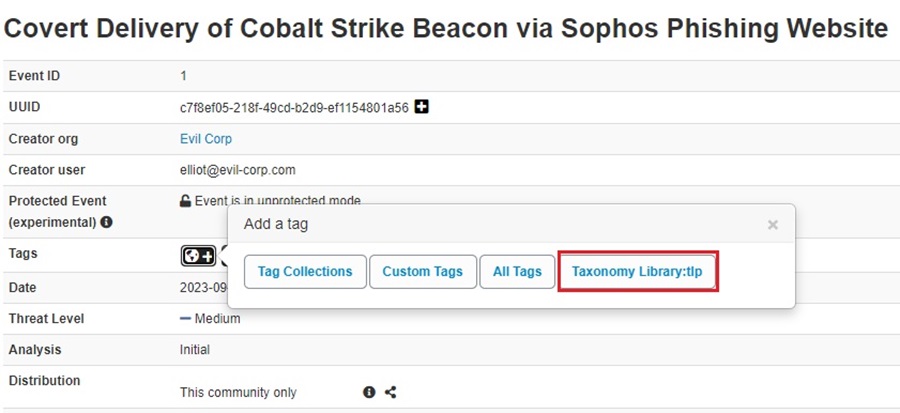
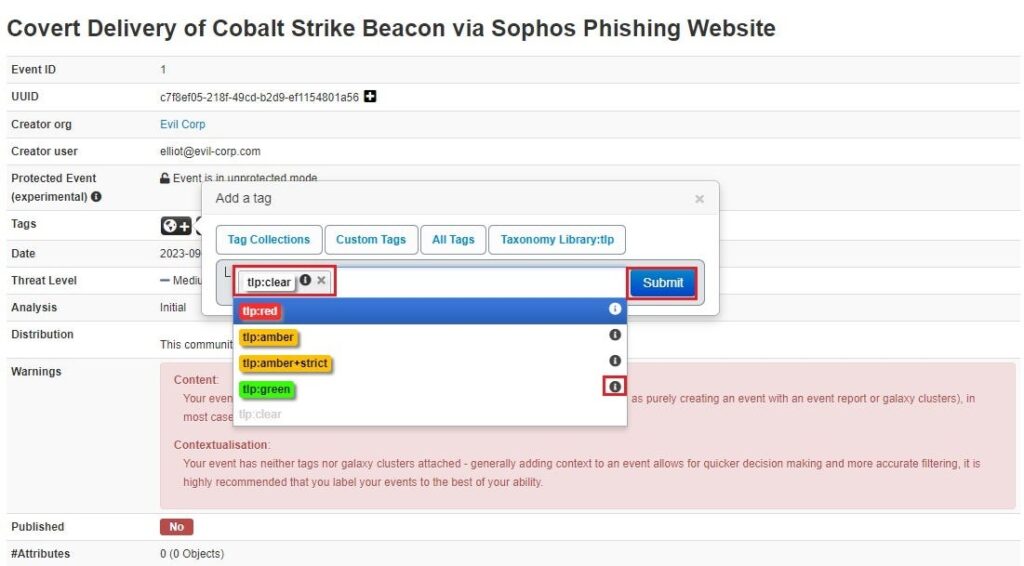
Select a tag you want to add (you can hover over it to reveal a description of your selection) and click Submit to add the tag.
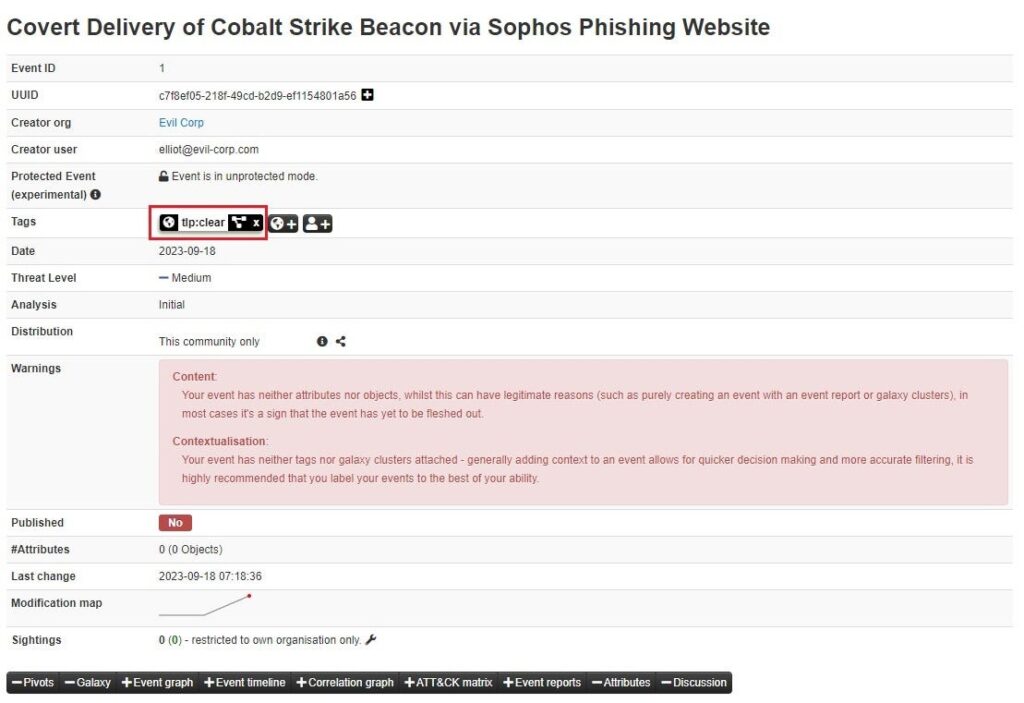
This tag will now follow this Event. It will be attached to it when it’s shared, searched, or edited in the future. Tags are useful for filtering for certain Events be it Events you share, ingest, or export in MISP.
Adding Galaxy Clusters
You can attach a MISP galaxy as a cluster to add more context to an Event. Galaxies allow you to describe an Event using shared threat intelligence frameworks or standardized lingo. For instance, you can add the name of malware seen in an Event, map the Event to MITRE ATT&CK technique, or add a threat actor.
The Event we’re describing is a threat intelligence article that details how a phishing domain is impersonating a legitimate Sophos domain to lure victims into downloading malware (a Cobalt Strike implant). You can map this to the MITRE ATT&CK matrix and the Cobalt Strike malware.
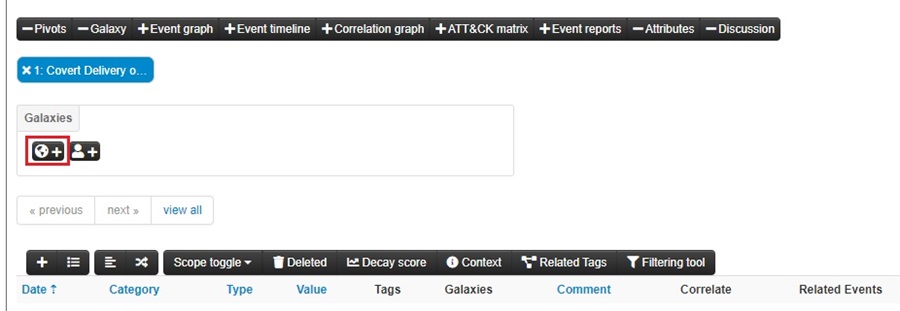
To map it to the MITRE ATT&CK matrix, select the Add new cluster button (world icon) in the Galaxies section.
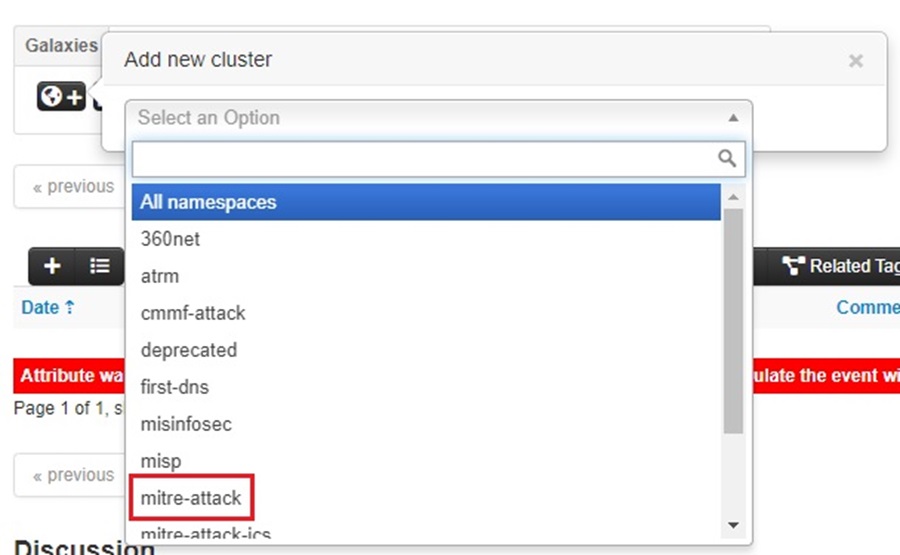
Select mitre-attack from the dropdown list.
Then click on the list icon next to Attack Pattern.

Here, you can begin typing in the MITRE ATT&CK techniques you want to add to the incident (e.g., T1059.001). Type the technique’s number, select it, and then type another technique number. Once you have selected all the techniques you want to add to the cluster, click Submit.

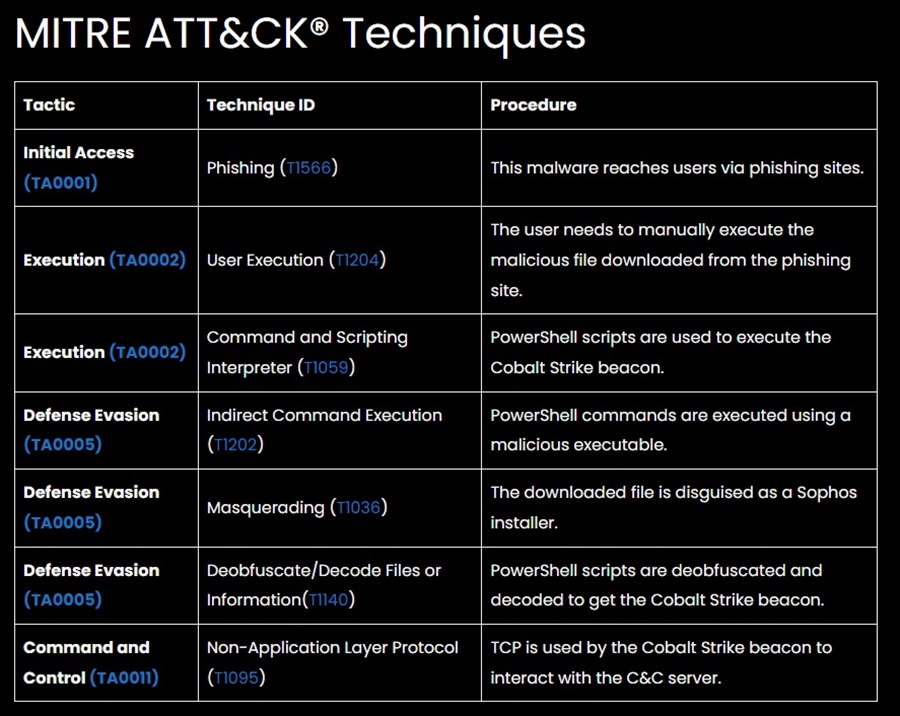
The article we are adding to MISP lists the MITRE ATT&CK techniques towards the end of the article (this is common for threat intelligence articles).
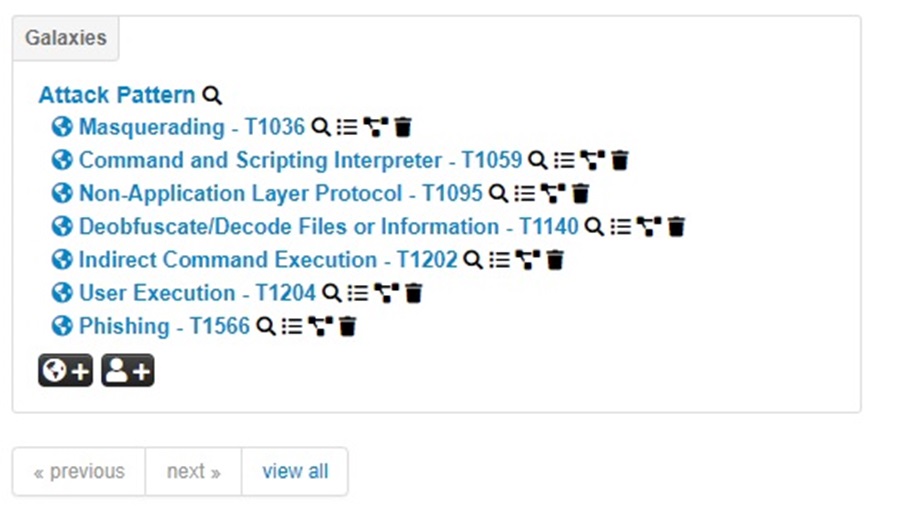
Once you have added all the techniques and clicked Submit, you will see them populated in the Event view.
To add the Cobalt Strike malware to the Event, select the Add new cluster button (world icon) again. Now, select the misp option from the dropdown menu.
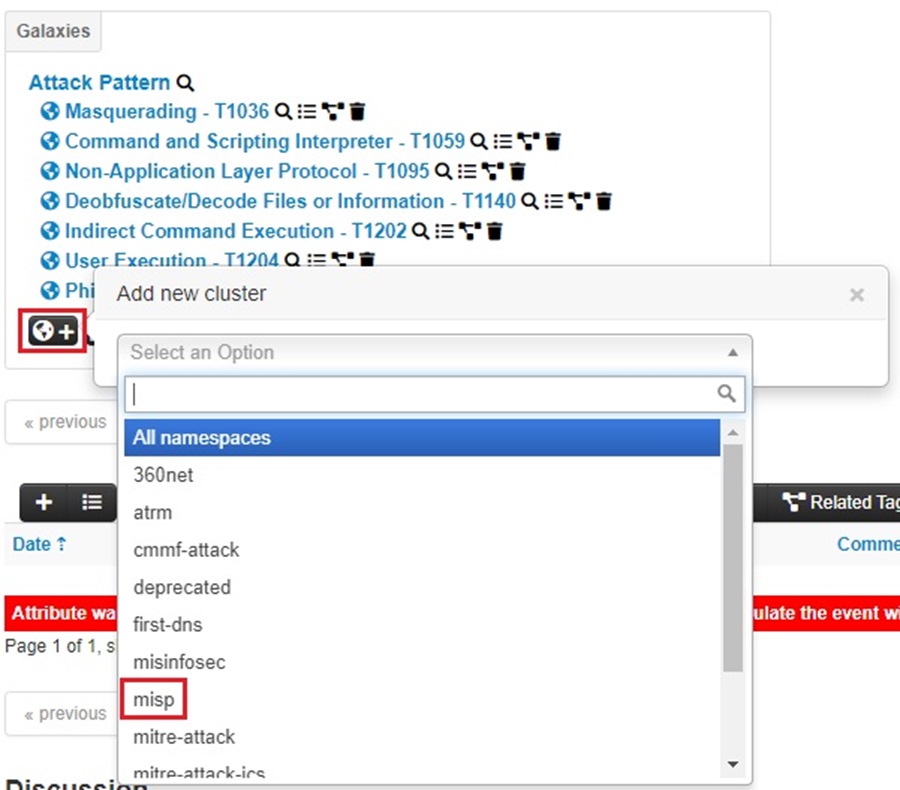
Then select the Malpedia cluster and search for “cobalt strike.” Once you find it, click on it to select it and press Submit.

You will see this MISP galaxy cluster added to your Event.
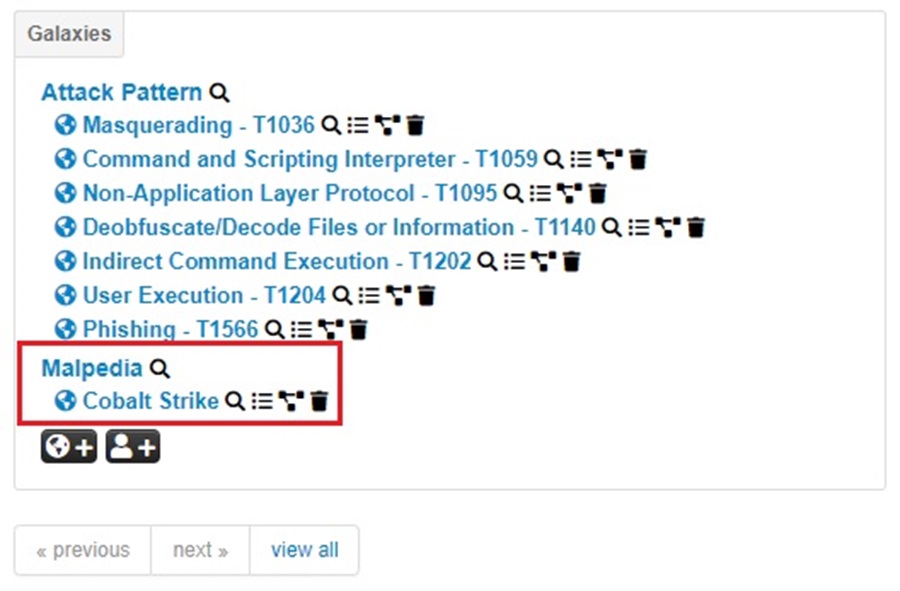
Adding contextual information to MISP Events is a great way of mapping out common threats you are facing, be it MITRE ATT&CK techniques, threat actors, malware, or anything else.
Adding galaxies to Events adds a hidden tag to the Event in the background. This lets you filter and search for Events based on your added galaxy information.
Populating an Event
Once you have created an Event and filled out the meta-data, you can begin populating it with intelligence. There are several options for adding data to an Even. You can do it automatically, which we will take a look at later, or manually using MISP attributes and objects. The automated methods ultimately add either MISP attributes or objects under the hood, so let’s look at these and how to add each manually before jumping to the automated methods.
Adding MISP Attributes
MISP attributes are atomic pieces of intelligence, such as network indicators (e.g., IP addresses, domains, URLs), system indicators (a string in memory, a file hash, etc.), or even a Bitcoin wallet. An attribute will have a type that describes it and an overarching category that puts it in context (making it intelligence rather than just data). You can add the Intrusion Detection System (IDS) flag to an attribute to determine if an attribute can be automated (such as being exported as an IDS ruleset or used for detection).
If the IDS flag is absent, the attribute can be useful for contextualization only.
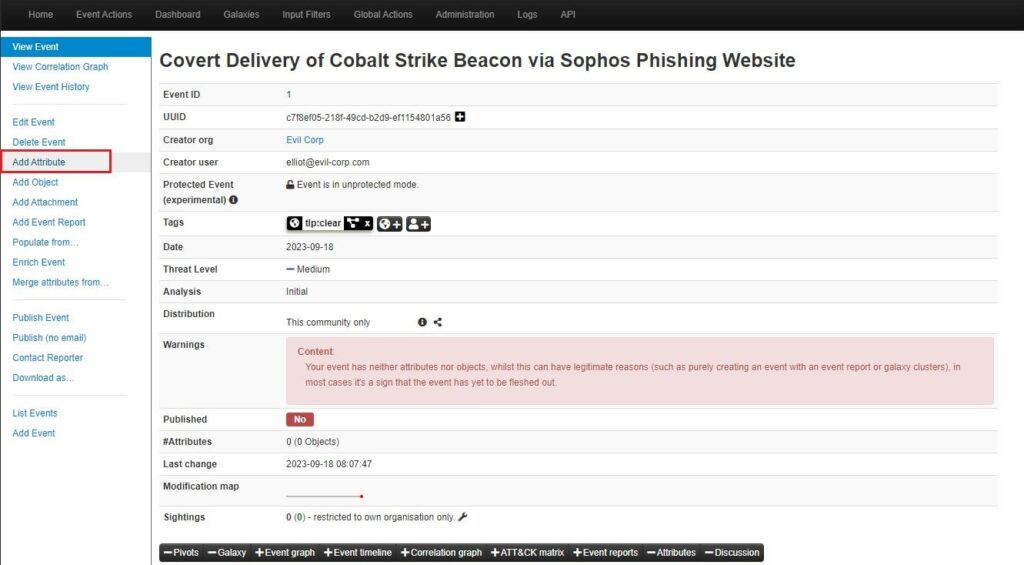
To add an attribute to an Event, select the Add Attribute button from the left-hand menu.
You can then fill out the Add Attribute web form to provide context to the attribute you add. First, choose what Category the attribute falls under, then choose the Type of attribute and how you want to share this attribute (Distribution). You can then copy and paste the Value across.
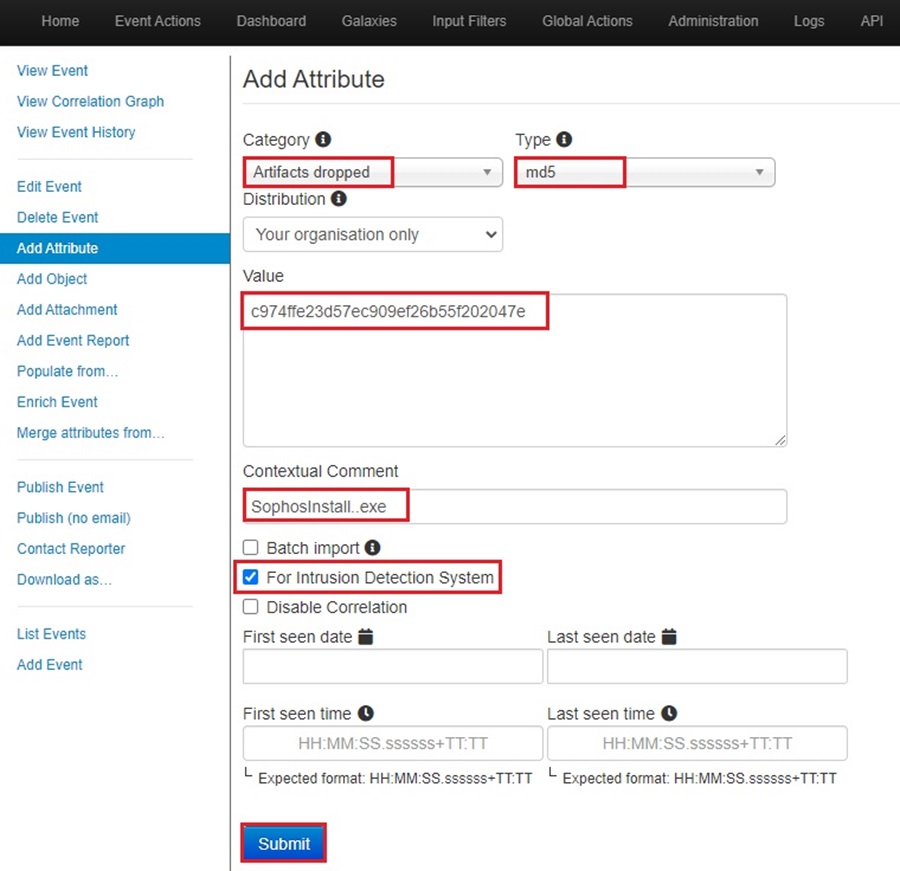
You can upload more than one attribute at a time (so long as they fall under the same Category and Type). Select the Batch import option and separate each attribute on its own line in the Value field.
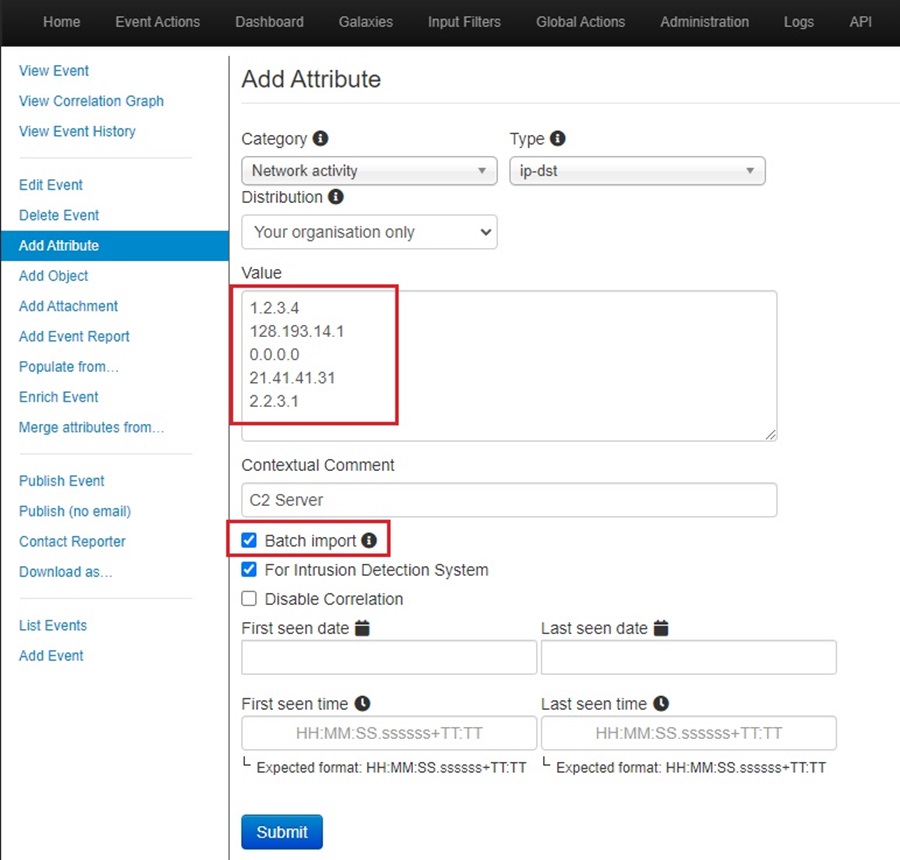
Ticking the For Intrusion Detection System checkbox will allow you to export this attribute and upload it to a security solution to alert or block. You can also add time information to an attribute. If you are unsure of what any of the options in the form represent, hover over the Information icon.

When you are done filling out the attribute details, click the Submit button. This will add the attribute(s) you created to the MISP Event. Scrolling down the View Event page, you can see these attributes listed. You can add attributes directly from this view by clicking the Add attribute button (+ icon) here.

There are many attribute types in MISP, and I recommend checking them out to see which best describes the intelligence you are uploading to the platform.
Adding MISP Objects
MISP objects allow you to combine related attributes together to provide more context to a piece of threat intelligence. Objects, and their associated attributes, are based on real cyber security use cases and existing practices in information sharing. They can be shared like attributes, and you can even create your own.
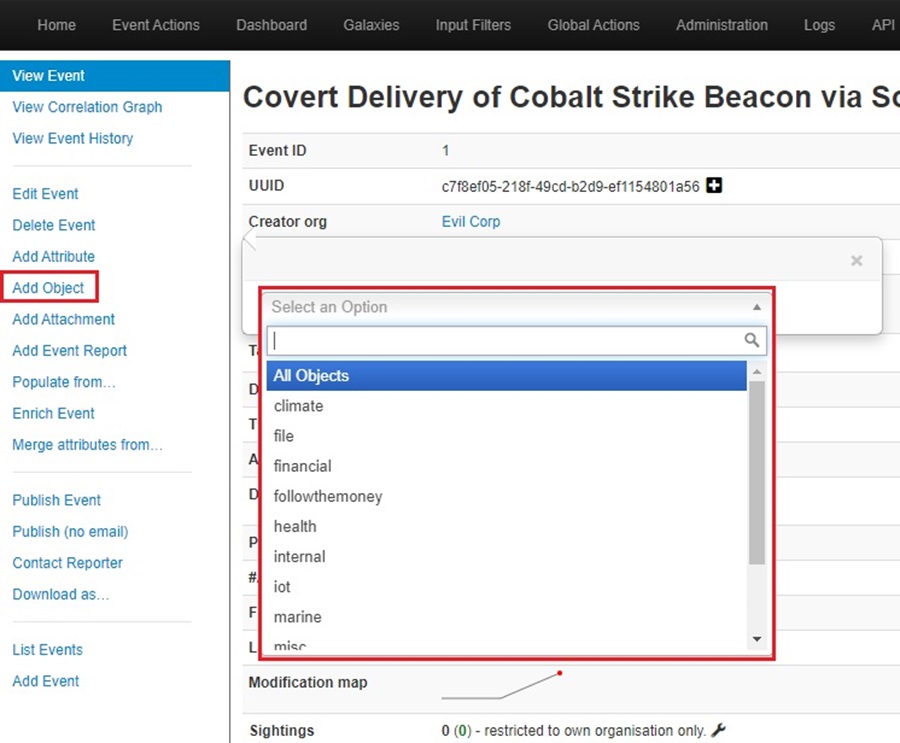
Click the Add Object button from the left-hand menu to add an object to an Event. This will bring up a popup window where you can select the object category you want to add from a drop-down menu.
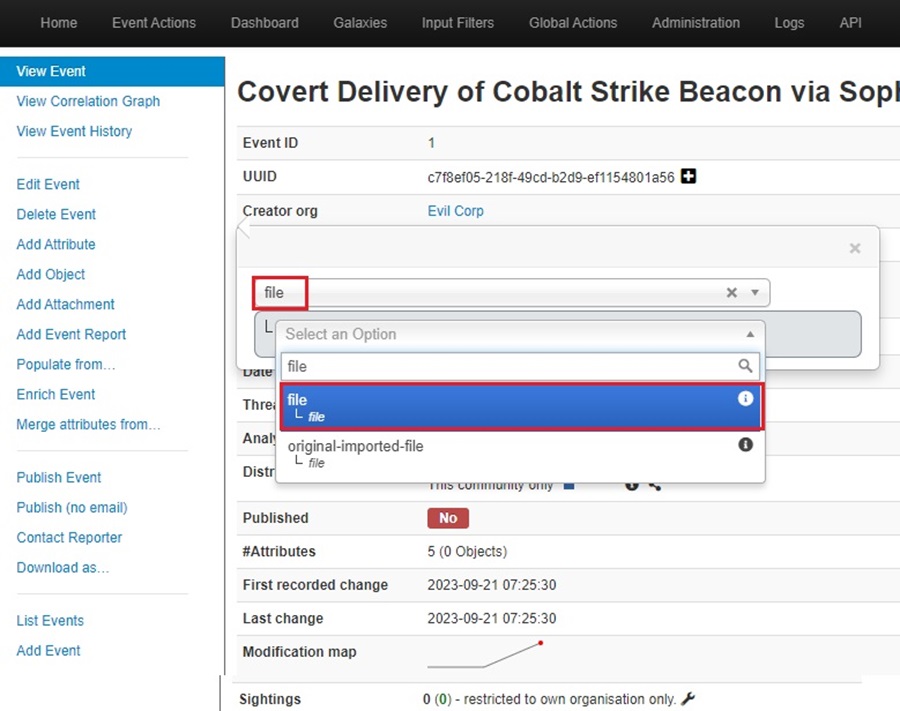
Once you select an object category, you can select the object type from another drop-down menu. Hovering over the information icon will reveal details about the type of object you are selecting. Here I will select “file” for a malicious file dropped on disk:
You will then be asked to complete the object web form about your selected object. This form includes several attributes that relate to the object you chose. The “file” object has attributes like hashes, the filename, encoding, attachments, and more. These let you thoroughly describe the malicious file and provide context to analysts using MISP. That said, you don’t need to fill out all these fields.
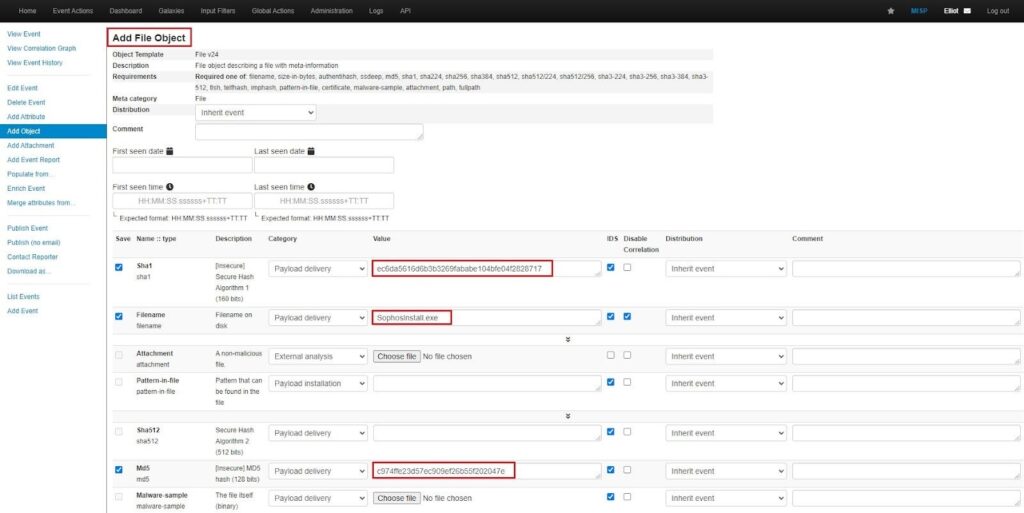
When you are finished filling out the form, click Submit. You will then be asked to review and confirm your selections by clicking Create a new object.

Once confirmed, you will see the new object in the Event View screen. The attributes associated with one another are grouped together as an object.
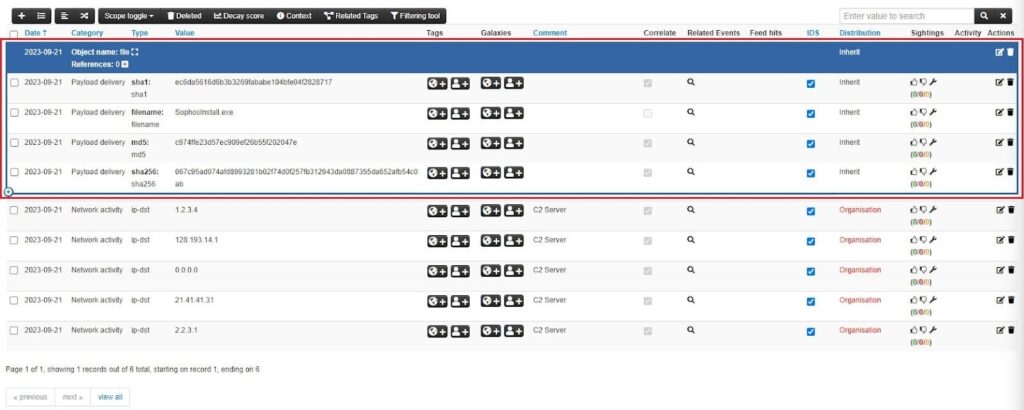
Similar to attributes, there are many types of objects in MISP. I recommend checking them out to see which best describes the intelligence you upload to the platform.
A Summary of Events, Attributes, and Objects in MISP
To get a better understanding of how MISP Events encapsulate attributes and objects, here is a diagram that illustrates how each related to one another.
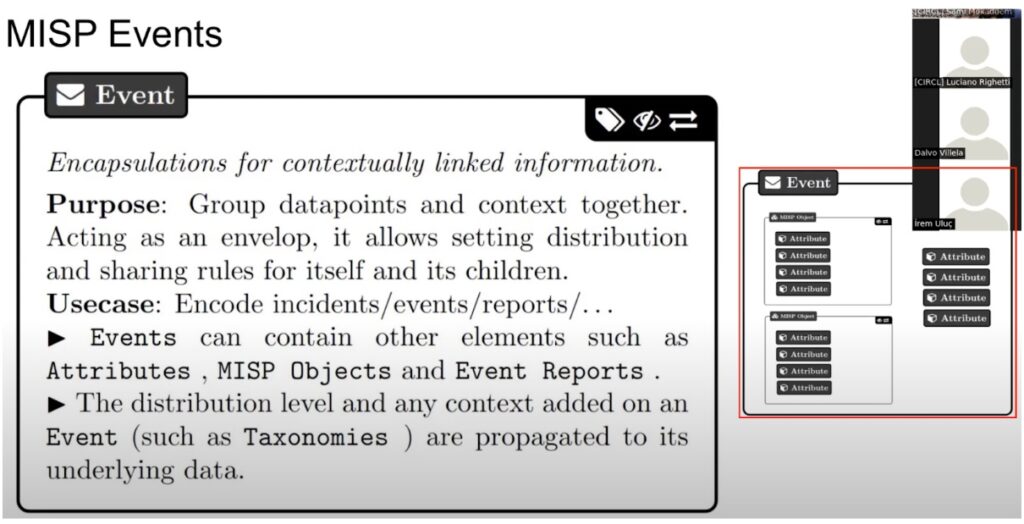
MISP Events are comprised of attributes and objects, while objects are made up of just attributes. This means you can have Event-level attributes which are attached to Events, and Object-level attributes which are attached to objects. Objects are used to provide more context to Events and are the recommended component to add to Events where possible.
“Some attributes like filename|sha512 and ip-dst|port now have equivalent objects such as file and ip-port. Using the object equivalent of attributes is recommended. It gives flexibility to add more context later and groups all the relevant attributes related to one concept, for example a file, together.” – MISP Documentation Best Practices
Automated Data Upload
Although you can create objects and attributes manually, MISP offers easier ways to add intelligence to an Event.
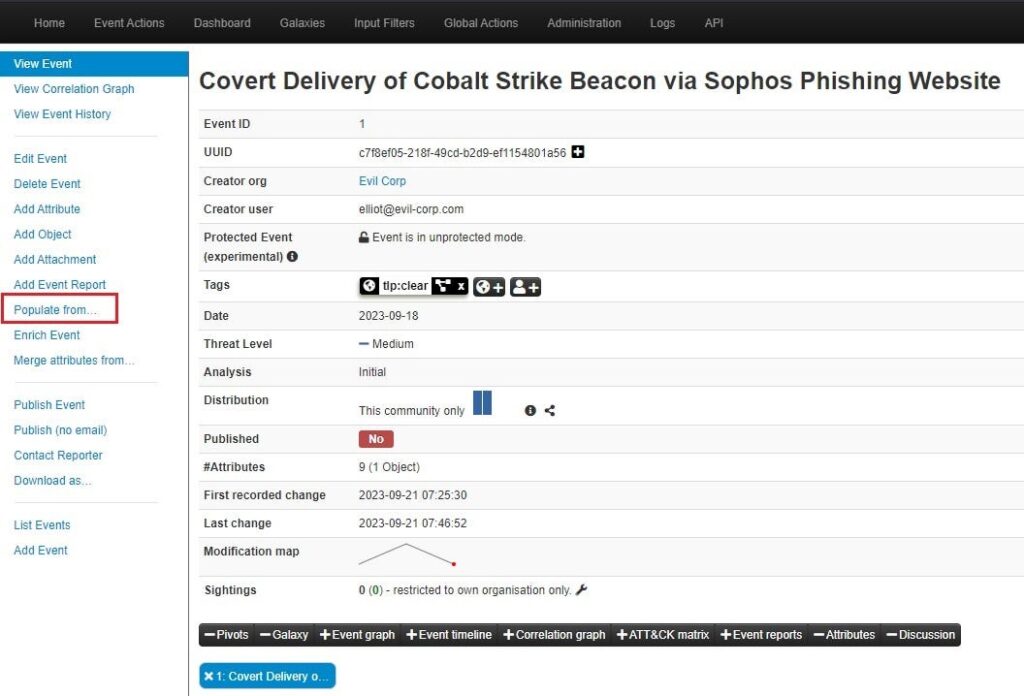
Select Populate from in the left-side menu brings up a popup window where you can choose to populate the MISP Event using automated methods.
These automated methods include:
- Populate using a JSON file containing MISP event content data: Populate using blob of JSON data containing MISP Event elements (e.g. attributes, objects, tags, galaxies, etc).
- Freetext Import: Quickly generate attributes from a list of indicators.
- Populate using a Template: Use a custom template to rapidly populate an Event with specific information by filling out a series of pre-defined fields.
- OpenIOC Import: Populate an Event by importing data from an OpenIOC (.ioc) file.
- ThreatConnect Import: Populate an Event by importing data from a ThreatConnect export csv file.
- (Experimental) Forensic analysis – mactime: Import SleuthKit machine timelines (mactime) to MISP directly.
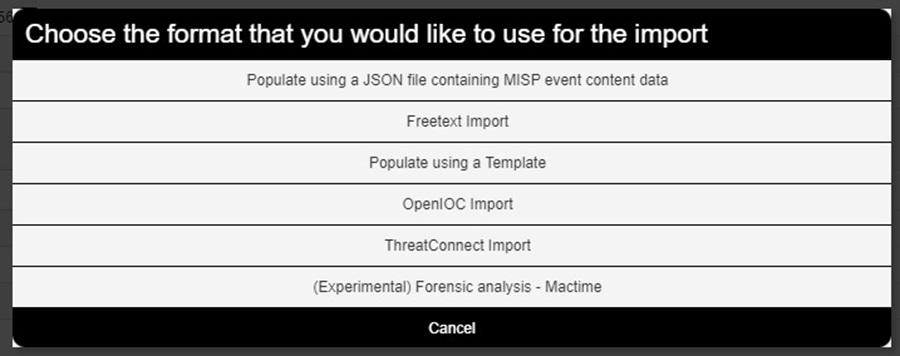
The two most common import methods you are likely to use are Popuate using a Template which lets you use a custom template to make it easier to upload attributes to MISP, and the Freetext Import. Let’s take a look at the Freetext Import tool.
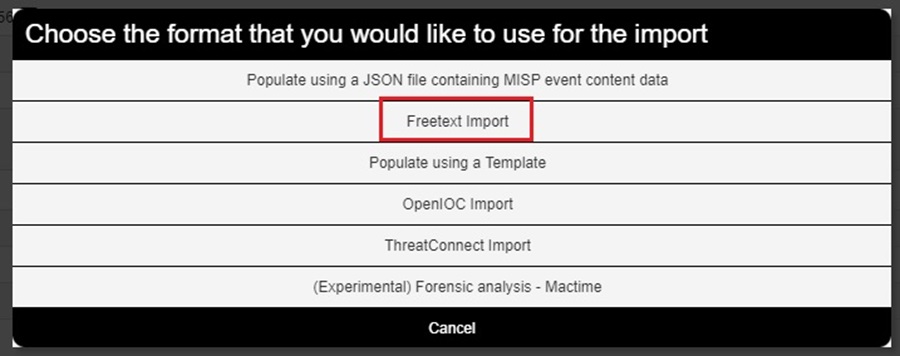
Selecting the Freetext Import option will bring up the tool’s popup window. Here you can simply copy and paste a list of Indicators of Compromise (IOCs) from a threat intelligence report into the tool and the tool will do the hard work of parsing them into the correct MISP attributes for you.
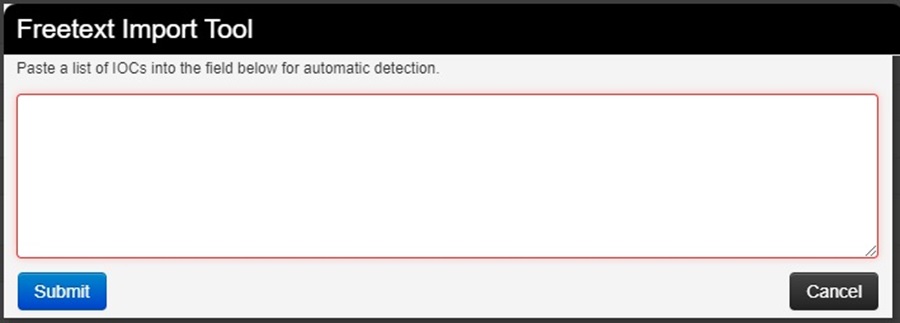
IOCs are the most basic way of detecting a threat, but they still play an important role in automatically blocking or alerting on mass-malware campaigns that is target lots of companies.
You can learn more about IOCs and better detection methods in Elevate your Threat Detections using the Almighty Pyramid of Pain.
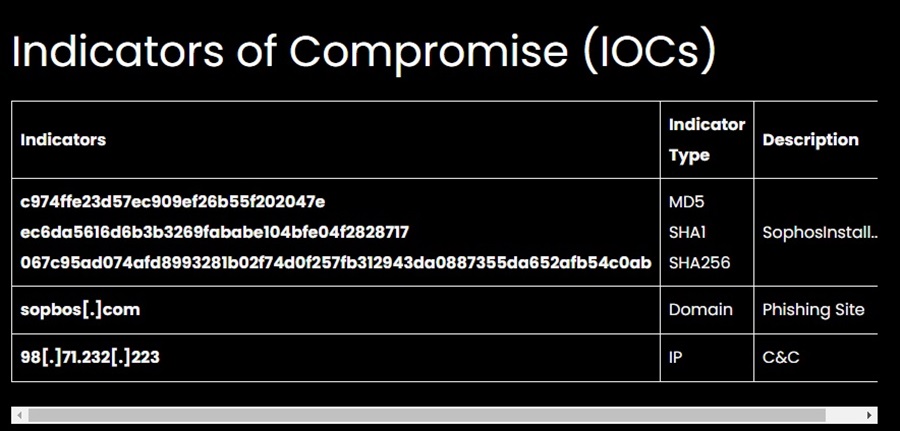
You can usually find IOCs at the end of a threat intelligence report where they are nicely summarized in a table, such as in our Cyble article on phishing websites:
Copy and paste the IOCs into the Freetext Import tool and click Submit:
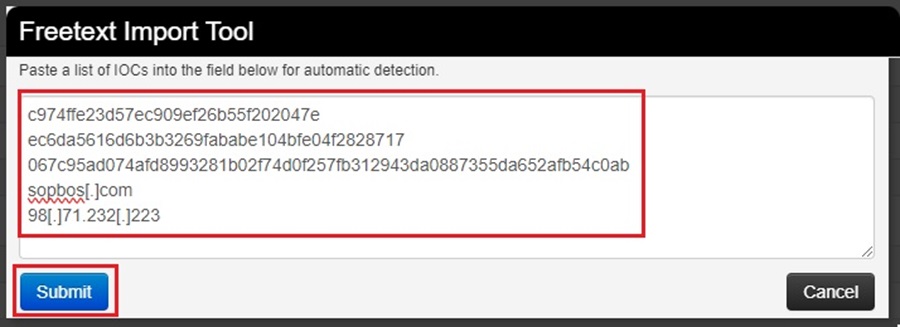
The Freetext Import tool will parse these IOCs into legitimate MISP attributes. However, it might not get it right every time. As such, the tool lets you change your attributes before adding them to your Event in a review screen.

You can see in the image below that the tool has missed the “sopboas[.]com” domain. To recognize top-level domains (TLDs), like .com, you need to add the “TLDs as known by IANA” list so the tool can recognize TLDs (see the red warning message).
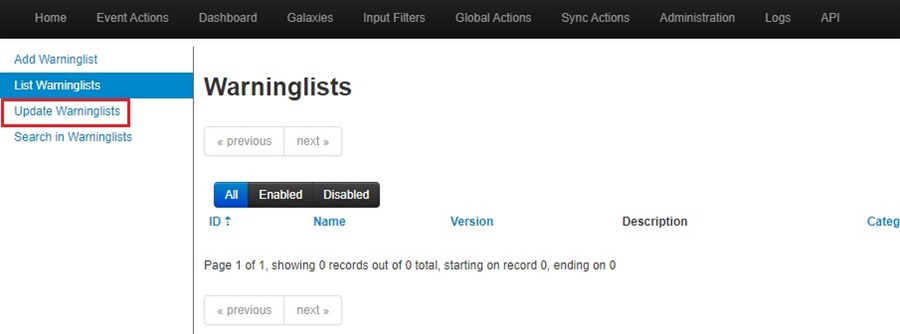
Login to MISP using the admin account, go to Input Filters > Warninglist:

Click the Update Warninglists button.
This will populate the Warninglists page with all the default MISP warninglists. From here, you need to enable the “TLDs as known by IANA” list by clicking on the Enable button (play icon) under the Actions column.
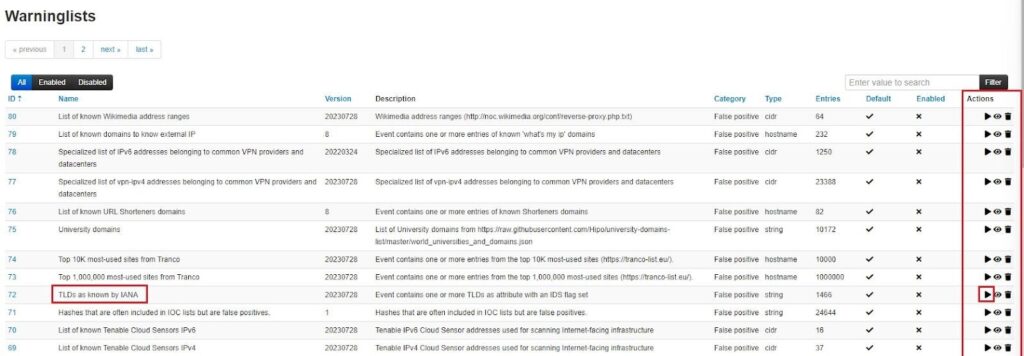
Once enabled you will see a tick in the Enabled column and you can try importing those IOCs again. This time the “sopboas[.]com” domain is recognized.

Clicking the Submit attributes button will add the attributes to the MISP event, which you can then view on the Event View page.

MISP’s Freetext Import option is a powerful tool that makes it very easy to upload a large number of IOCs in one go, rather than having to manually upload individual attributes or objects. The tool also lets you customize how attributes are uploaded. For instance, you could have created a file object out of those file hashes to link them to the same filename using the Create object button. I highly recommend using this tool, or creating a custom template, when uploading data to MISP.
Summary
In this installment of the series you got to see how to add threat intelligence to your MISP instance. You discovered what Events are and how they are used in MISP. This included adding tags and galaxy clusters to provide context to the threat intelligence you uploaded, as well as seeing the various automated ways of populating an Event with data (IOCs). We concluded by learning about MISP’s powerful Freetext Import tool, which lets you easily upload a large number of IOCs in one go and automatically parses these into MISP attributes for you.
The next installment in this series will look at getting even more threat intelligence into your MISP instance using automation through the power of MISP Feeds. Stay tuned to learn more!
Discover more in the Threat Intelligence with MISP series!

