Welcome back to this series on using MISP for threat intelligence!
MISP (Malware Information Sharing Platform and Threat Sharing) is an open-source threat intelligence platform that allows you to share, collate, analyze, and distribute threat intelligence. It is used across industries and governments worldwide to share and analyze information about the latest threats. This series aims to give you the knowledge you need to get up and running with MISP as quickly as possible.
If you have followed this series, you will now have events and attributes (IOCs) in your MISP instance. Today, you will learn how to search and filter this data to find what is relevant to you. You will see how you can perform a basic search, use more advanced filtering options, and perform these actions on MISP vents and attributes.
Let’s get started using our finding data!
Searching Events
MISP events are “encapsulations for contextually related information represented as attribute and object.” They can be threat intelligence articles, malware analysis reports, threat research, or any other way you imagine representing threat intelligence. Events are the individual containers that group your atomic pieces of threat intelligence with contextual information so analysts can actually use it. They are the main way of interacting with data in MISP.
Once you have created events manually or enabled a feed and added them to your MISP instance automatically, you need a way to search through them to extract relevant information. You will find yourself searching through MISP events when performing incident response, threat hunting, or security research activities to provide context to your investigations.
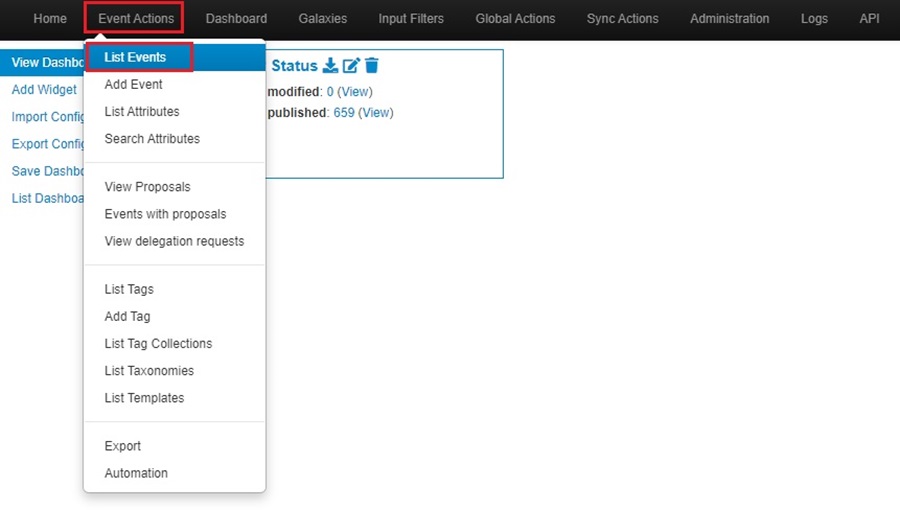
The easiest way to look up events stored in your MISP is through the search bar on the Events page. Go to Event Actions and click on List Events to get to this page.
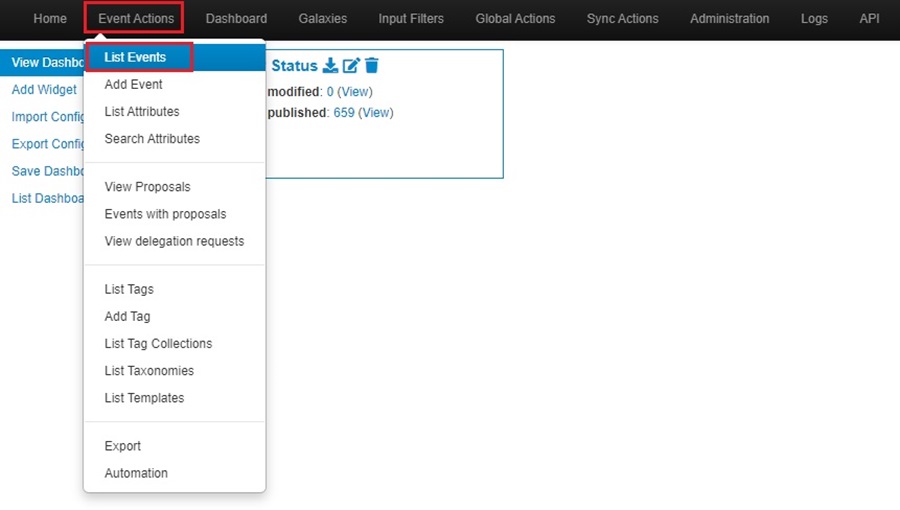
The Events page had a builtin search bar which you can use to filter for events in your MISP instance.
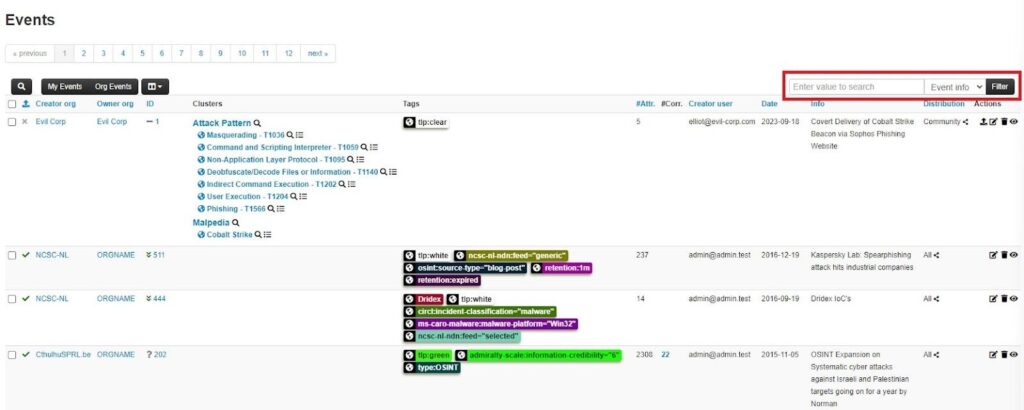
You can search any of the following fields by using the dropdown menu next to the search bar:
- Event info: The short description of an event.
- All fields: All the general event information fields (ID, UUID, organization, tags, date, threat level, analysis, distribution, info, and published).
- ID / UUID: The unique identifier associated with an event.
- Tag: Tags associated with an event.
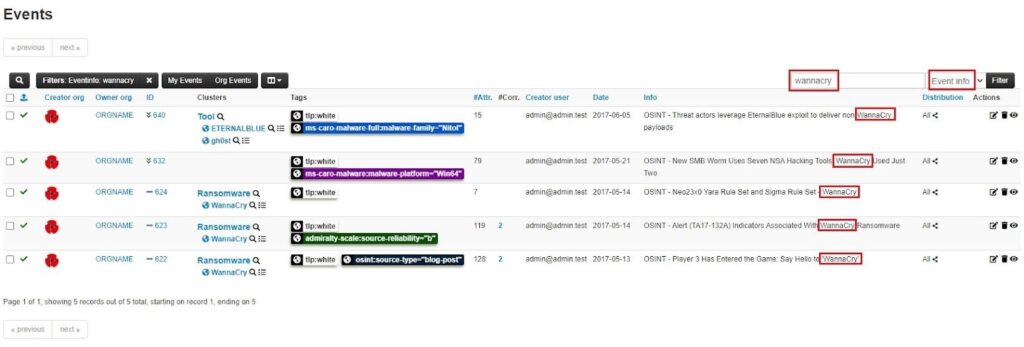
Here, I have searched the Event info field for the notorious “wannacry” ransomware, and several events have matched.
Filtering Events
Locating events through the search bar has its limitations. The options you can search through are limited, and you do not have the ability to search using more than one filter. A more powerful option is MISP’s Filter Event Index popup window. This popup window provides granular control of your event search by allowing you to add multiple filter rules and boolean logic. Let’s see how!
Navigate to your MISP Events page as before by going to Event Actions and clicking on List Events.
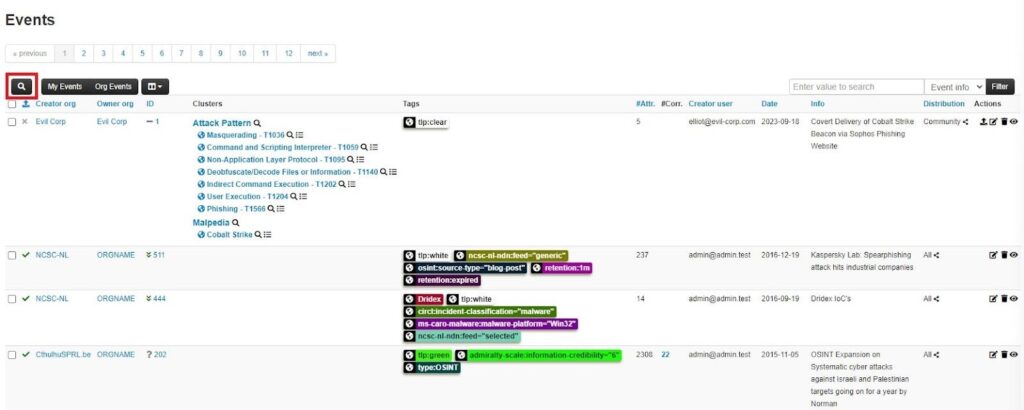
To access the Filter Event Index popup window, click on the Modify filters button (search icon).
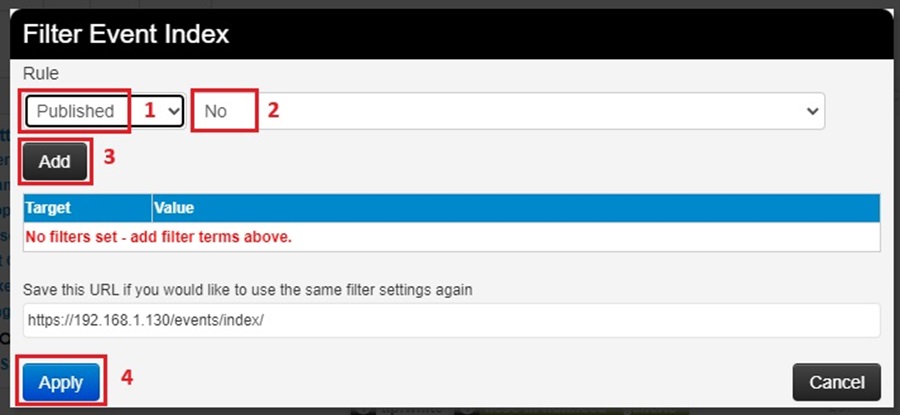
This will bring up the popup window. You can then add rules and create boolean logic to create a powerful filter.
First, select what field to filter on using the dropdown menu. This is a much more extensive list than the search bar provided before. Next, apply the boolean logic using the dropdown menu to the right of the field (this is dynamically populated with options based on your MISP instance). Then click the Add button to add this rule to your filter. Click Apply to run the filter.
What makes this filtering feature powerful is its ability to apply more than one rule at once. You can keep adding as many rules as you want to your filter. Here, I have added several rules:
- Filtered for Published events
- Filtered for events with the tag OSINT
- Filtered for events with a High Threat Level
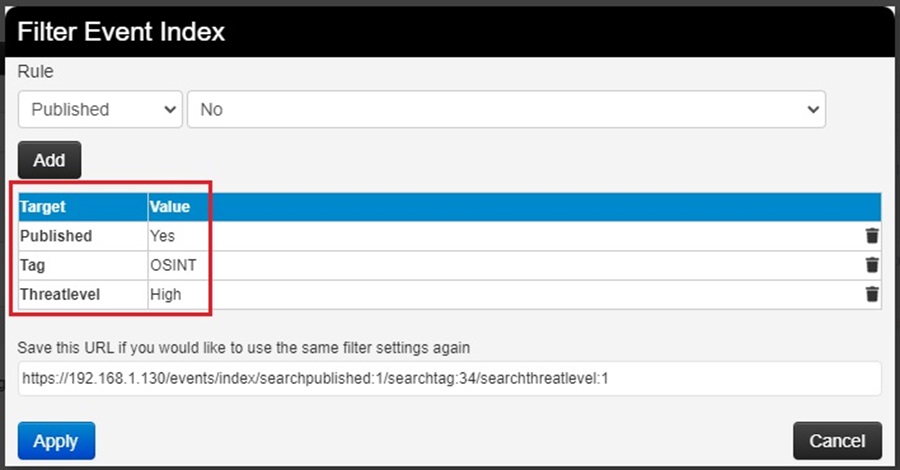

You can use the Delete filter button (bin icon) next to a rule to remove it from your filter, and if you want to reuse a filter, save the dynamically generated URL at the bottom of the popup window.
Searching Attributes
MISP attributes are atomic pieces of intelligence, such as network indicators (IP addresses, domains, URLs), system indicators (a string in memory, a file hash, etc.), or even a Bitcoin wallet. They are usually used to represent Indicators of Compromise (IOCs) that are associated with a larger piece of threat intelligence (MISP events).
Once you have created events manually or enabled a feed and added them to your MISP instance automatically, you will have attributes associated with these events. During your incident response, threat hunting, or security research activities, you will need a way to search through these attributes to find IOCs related to your investigation. This usually involves providing more context to an IOC you find so you can make an informed decision about the next steps in your investigation.
To search for attributes stored in your MISP instance, click on Event Actions and select the Search Attributes option.
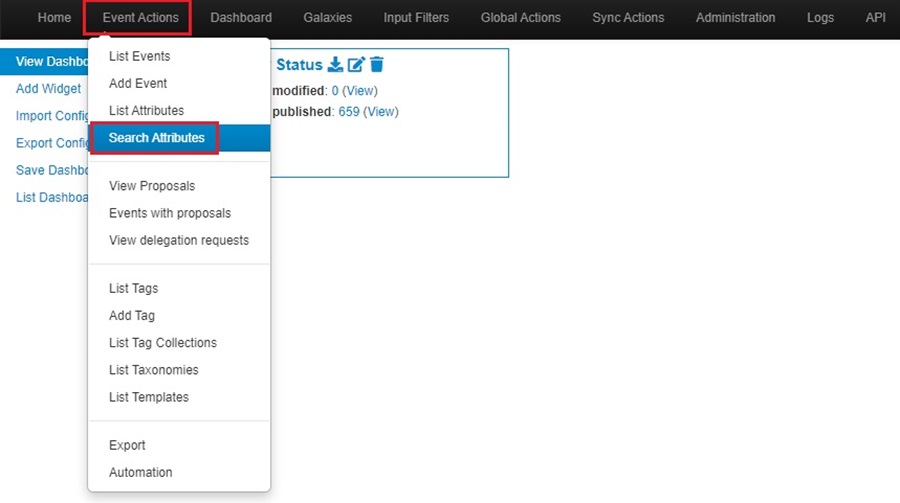
This will take you to the Search Attribute web form, which you can use to search for attributes.
First, provide an attribute expression (i.e., an IP address, domain name, file hash, etc.). Then, add any tags or event IDs/UUID associated with the attribute and an organization the attribute is related to. Next, you can fill out the Type and Category the attribute is associated with (i.e., ip-dst and Network activity for an IP address or sha256 and Artifacts dropped for a malicious file). Finally, you can select if you want to search for attributes that are flagged for IDS (are compatible with an automated Intrusion Detection System) and any time-related information.
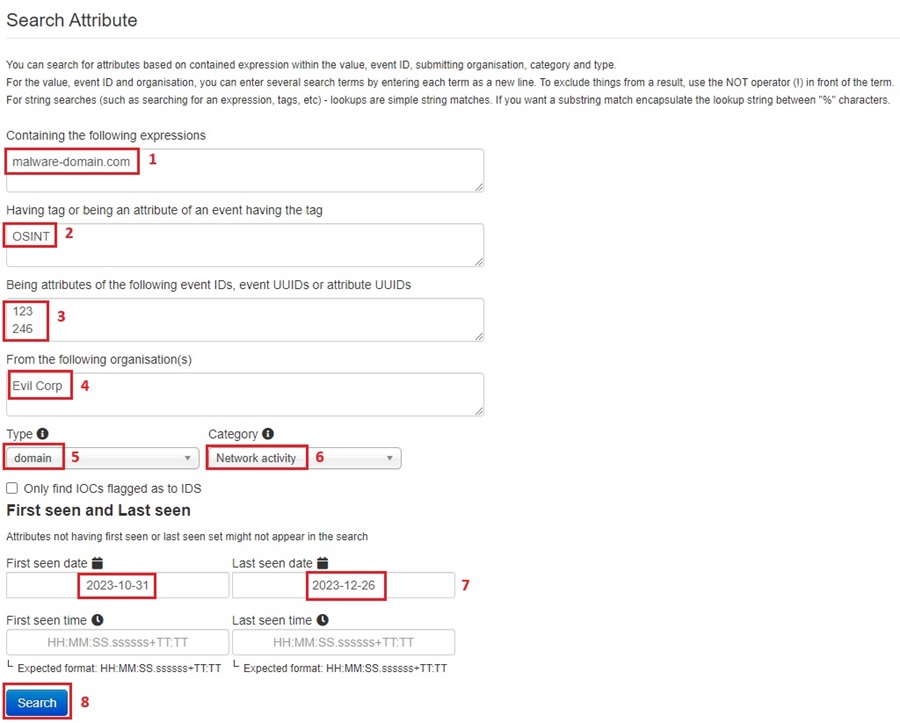
The Search Attribute web form provides you with a lot of control over searching for attributes. However, you usually don’t need this level of power, and you can simply provide an attribute’s expression (an IOC value) and search for it across your entire MISP database, leaving the other fields as their defaults.
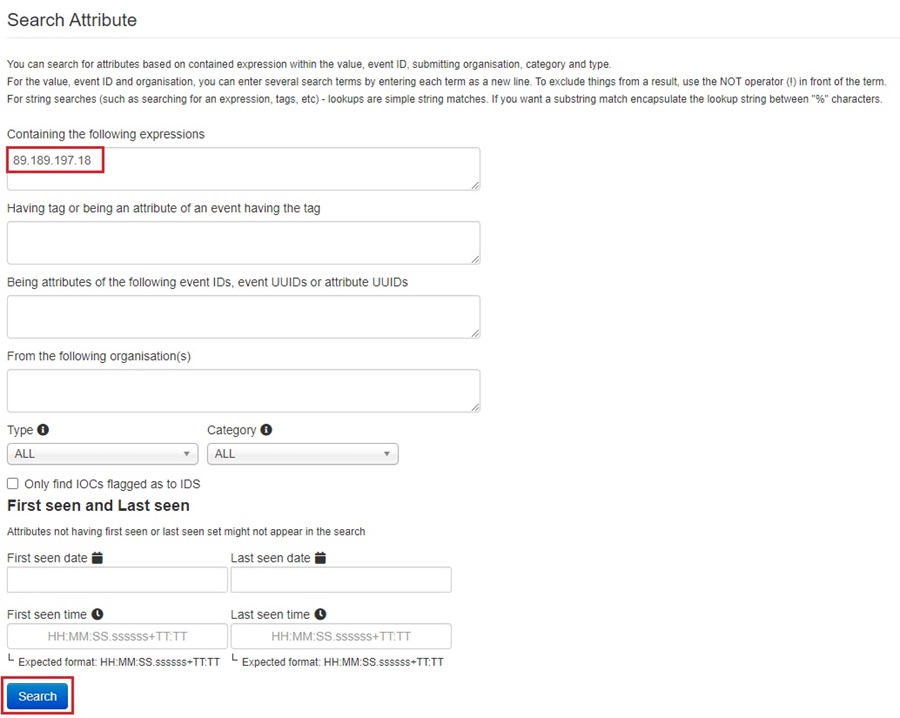
Once you click Search, the query you created will be run, and MISP will redirect you to the List Attributes page, where the results of your search will be shown.

Summary
You should now know how to search and filter both events and attributes that are stored in your MISP instance. This is an essential skill when investigating incidents, performing threat hunting, or correlating your security research activities. That said, using MISP’s default web interface to search for events and attributes can be time-consuming and tedious. Surely there is a better way!
The next installment in this series will introduce you to a better way. We will dive into MISP’s Application Programming Interface (API) and explore how to use it to interact with your MISP instance programmatically. You will see how to create basic Python scripts that can automate your day-to-day MISP activities. Stay tuned!
Discover more in the Threat Intelligence with MISP series!

