Welcome back to this series on using MISP for threat intelligence!
MISP (Malware Information Sharing Platform and Threat Sharing) is an open-source threat intelligence platform that allows you to share, collate, analyze, and distribute threat intelligence. It is used across industries and governments worldwide to share and analyze information about the latest threats.
This series aims to give you the knowledge you need to get up and running with MISP as quickly as possible. Today you will learn how to install and set up MISP. You will discover the various installation methods available, which is best, and how to configure your MISP instance to begin ingesting threat intelligence.
Let’s get started building our MISP instance!
Installation Methods
MISP can be installed in various ways. You can test it out using a virtual image, run it bare metal using the open-source code on GitHub, or install it using a Docker container. Let’s look at these three methods and which is right for you.
You can also install MISP using Vagrant, Puppet, Ansible, RPM, or as an AWS cloud image. For more information on these installation methods, visit the MISP Project’s Download page.
Testing MISP as a Virtual Machine Image
If you want to test MISP without going through the pain of installation, you can download a VMware or VirtualBox image directly from https://vm.misp-project.org/. The MISP team creates a new virtual machine image at each MISP core commit so you can try it out.
However, these images are for testing purposes only and should not be used in production. They lack a thorough security review, do not come with the latest MISP modules, and are difficult to integrate into a production workflow.
I found the VirtualBox image great for understanding MISP and what it can do. It was a stripped-down experience that was hard to integrate with other tools or workflows. If you want to experience MISP quickly, this is a great installation method, but if you want the full experience continue reading.
Installing MISP Bare Metal
MISP is a relatively old project. It started back in 2011 as a way to share information about malware. Since then, it has grown into a threat intelligence platform used worldwide by everyone, from independent researchers to large multinational organizations. The original way of installing MISP in production was by cloning the open-source GitHub repository and executing a bash script on a Ubuntu machine.
This is still a popular installation method today, and you can find details about how to install MISP this way at https://misp.github.io/MISP/. That said, when I tried to install MISP this way, the installation script was buggy and it required manual debugging and re-writing of the script to get a usable version of MISP, which brings me to my preferred method.
Installing MISP With Docker
In the age of DevOps, there is a much better (easier) way to install MISP than the buggy bare metal way. Through the power of Docker (a platform for creating, deploying, and running applications inside containers), you can spin up a MISP instance in a few commands!
If you don’t know what Docker is, I highly recommend taking the time to learn it. For now, just follow the walkthrough below. It will provide you with a step-by-step guide to setting up MISP using Docker for you to follow along with.
Docker is my favorite installation method for any new software I run. It lets you easily control applications, run multiple applications on a single machine, and create virtual networks so applications can securely interact with the outside world. Let’s look at how to install MISP using Docker.
Walkthrough of Installing MISP With Docker
To install MISP using Docker, you need a few things:
- A Linux machine that is capable of running Docker. In this demo, I use Ubuntu Server 22.04.3 LTS. I will assume you know how to create a Linux machine on your platform of choice (e.g., VMware, VirtualBox, Proxmox, etc.)
- A Docker image of MISP. I will be using misp-docker.
- Network access to the machine you are running MISP on so you can access the MISP dashboard, run MISP modules, and ingest threat intelligence into the MISP instance. This usually means opening ports 443 and 80 and creating port forwarding rules.
Installing Docker
To install Docker on Ubuntu machines, run the following commands. First, uninstall any old versions of Docker that might be present:
for pkg in docker.io docker-doc docker-compose podman-docker containerd runc; do sudo apt-get remove $pkg; doneThen add Docker’s Apt repository:
# Add Docker's official GPG key:
sudo apt-get update
sudo apt-get install ca-certificates curl gnupg
sudo install -m 0755 -d /etc/apt/keyrings
curl -fsSL https://download.docker.com/linux/ubuntu/gpg | sudo gpg --dearmor -o /etc/apt/keyrings/docker.gpg
sudo chmod a+r /etc/apt/keyrings/docker.gpg

# Add the repository to Apt sources:
echo \
  "deb [arch="$(dpkg --print-architecture)" signed-by=/etc/apt/keyrings/docker.gpg] https://download.docker.com/linux/ubuntu \
  "$(. /etc/os-release && echo "$VERSION_CODENAME")" stable" | \
  sudo tee /etc/apt/sources.list.d/docker.list > /dev/null
sudo apt-get update
Install the Docker packages:
sudo apt-get install docker-ce docker-ce-cli containerd.io docker-buildx-plugin docker-compose-pluginFinally, verify Docker was installed successfully by executing:
sudo docker run hello-worldIf you struggle to get Docker running, visit Install Docker Engine on Ubuntu in the official Docker documentation for help.
Installing the MISP Docker Image
To install the MISP Docker image, run the following commands. First, clone the misp-docker GitHub repository:
git clone https://github.com/MISP/misp-dockerNext, change into this directory and copy the template.env file into .env (in the root directory):
cd misp-docker
cp template.env .env
Now edit the the .env file:
vim .envYou need to change the MISP_BASEURL variable to reflect the IP address of the machine you are running MISP on.
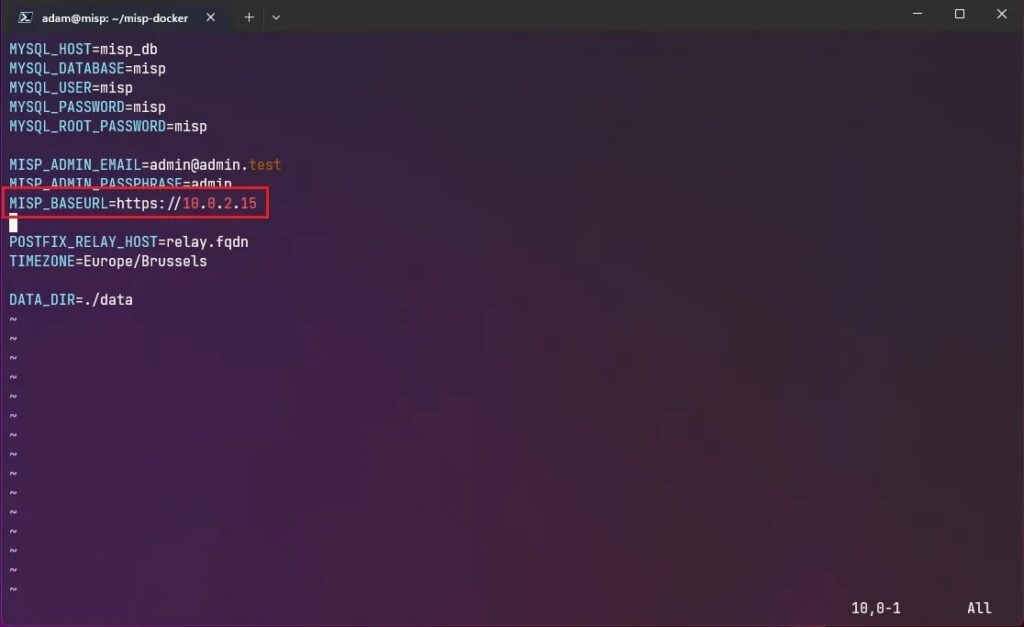
Next, build the Docker containers with the command:
docker-compose buildThis MISP Docker image contains two containers. One to run MISP’s web frontend and one to run the backend SQL database where MISP stores its data. You will see each of these containers get built once you execute the command above.
Running MISP Using Docker
Once you have built the Docker containers, you must edit the docker-compose.yml file so that you can run them. This file contains configuration information for the Docker environment you will run MISP within. Specifically, you need to edit the MISP_BASEURL variable to reflect the IP address of the machine you are running MISP on.
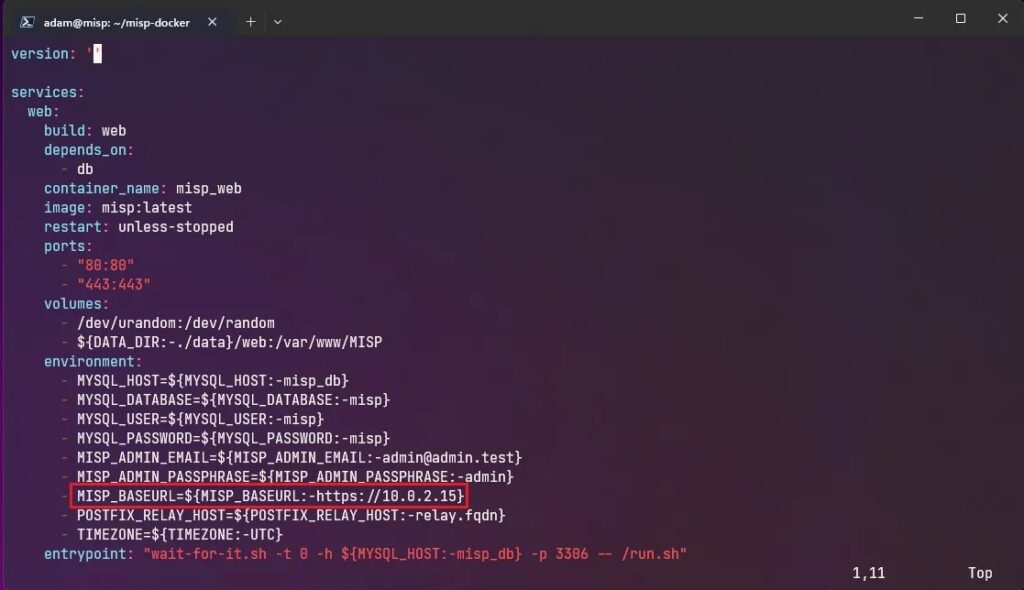
Now you have edited the MISP_BASEURL variable, you can start the Docker environment and run your MISP instance with the command:
docker-compose up -d Now you’re ready to log in to MISP and begin using it. If you ever want to to shut down the Docker environment, run the command:
docker-compose downThis MISP Docker image keeps your MISP data persistent across reboots by storing it within the misp-docker/data directory.
Logging into MISP
You can access your MISP instance on ports 80 and 443 of the machine you are running MISP on. Accept the security certificate and use the credentials [email protected]:admin to log in as the default Administrator user.
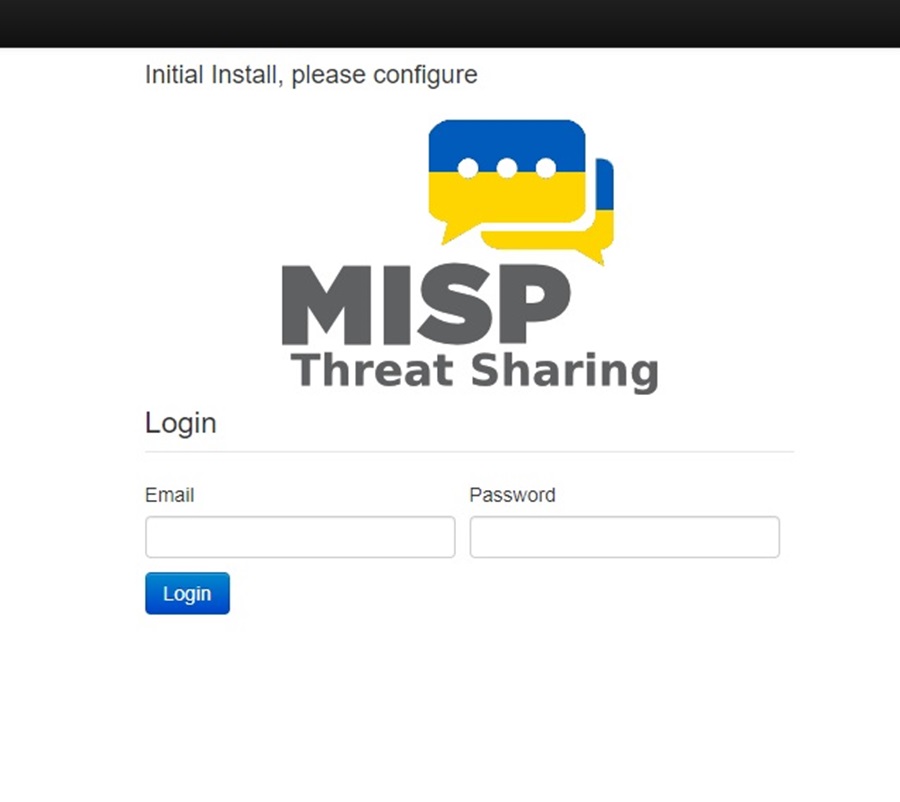
MISP’s default dashboard will greet you, and you’re ready to use the platform!
If you are running MISP from a virtual machine with a NAT network configuration, you may need to set up port forwarding on that machine to your localhost to access the MISP instance. For more information, see How to Configure VirtualBox Port Forwarding?
Setting up MISP
Once you get MISP up and running, you can begin configuring your instance. Here you will tailor it to your needs and make it your own. There are many options to configure in MISP, so I will start with the basics here but feel free to explore more in the documentation.
Changing Default Admin Password
When you first log in to MISP, you will be prompted to change the default admin account’s password to something more secure. This is the first thing you should do, particularly if you plan to use MISP in production.

Creating an Organization
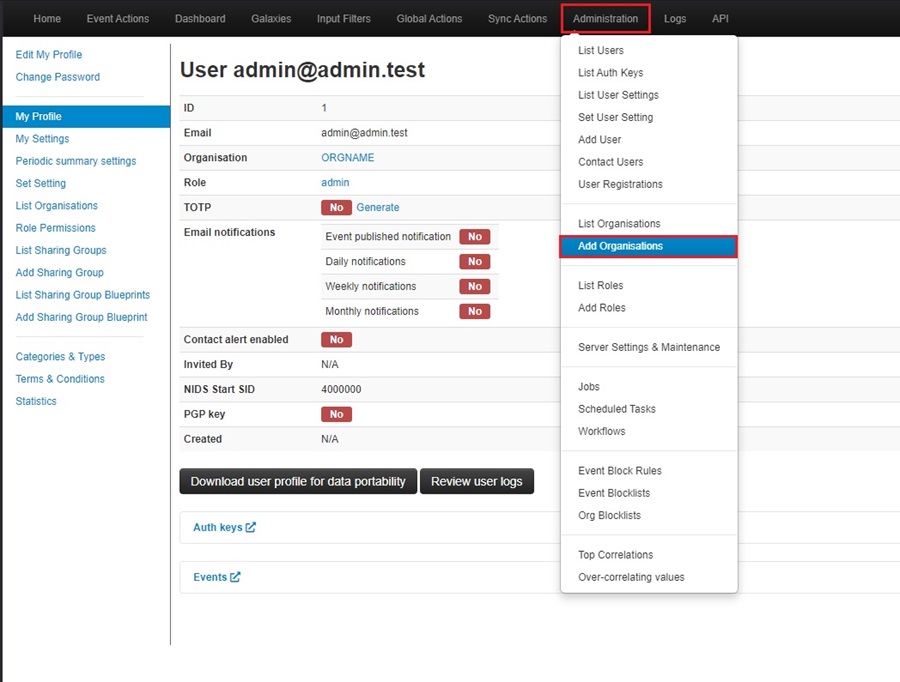
To use MISP, you need to create an organization. You can use this by going to Administration > Add Organizations.
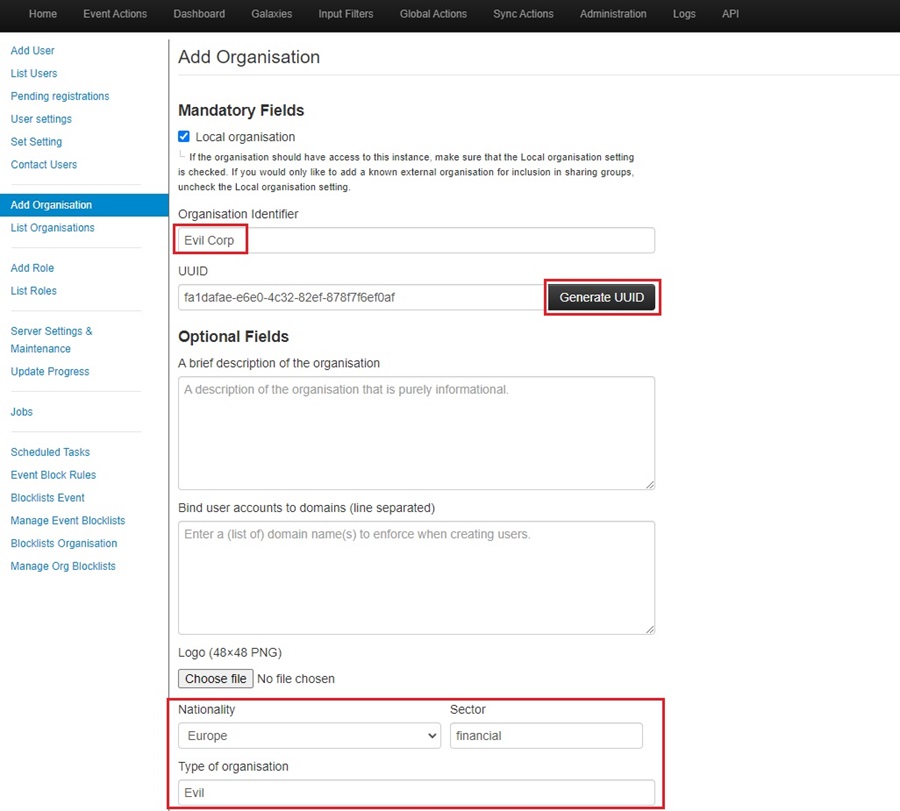
Next, fill out the details about your organization. This includes the name, description, logo, nationality, business sector, etc. Click the Generate UUID button to get a unique ID for your organization that lets MISP identify it.
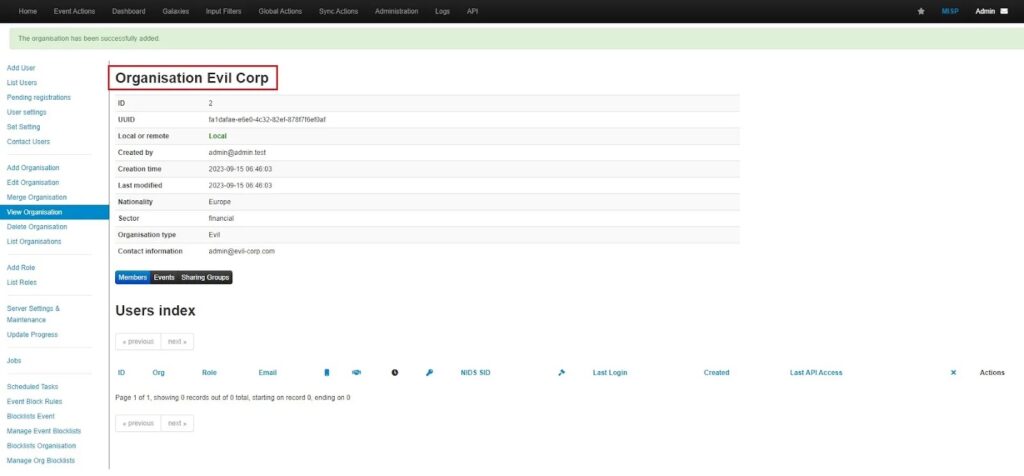
Once you click Submit, your organization will be added to the MISP instance.
Creating a User
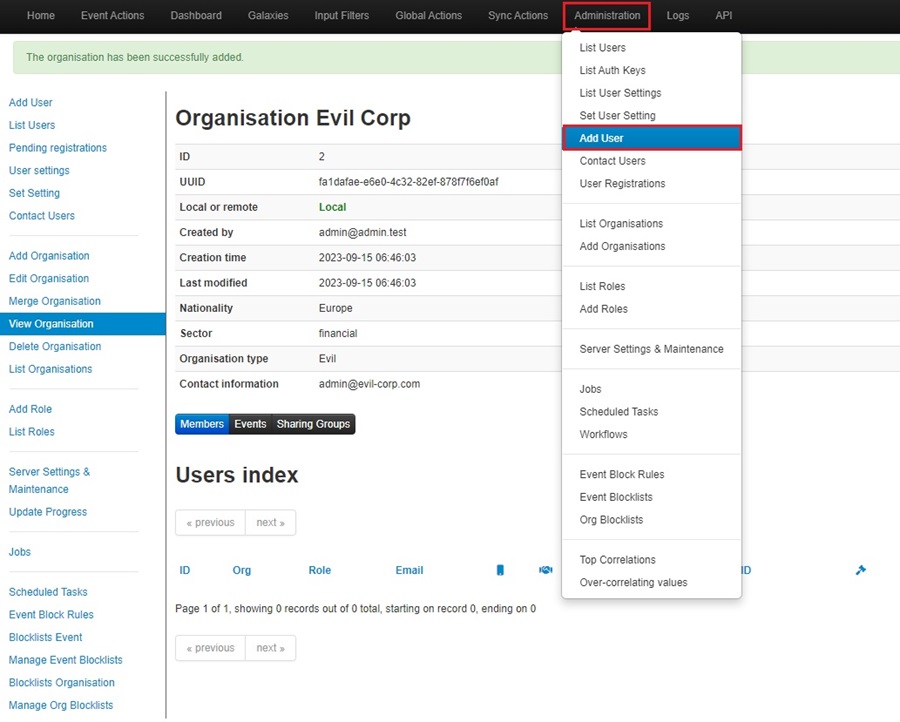
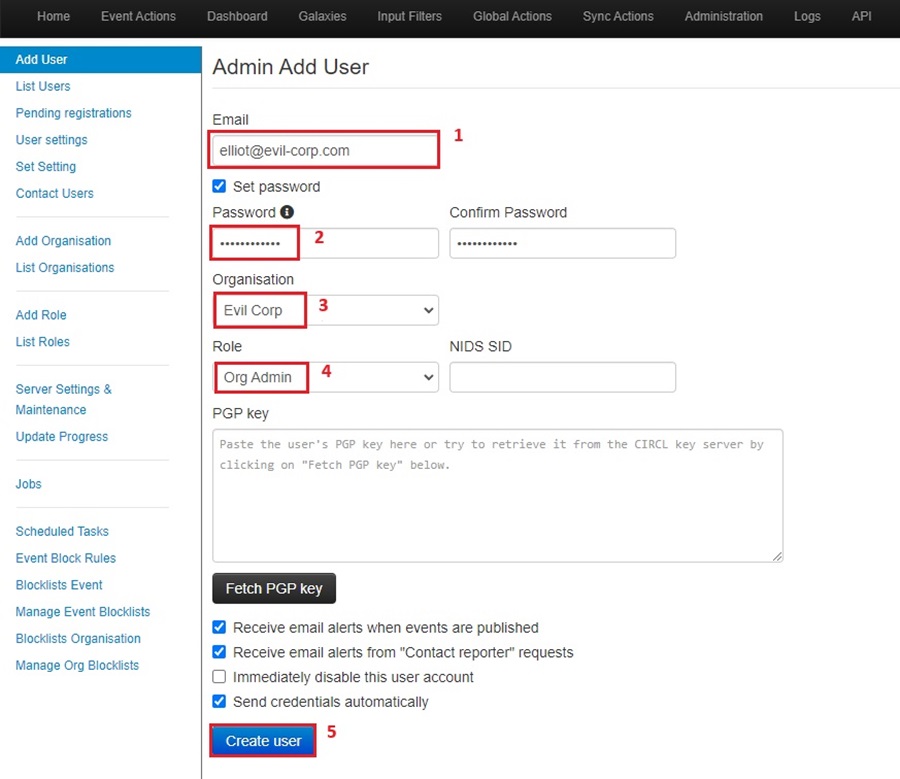
To use your organization, you need to create and assign a user to it. To do this, go to Administration > Add User.
Fill out the user’s details:
- Their email address will be used to login to the system.
- You can choose to give them a password or have them set it the first time they log in.
- Assign them to the organization you just created.
- Give them the Org Admin so they can perform some administrative actions.
- Click Create User to generate this account.
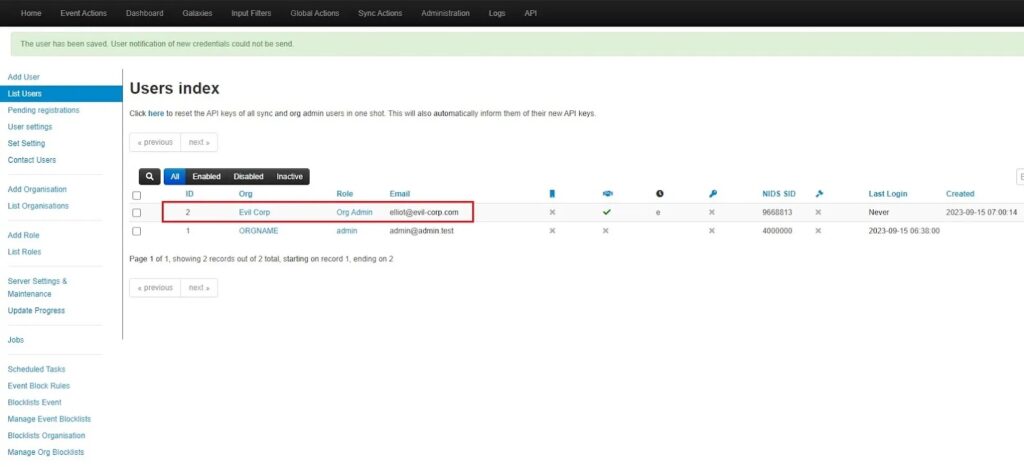
Once you click Create User, you will see this use appear in the list of users on this MISP instance, and you can begin tailoring MISP to your organization’s needs!
Updating Galaxies and Taxonomies
The first thing you need to do in MISP is update the MISP galaxies and taxonomies so you use them to structure your threat intelligence.
- MISP Galaxy: A way to add structured threat information to a MISP event in a standardized and interoperable format. For instance, the MITRE ATT&CK framework for describing a threat actor’s attack tactics, techniques, and procedures.
- MISP Taxonomy: A way to classify a MISP event by adding a “tag” to it. For instance, the Traffic Light Protocol (TLP) for classifying how intelligence should be shared.
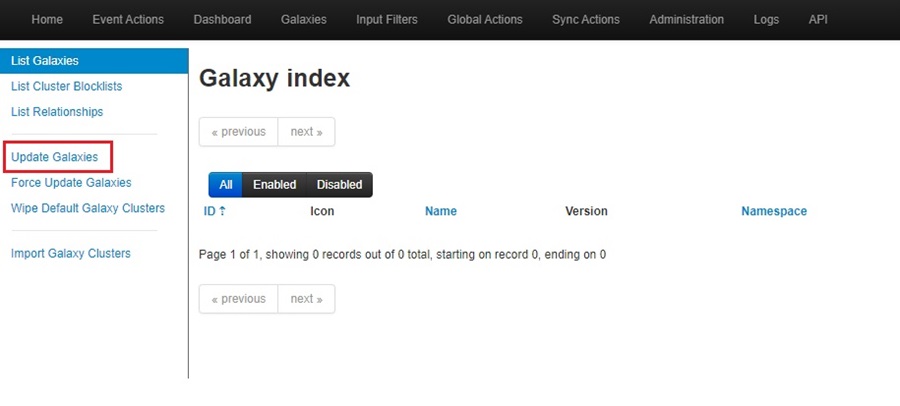
To update your galaxies, go to Galaxies > List Galaxies.

Now select Update Galaxies in the left-side menu.
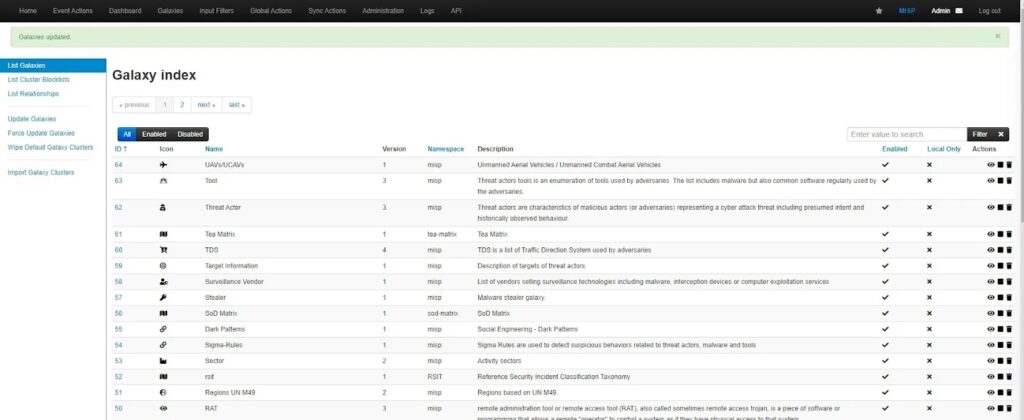
This will update your MISP Galaxies with the latest versions released. You will see them populated in the Galaxy index.
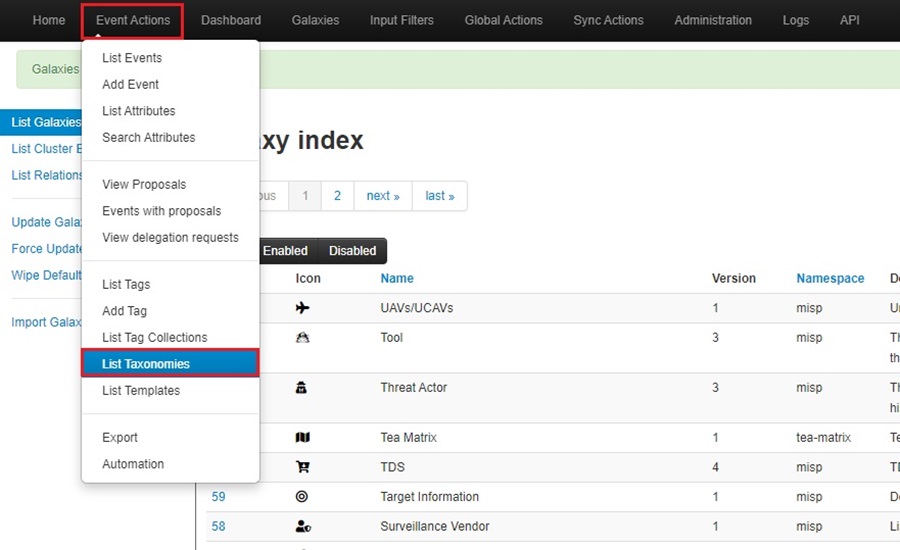
To update your taxonomies, go to Events > List Taxonomies.
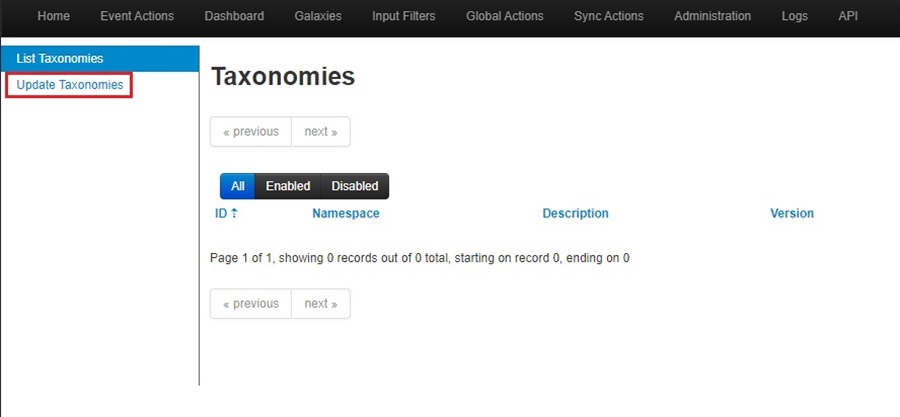
Now select Update Taxonomies in the left-side menu:
This will update your MISP Taxonomies with the latest versions released. You will see them populated in the Taxonomies list.
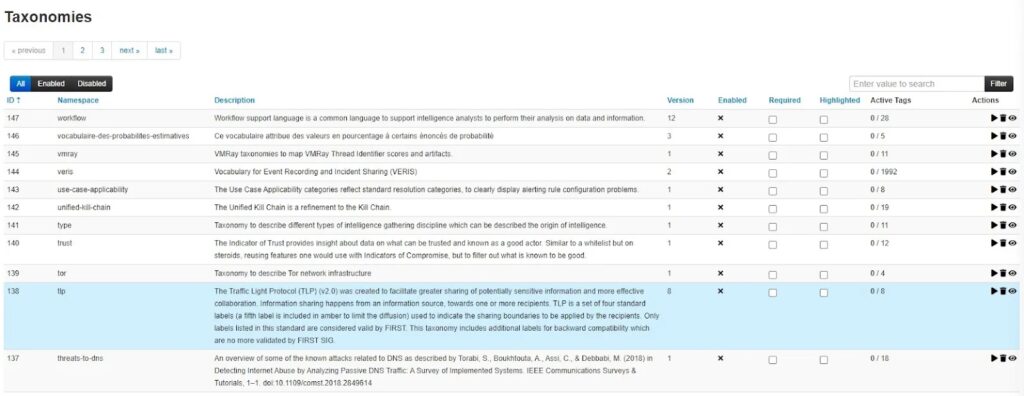
Configuring the TLP Taxonomy
With the taxonomies updated, you can now begin using them. I recommend starting with tlp (traffic light protocol) as a minimum because it adds context to how intelligence should be shared. To use a galaxy, you must enable it by clicking the Enable button (play icon) under the Actions column.
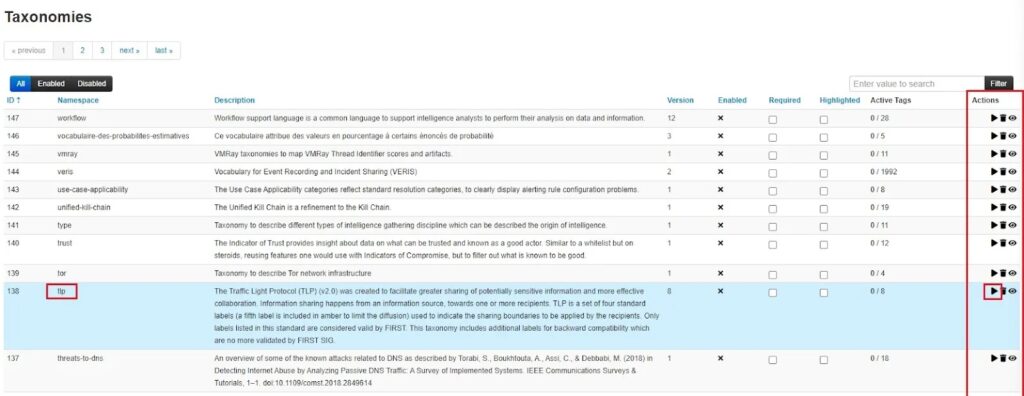
Once you enable a taxonomy, you will see a tick next to its Enabled column in the List Taxonomies section.
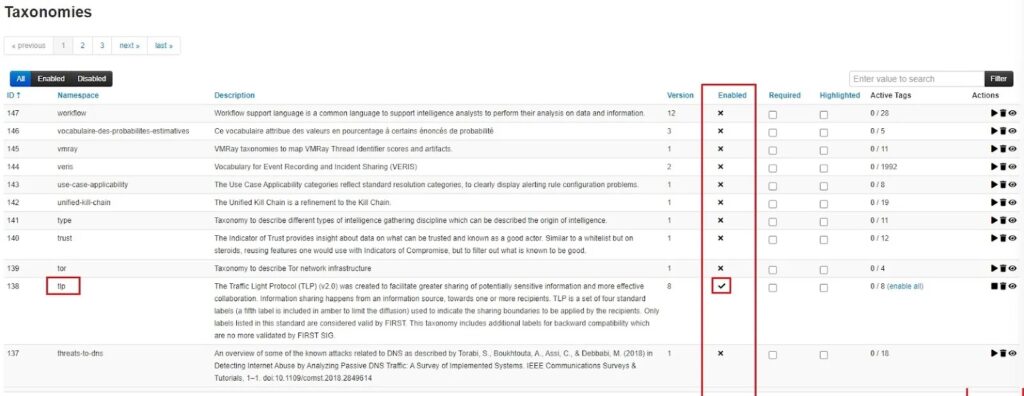
To use this Taxonomy, you need to configure which TLP tags you want to use. Click on the View taxonomy button (eye icon) in the Actions column.
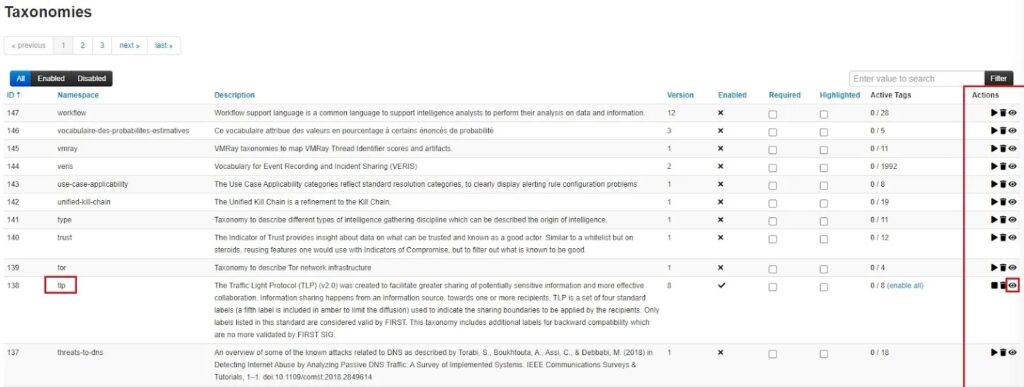
Select the TLP tags you want to use by clicking the Create Tag button (addition icon) in the Actions column. Here I have added tlp:amber, tlp:amber+strict, tlp:clear, tlp:green, and tlp:red.
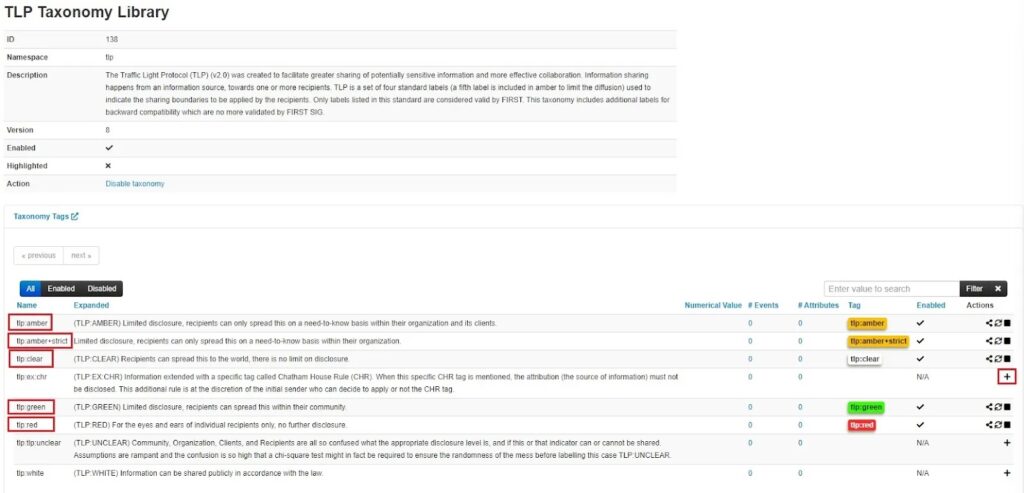
You can now begin using this Taxonomy when you add tags to MISP Events. More on this later.
Logging Into Your Organization
To start using MISP, you must log out as the default MISP admin user and log in as the Org Admin user you just created. Click the Log out button on the top right of the MISP web interface.

Login with the new user’s credentials you just created:
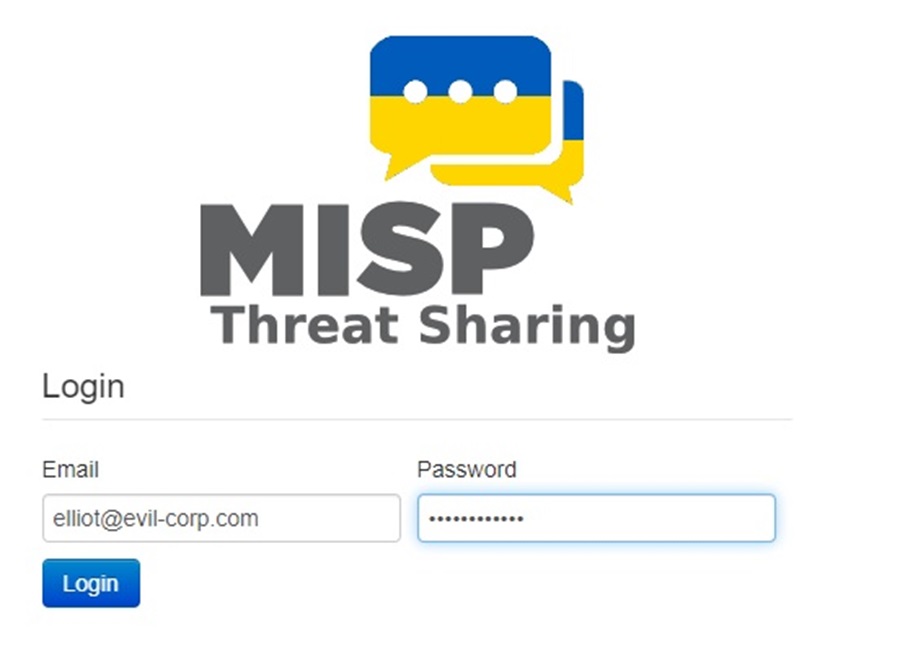
You are now ready to start using MISP!
Summary
Congratulations, you have successfully installed MISP and are ready to add threat intelligence! You have seen how to install MISP using Docker (the easiest and most convenient way) and got you started configuring your very own MISP instance. This involved creating an organization, an admin user, and updating MISP’s galaxies and taxonomies. You also saw how to set up the TLP taxonomy, which you will use later in this series.
The next installment in this series will dive into actually using MISP. You will see how to add threat intelligence into MISP using MISP Events and export IOCs to your security solutions to detect or block the latest threats!
Discover more in the Threat Intelligence with MISP series!

