Welcome to the third instalment in this threat hunting series!
If you’ve been following along so far you should have a virtualised environment all setup and ready to hunt in using the DFIR tool Velociraptor. However, if you are just joining please see my previous post Threat Hunting II: Environment Setup to get up to speed.
This instalment will focus on using Velociraptor’s hunting capabilities to identify malicious activity associated with real-world malware and threat actors. Let’s begin!
The Three Pillars of Threat Hunting
A good threat hunt is build on three basic pillars:
- A solid hypothesis
- A testable theory
- Clear documentation
These pillars keep a threat hunt focused, falsifiable, and repeatable in the future (ideally with automation).
Pillar #1: A Solid Hypothesis
To fulfil a solid hypothesis, a Cyber Threat Intelligence (CTI) team will usually turn to (in a shock twist) threat intelligence to get an initial idea about what to look for in their environment. This intelligence needs to meet the criteria of “good” threat intelligence in that it is timely, actionable, and relevant to their organisation’s environment.
An example of a hypothesis would be “Threat actor XYZ who targets organisations like ours is using TTP (tactic/technique/procedure) ABC when they have infiltrated a target’s environment. I wonder if our log sources show TTP ABC in our environment”.
There are other components to “good” cyber threat intelligence which I will go into in a later blog post. For now just know that intelligence needs to be timely (it is relatively recent news), it is actionable (it can be hunted for), and it is relevant (it relates to the organisation’s demographics in terms of business sector, geography, and scale).
Pillar #2: A Testable Theory
The second pillar would be turning the hypothesis (initial idea) into a, somewhat, scientific theory that can be either be proven or disproved in an acceptable time frame. The theory a CTI team comes up with is often heavily dependent on the tools at their disposal.

For instance, if a threat actor was using registry keys on endpoint machines for persistence (i.e. every time a computer booted up the malware would automatically run and give an attacker control of the system); the team would need a security solution that would allow them to inspect the registry keys on all endpoints in their environments (typically an agent installed on every machine). If the team did not have this capability they would need to come up with a different theory to test their hypothesis.
Think of doing a science experiment at school and your teacher has asked you to time how long it takes a beaker of water to boil. If your teacher has given you a useful tool (a thermometer) you would stick this in the beaker, start the timer, heat up the water, and wait till the thermometer read 100C. However, if you don’t have a thermometer then you would start the timer, heat up the water and wait till it started bubbling till you concluded that the water had boiled.
Fancy security tools and additional log sources make devising theories easier, but there are still ways to test an hypothesis’s even if you don’t have access to the latest and greatest security solutions.
Pillar #3: Clear Documentation
Finally, we come to the third pillar (everyone’s least favourite thing to do).
It is all well and good doing a threat hunt in January with no documentation but what happens when it comes to July. Will you remember what you hunted for in January? Will you remember all the systems you checked and their results? Will you remember all the specific TTPs you searched for? Even if you have perfect recall it will still take you the same amount of time as it did back in January to perform the hunt and you won’t have data to compare this hunt to.
This is where the magic of documentation comes in. Good documentation can let you automate hunts, perform data analysis, and (if your working for a business) justify the value that your team is bringing to the organisation.
It may be a pain to do in January but come July when you can just press a button to automatically run the hunt, generate data, and analyse/compare this data to your last hunt, it makes justifying having a threat hunting program considerably easier.
Setting the Stage
Let’s set the stage so we can get into the fun stuff.
To generate our hypothesis we will use this threat report by Microsoft. In this report it says that Tarrask malware is using scheduled tasks to maintain persistence and evade detection. That’s some helpful insight and allows us form our threat hunting hypothesis “Is there a bad guy in my environment using scheduled tasks to maintain persistence on one of my endpoint machines?”
Next, let’s try and turn this initial idea into a testable theory.
We have Velociraptor installed on every endpoint in our virtualised threat hunting environment (all one of them). This allows us to hunt for scheduled tasks on these endpoints. Perfect! We can say “I will search for scheduled tasks using Velociraptor’s hunting capabilities and, if it is present on endpoints, my hypothesis that a bad guy is using scheduled tasks in my environment will be proven correct.”
Before we can demo this practically, we first need to fulfil the documentation requirement of a good threat hunt and it’s always useful if you prepare the documentation you want to keep ahead of time.
For this threat hunt we will create a basic spreadsheet containing the name of the hunt, a brief description of the hunt, the Velociraptor query that was run, the date it was run, the results (true & false positives), and the action taken.

Practical Lab
Let’s get started on the practical demo!
Preparing Velociraptor
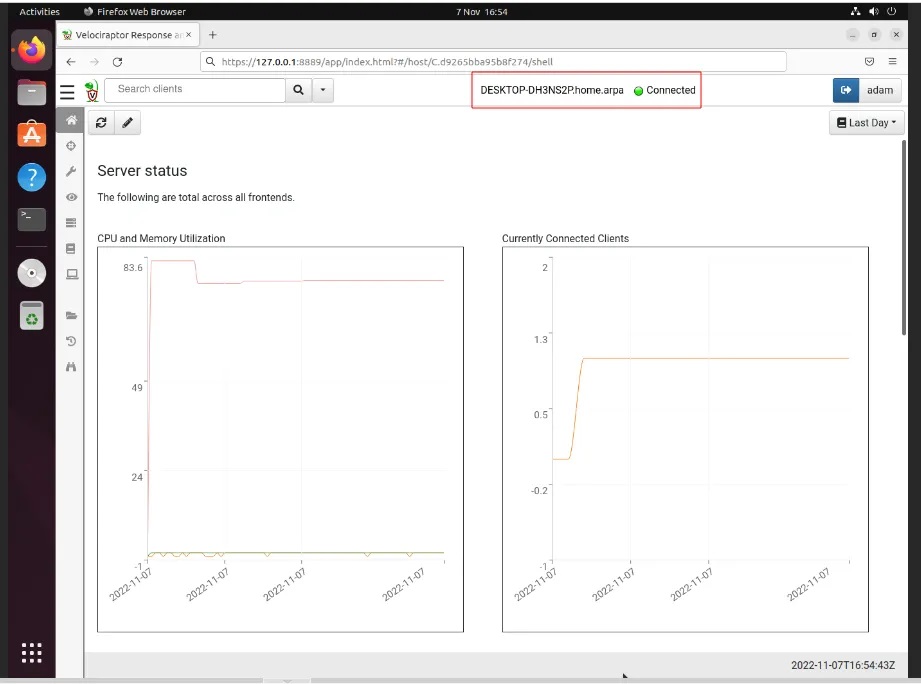
Step 1: Boot up our defender and victim machines from the virtualised threat hunting environment we have previously created. When both machines are up and running, login to the Velociraptor web dashboard by navigating to https://127.0.0.1:8889/ and logging in with your credentials. You should see the Windows victim machine Connected (if not try clicking the magnifying glass icon to search for endpoints).
Step 2: Navigate to the Hunt Manager tab (cross-hair icon) and select the + button to create a new hunt.
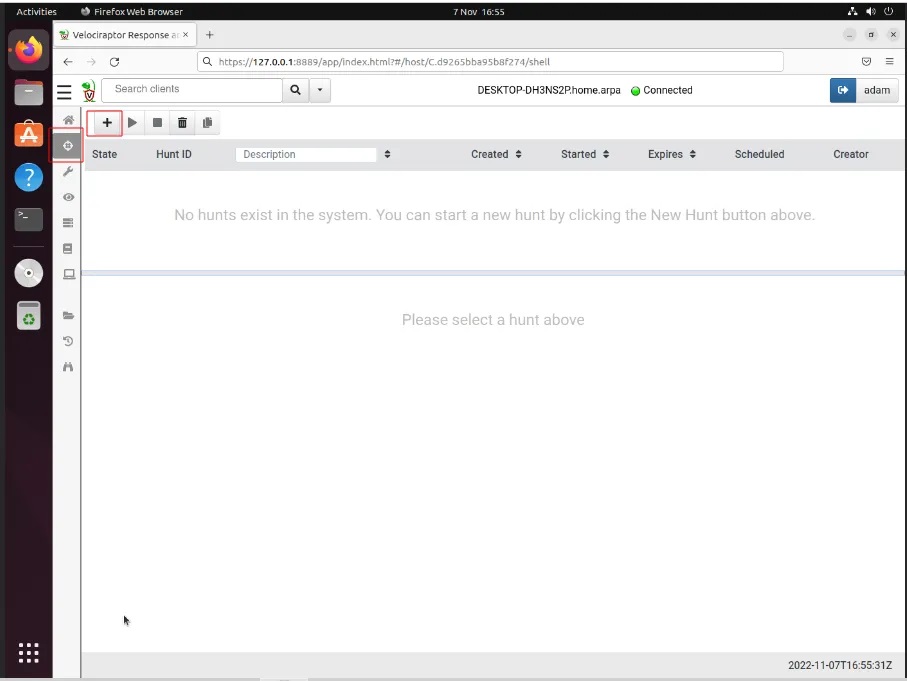
This will bring you to Velociraptor’s Hunts wizard which lets you hunt for artefacts on connected machines.
Step 3: Provide a description of the hunt you are performing, along with an expiry date and where to run the hunt (we can leave the defaults).
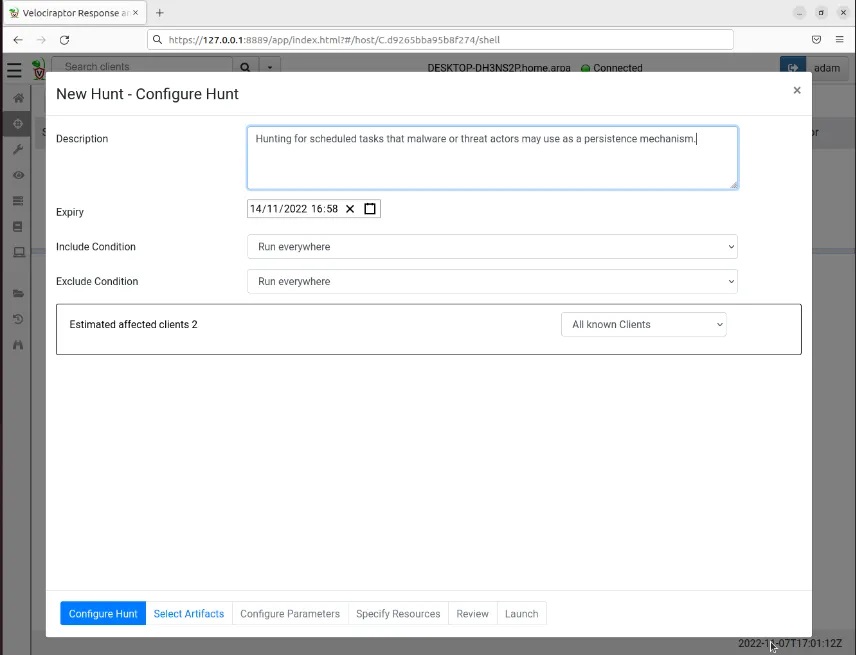
Now we need to select the artefacts we want to hunt for.
Step 4: Enter the type of artefact you want to search for (i.e. scheduled tasks) and this will auto-populate a drop-down menu from which you can select a hunting query to run. Velociraptor uses VQL to query data, however you don’t need to know VQL to perform hunts; simply select a pre-defined hunting query and the VQL will populate for you. Here I have selected the Windows.System.TaskSchedular query. This will extract the event logs from the machines queried that are related to all scheduled tasks present on the machine (useful when looking for newly created scheduled tasks).
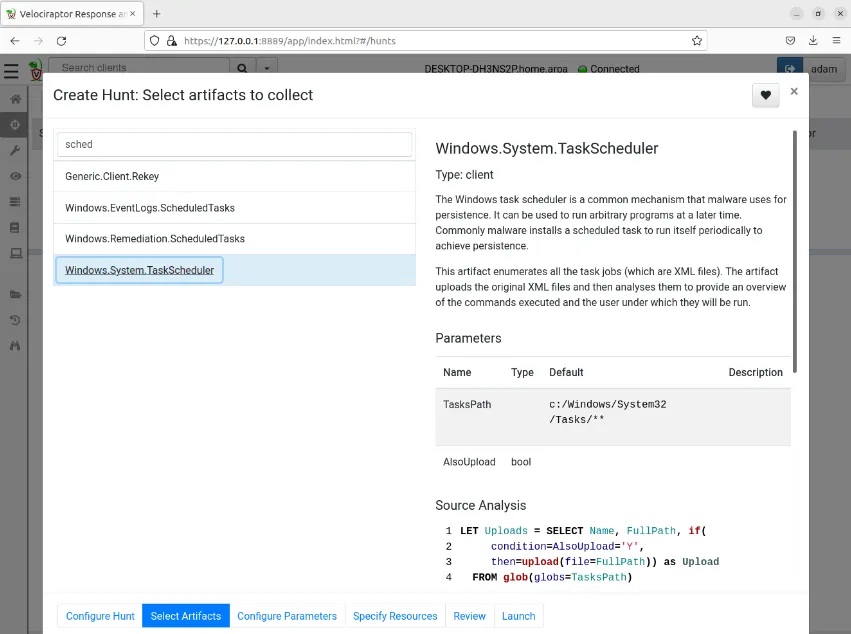
You can leave the default values for the Configure Parameters and Specify Resources tabs and move straight to Review. This screen will show you the JSON-formatted data that this hunting query will save as, useful for automating hunts later on.
Step 5: Review this information and then select the Launch button to save the query and ready the hunt to go.
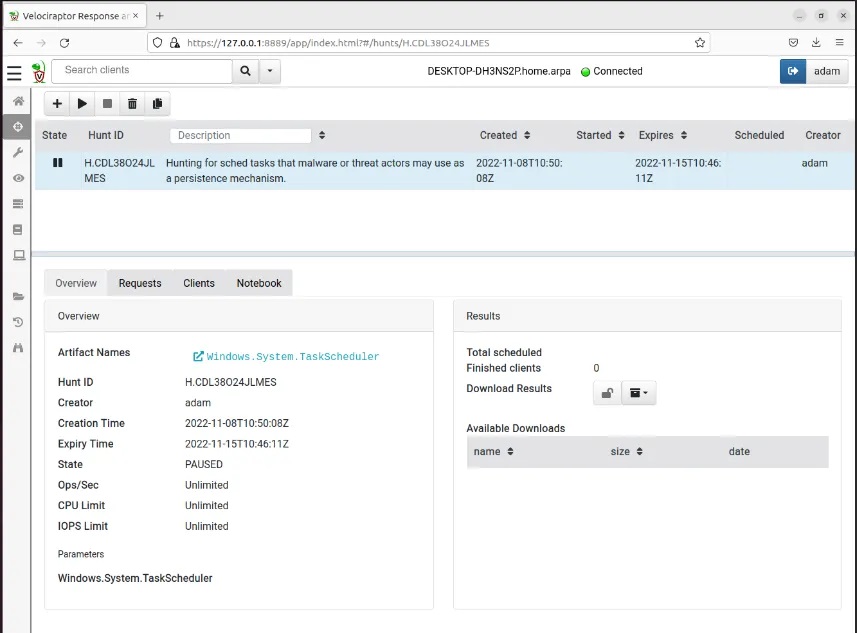
Creating Malicious Scheduled Task
With the hunt primed and ready to go, we can move onto actually giving it something to hunt for (otherwise this whole exercise is rather pointless).
On the victim machine we are going to download the post-exploitation tool SharPersist which was created by Mandiant. This tool is a “Windows persistence toolkit written in C#” that will allow us to create a malicious scheduled task on the victim machine and is often use during a penetration test or red team engagement to mimic real world threat actors.
Step 1: Navigate to the tool’s Releases page on GitHub and download the latest EXE version onto the victim machine.
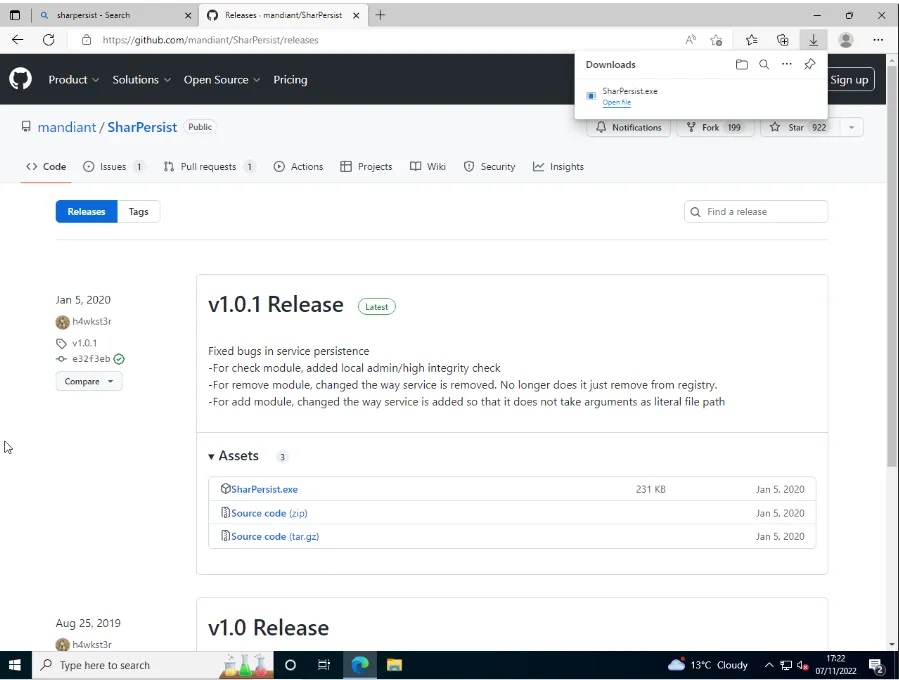
You will need to disable Windows Defender and Windows Smart Screen to download this tool. Just search for this on the machine and these security settings should be easily found.
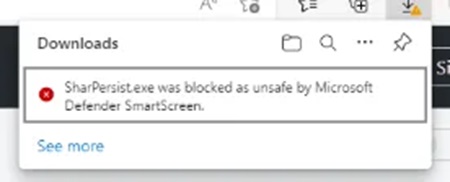
Step 2: To use SharPersist, navigate to the Downloads folder in PowerShell and run the following command:
SharPersist -t schtask -c "C:\Windows\System32\cmd.exe" -a "/c echo 123 >> c:\123.txt" -n "My Malicious Task" -m add -o hourly
This command tells SharPersist to create a scheduled task that runs the following command every hour (to -o hourly option):
C:\Windows\System32\cmd.exe /c "echo 123 >> C:\Windows\Temp\123.txt"The command just appends the string 123 to the file named 123.txt in the C:\Windows\Temp folder on the machine. If the file doesn’t exist then it will be created. For demonstration purposes I have named this scheduled task My Malicious Task using the -n option.
You can open the Task Scheduler to confirm the scheduled task was created.
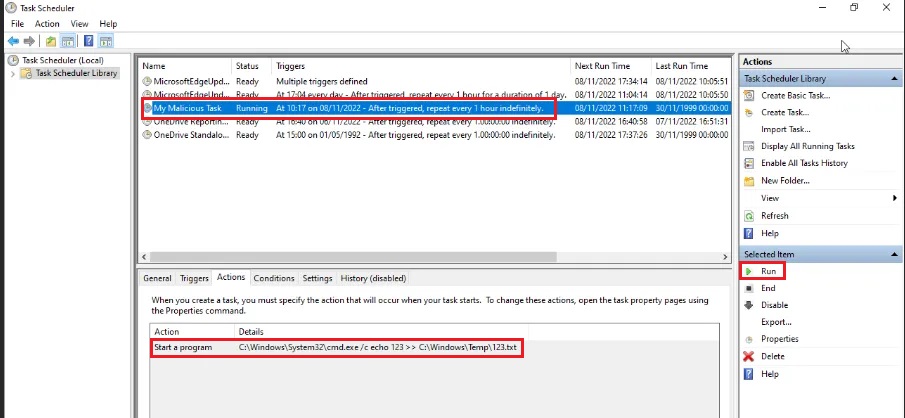
In the From Task Scheduler you can run the task to confirm it works (or wait for an hour if you have zen-like patience).
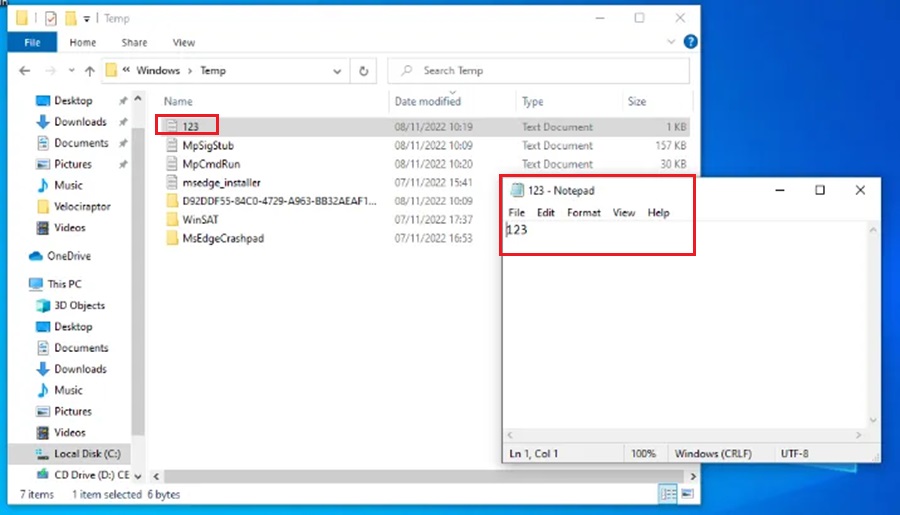
In the real-world a pieced of malware or threat actor is likely to trigger a task that allows them to gain persistence on the machine. This could be detonating malware or reaching out to a Command & Control (C2) framework to download malware/implant/agent, and we will dive into this behaviour in later instalments of this series. In this lab we will assume they just want to get better at counting to three.
A tool like SharPersist will be typically executed by a malicious actor through a C2 framework like Cobalt Strike, PowerShell Empire, Covenant, etc.
Now the scheduled task has been created we can hunt for it.
Hunting for Scheduled Task With Velociraptor
Jump back on the defender virtual machine and let’s hunt for that pesky scheduled task.
Step 1: Run the hunt you previously created by selecting the Run Hunt button (play icon) and then selecting press Run It! option from the dialog box.
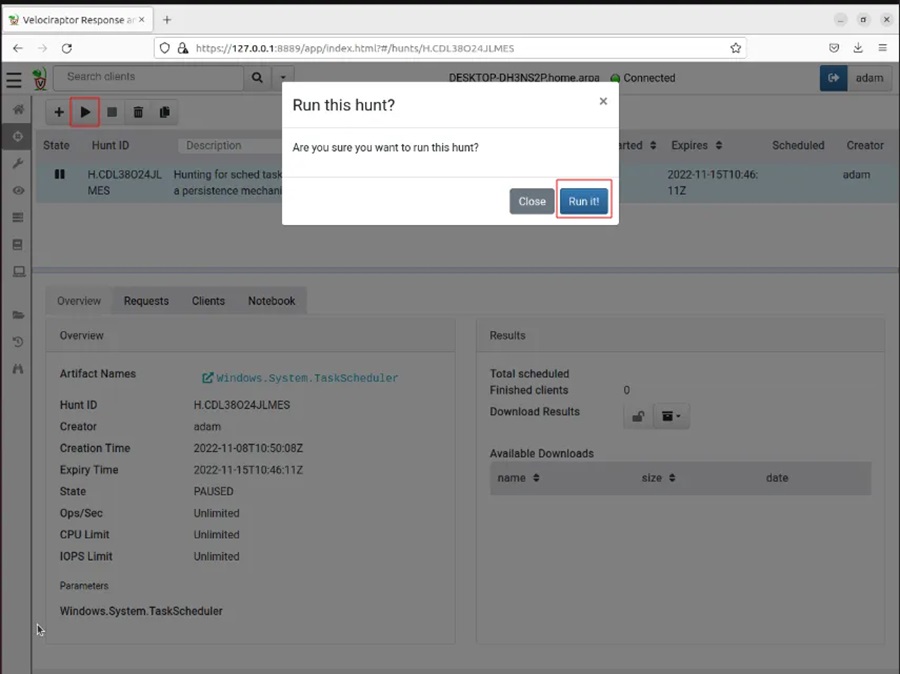
This will start the hunt. While the hunt is running the hourglass icon will appear next to it under the State column to indicate it is in progress.
Step 2: When you see that Finished clients is equal to 1 (under the Results section), click the file box drop-down icon and select Full Download. This will populate the Available Downloads section.
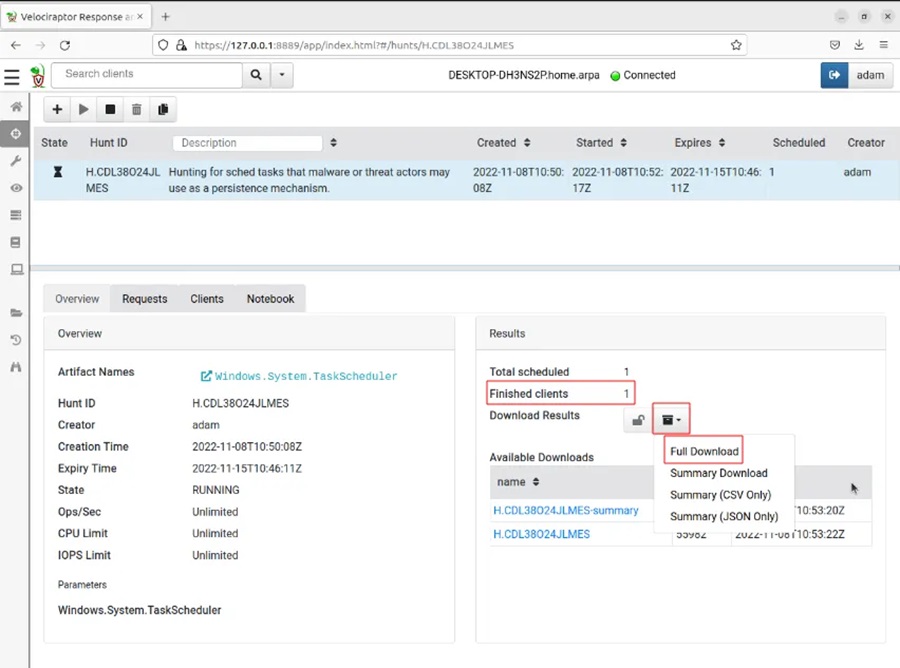
Step 3: Click on the hyper link to download the data.
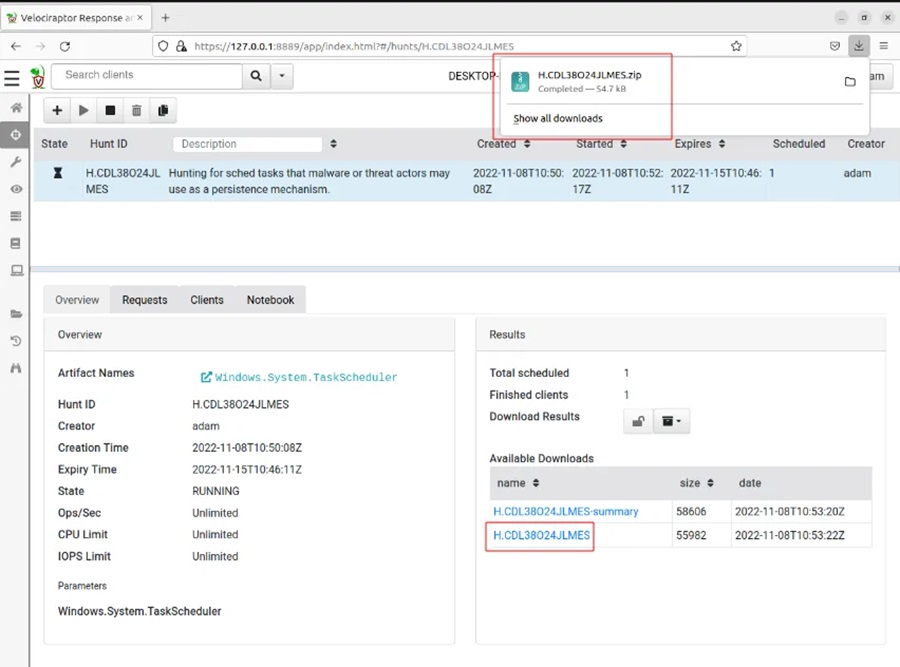
Then extract the downloaded data from the zip archive.
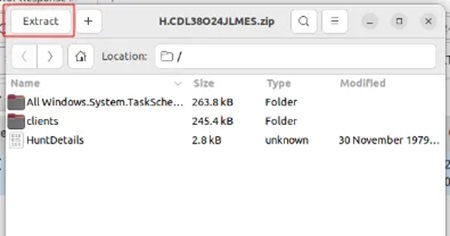
By default, this will extract the data to your Downloads folder.
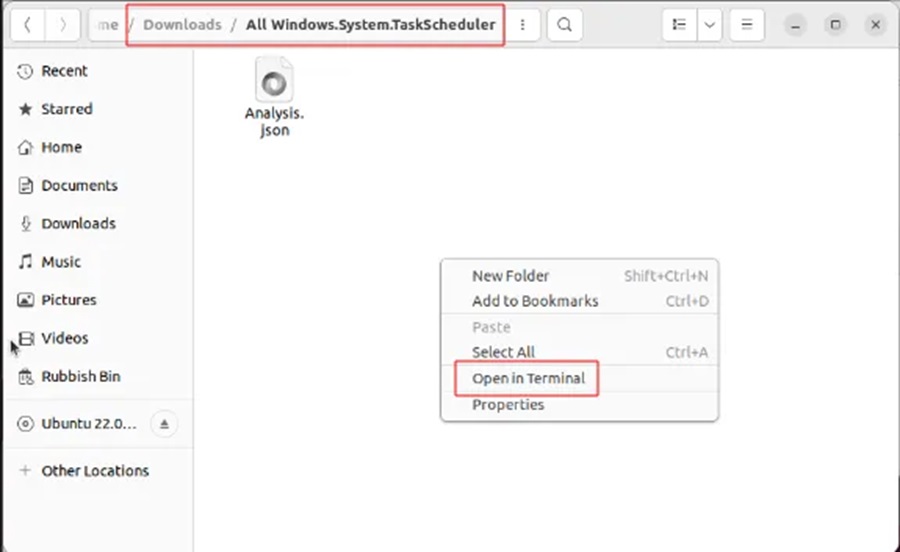
Step 4: Navigate to the folder All.Windows.System.TaskSchedular, right-click on any white space and select Open in Terminal. This will open a terminal window where it will be easier to parse the data in the Analysis.json file.
Step 5: To parse the data we will be using the following command line utilities:
jq– a handy JSON data formatting tool.grep– the defacto Linux tool for quickly searching for data in a file.
You may need to install jq by running the following command:
sudo apt install jqTo nicely format the data run:
cat Analysis.json | jqUnfortunately there is a lot of scheduled task data to sift through and looking through it manually will take some time (11,261 lines in my data set).

Hence, we shall use the might grep command to search for the malicious task we created (aptly named My Malicious Task).
In the real world a bad guy is somewhat unlikely to call their persistence mechanism My Malicious Task and it will take a bit more detective work to figure out the good scheduled tasks from the bad. However, for the sake of this demonstration we will assume the threat actor is very drunk, very cocky, or very dumb.
Step 6: To search for our malicious scheduled task run the command:
cat Analysis.json | jq | grep "Malicious" -C 10This command will nicely format the JSON data and search for the string Malicious. It will then return 10 lines above and below using the context option (-C 10).
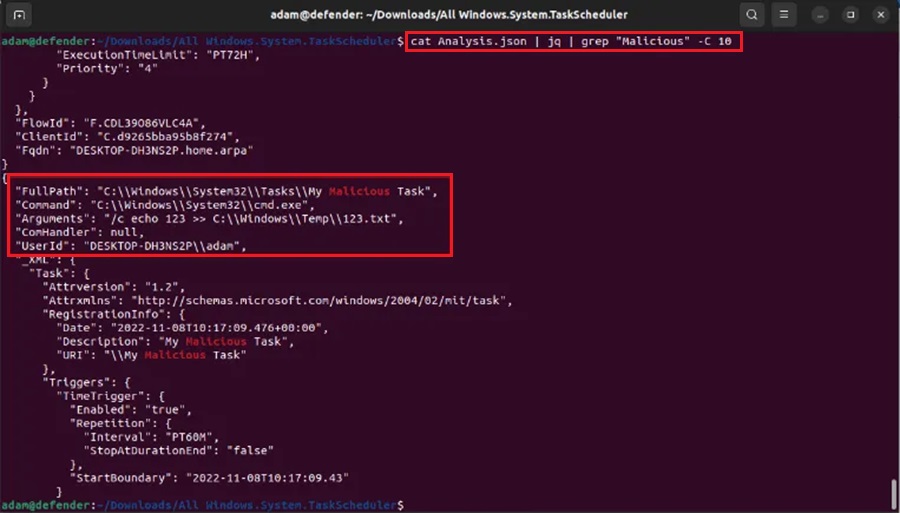
As we can see from the output, we have the Command to be run, the Arguments supplied to the command, and the UserID of the person who created the scheduled task.
We could delve into this log data deeper to find out when this scheduled task is set to run, but I will leave that as homework for the reader.
To conclude our threat hunt we can fill out the documentation we created at the start.

It is also important to keep the log data as evidence.
Summary
Congratulations, you have made it to the end!
This article delved into performing a realistic threat hunt using the DFIR tool Velociraptor. We looked at the three key pillars to a successful threat hunt (hypothesis, theory, documentation) and then used a real-world example of a persistence mechanism (scheduled tasks) to demonstrate these pillars in action. The intelligence-driven threat hunting scenario was then practically shown in our virtualised threat hunting environment with help from SharPersist, jq, and grep.
The examples used in this article may seem a little contrived (drunk threat actors wanting to count), but the process does accurately detail how threat hunting works in the real-world. We create a hypothesis using threat intelligence, develop a theory utilising the tools at our disposal, and then write out clear documentation so the hunt can be tracked and reproduced in the future. Using these three basic pillars you should now be able to perform threat hunts in your environment.
Till next time, stay frosty my friends and keep on hunting!
Discover more in the Threat Hunting with Velociraptor series!


