Home labs are the bread and butter for any IT professional who wants to take their technical skills to the next level.
Whether it is practising setting up an Active Directory environment or detonating malware to discover hidden functionality, home labs are the vehicle to drive your journey. Home labs are what gyms are to bodybuilders, a place to exercise once abilities and grow.
That said, like most bodybuilders, most home lab users cannot go out and buy all the expensive equipment you find in enterprise environments or commercial gyms. However, unlike bodybuilders, us home lab users can buy one moderately expensive server and virtualise all our needs.
What is Virtualization?
Virtualisation is “the act of creating a virtual (rather than actual) version of something, including virtual computer hardware platforms, storage devices, and computer network resources” (wikipedia). It makes our lives easier because we can put a ton of stuff onto one physical box. In fact, we can setup entire environments compromised of multiple assets (e.g. firewalls, Windows/Linux machines, servers, etc.).
There are two ways to virtualise all the things.
- On your host (desktop) computer through a type II hypervisor like VMware Workstation or VirtualBox (the method I’d recommend if you’re just getting started)
- On a server through a type I hypervisor like VMware vCenter or Proxmox.
I chose to go with a type I (Proxmox) which meant installing the hypervisor on a dedicated server/workstation. This is typically what enterprise do but with much more powerful and expensive servers.
Why Proxmox?
Proxmox is an “open-source server management platform for enterprise virtualization” and is probably the best “free” visualisation platform able with it’s tight KVM hypervisor and Linux Containers (LXC) integration, as well as built-in web-based user interface for intuitive management.
To get to grips with the installation and management of Proxmox I’d highly recommend watching LearnLinuxTV’s YouTube course. I won’t walk through the installation process in this article, it’s pretty basic and there are lots of resources on it, however I will describe a philosophy I adopted for organising virtual machine (VM) deployments and resources within Proxmox.
Be one with everything
A philosophy I have come to adopt when managing my Proxmox environments is one pool = one bridge = one network = one environment (inspired by this Medium article).
This basically means that each environment will have one pool of resources and one network it’s VMs will use, which is defined by the bridge (functionally a switch) that all the VMs connect to. This bridge will be connected to a firewall VM as an interface for easy management.
In my case, I chose to use pfSense as a firewall solution because it’s probably the best “free” firewall available and there are a ton of resources on configuring it’s features (which can get pretty advanced).
So how does this all look?
Well I have my pfSense box with a WAN interface connected to my home network (so I can access the Proxmox VMs) and several other interfaces connected to virtualised network bridges I have created in Proxmox, each bridge corresponding to one environment. The diagram below should help.
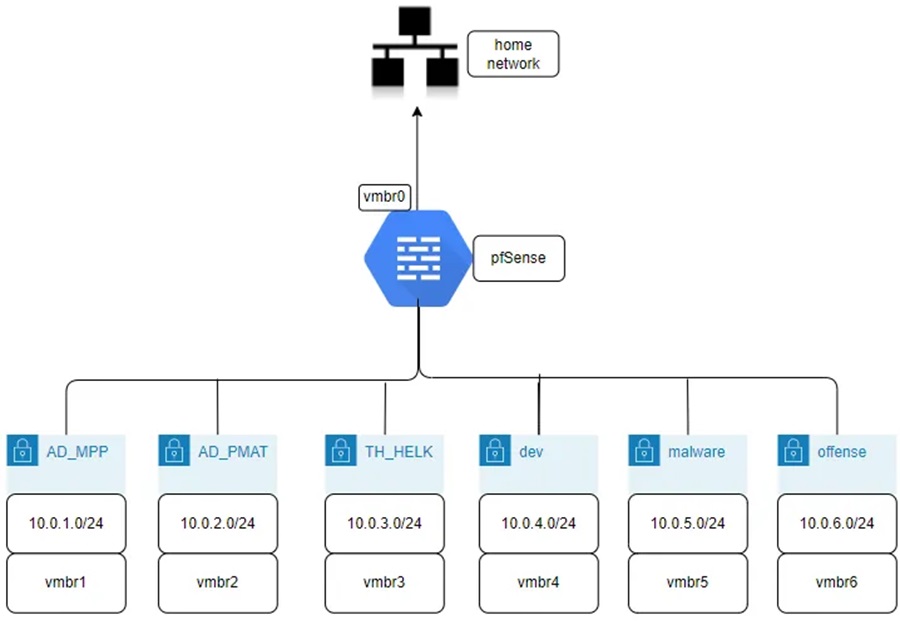
Proxmox Setup
With the theory aside, it’s time to show how things are setup in Proxmox.
Step 1: Go to setup a Resource Pool go to Datacenter > Permissions > Pools > Create.
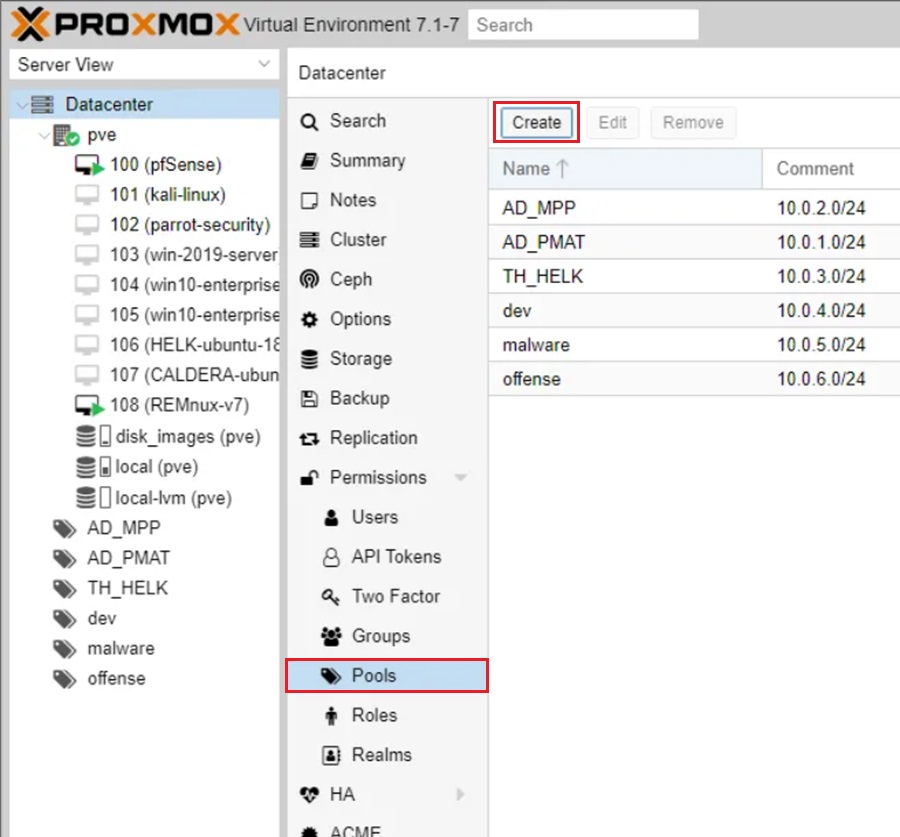
Pools let you group a bunch of VMs and data stores together and, for our purposes, map them to a corresponding environment. It is useful to put the network (subnet) the VMs will be part of in this pool as a comment so that when you attach a VM to a pool you can easily see the subnet it will be a part of.
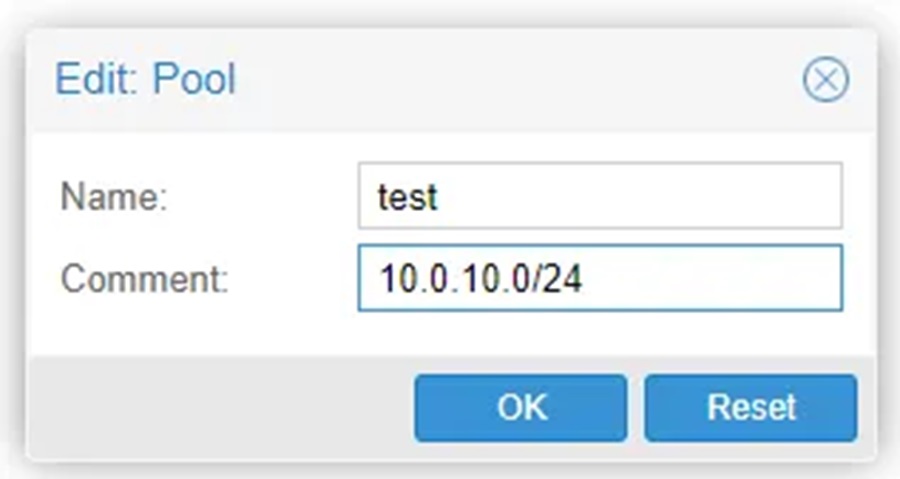
Step 2: Once you have created your desired pools, in my case 6 different pools representing 6 different environments, you can create corresponding bridges. This is done by going to your server/workstation (i.e. pve) and selecting System > Network > Create > Linux Bridge.
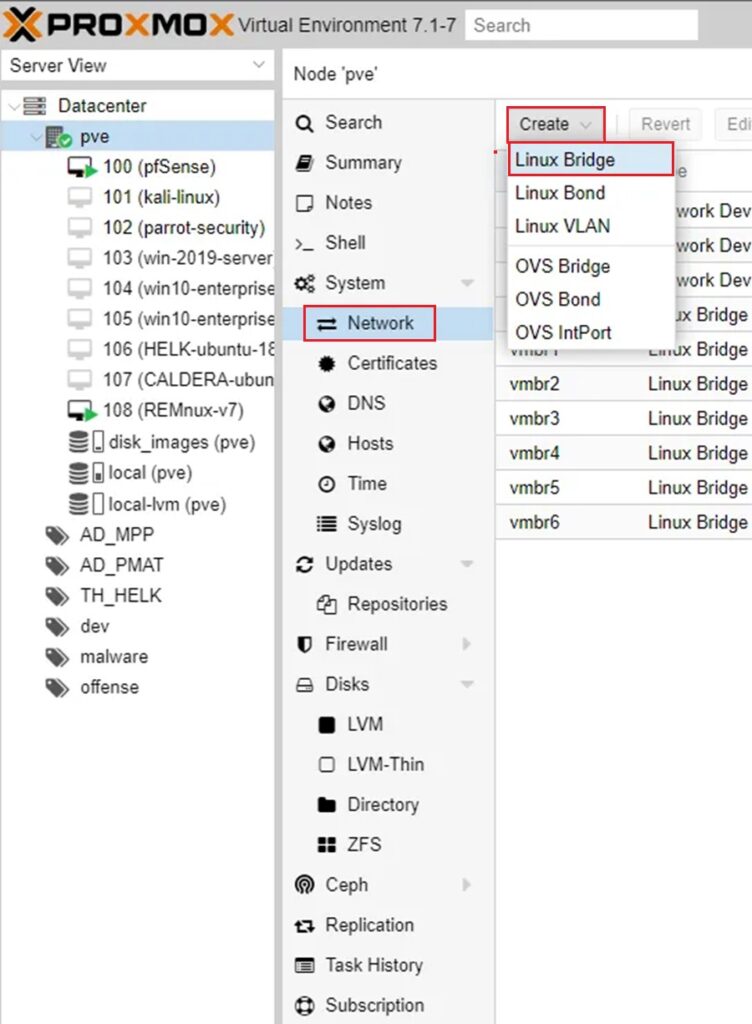
Step 3: Then create the bridge with a comment to denote the environment and subnet it uses (for ease of management).
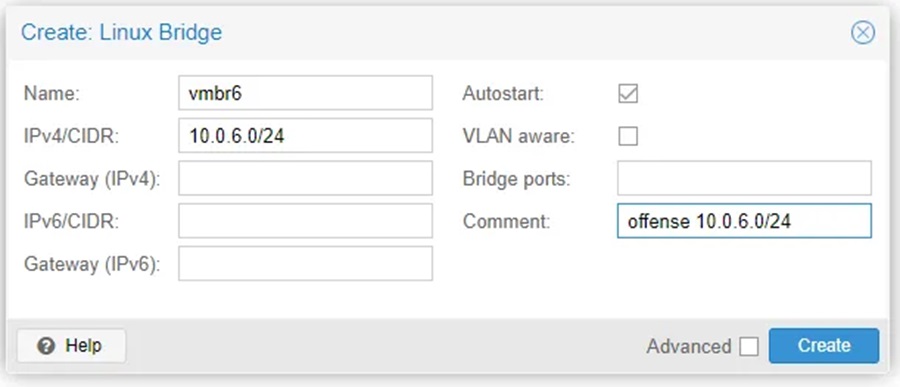
Once you have done this for all the environments you want to create you should have something like this.

One external facing Linux Bridge which corresponds to your server/workstation network card, and lets you communicate with your Proxmox instance through the web-browser GUI (i.e. at https://192.168.0.41:8006), and all the Linux Bridges you created to correspond to different environments you are going to create. Now, you need to setup pfSense.
pfSense Setup
First things first, you need to install pfSense and this involves creating a VM running pfSense.
Step 1: Download the ISO image of pfSense (see below for details) and then run the installer. Now there are a ton of videos on how to do this online and for some great pfSense content, check out Lawrence Systems’ pfSense tutorials.
I’d recommend starting with just the WAN interface so you can connect to it externally through a device attached to your home network and then add the virtual interfaces once you can login to the web GUI.
A useful rule to setup immediately once you login to the GUI is remote access from anywhere (well not really “anywhere” just from any device on your home network in this case). This rule can be found here, but for brevity I have included a screenshot below.
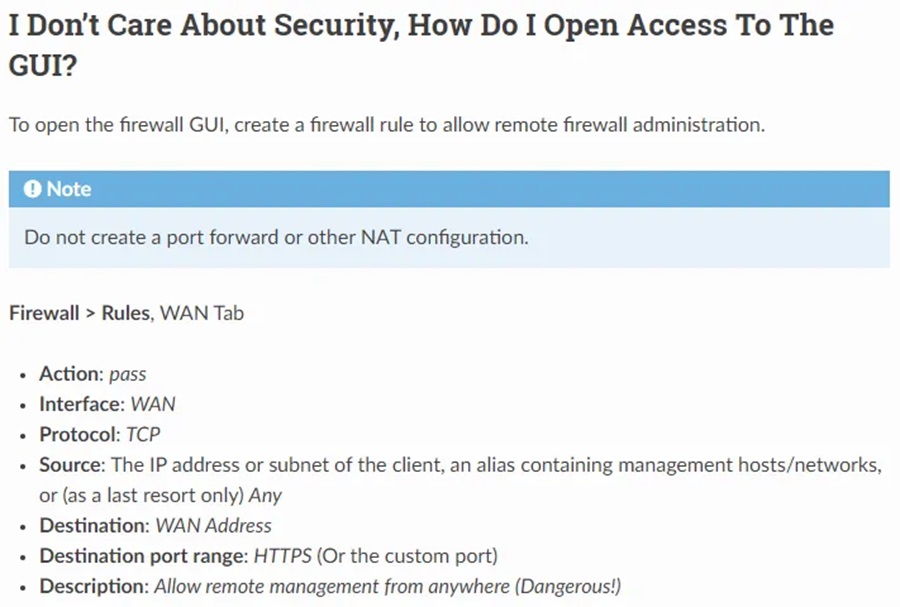
This will allow you to access the web GUI from any device on your home network, rather than from a VM running on your Proxmox machine, which makes management a little more friendly.
Step 2: Once this is setup you can begin adding your virtual network interfaces by going to Interfaces > Assignments and clicking the green add button add the bottom to add a new interface. Select the interface corresponding to the Proxmox bridge you want to a add and edit the information to give it a static IP address which will be the default gateway for all devices in the subnet you are creating.
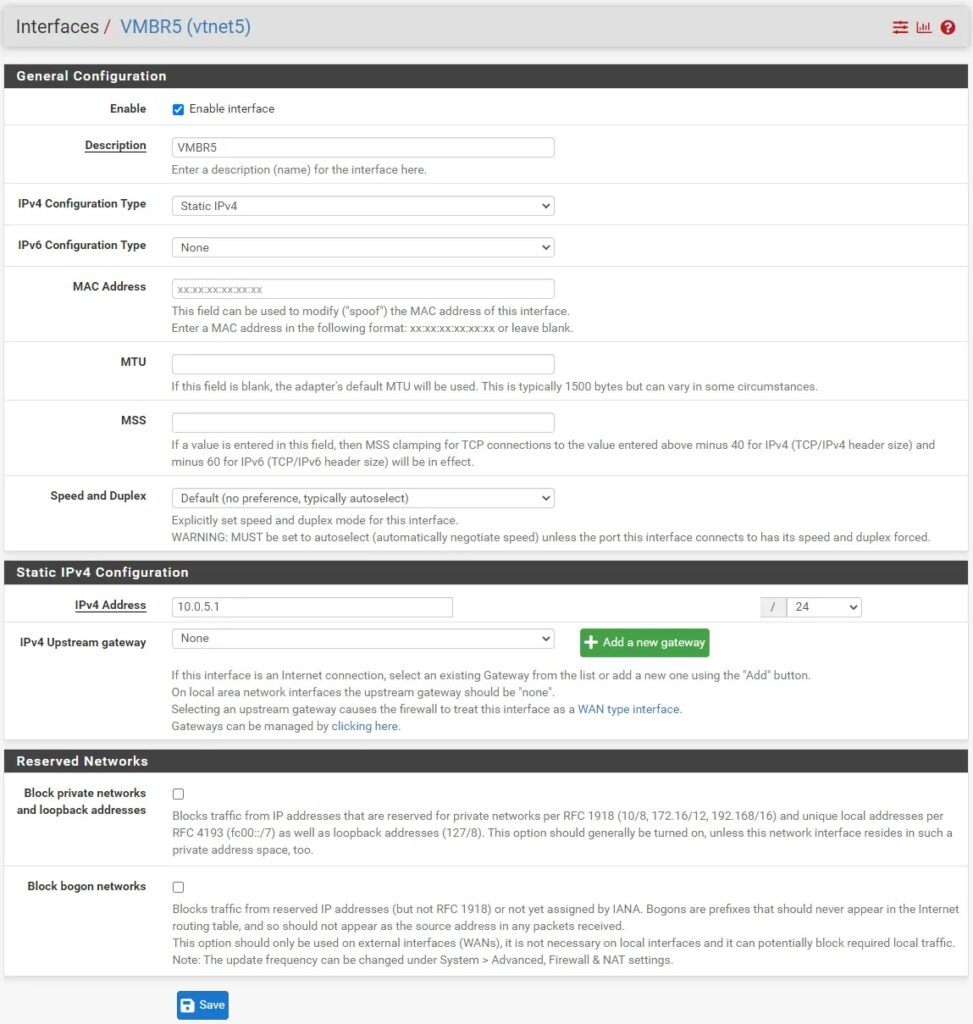
You may need to restart pfSense, and even proxmox one time, for it to register the new interface.
If you don’t see it, confirm the bridge is active, and that it is attached and try rebooting.
Step 3: Once all your interfaces are attached it’s recommended to disable hardware checksum offload to improve performance (System > Advanced > Networking) and run DHCP for environments where you don’t want to set this up manually. This can be done by going to Services > DHCP server > select the appropriate interface and configuration options.
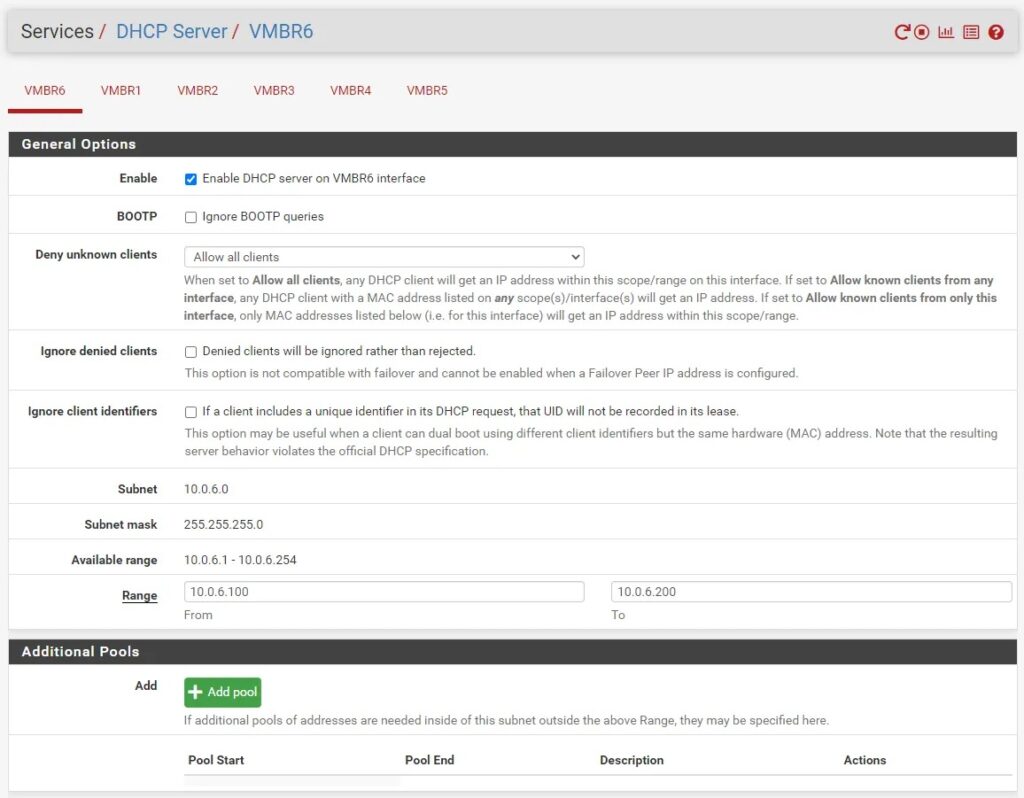
Step 4: Finally, you can now configure firewall rules for each of the environments (subnets) you created by going to Firewall > Rules and selecting the interface you want to configure rules for. For example, I opted to allow all communication between hosts within a subnet and to allow Internet traffic for all hosts.

Deploying Your First (Second) Virtual Machine
Now we have created our environments, lets deploy our first VM (excluding our pfSense on… obviously). To do this, you need to first download an ISO image to install.
Step 1: Go to local storage > ISO Images > Download from URL.
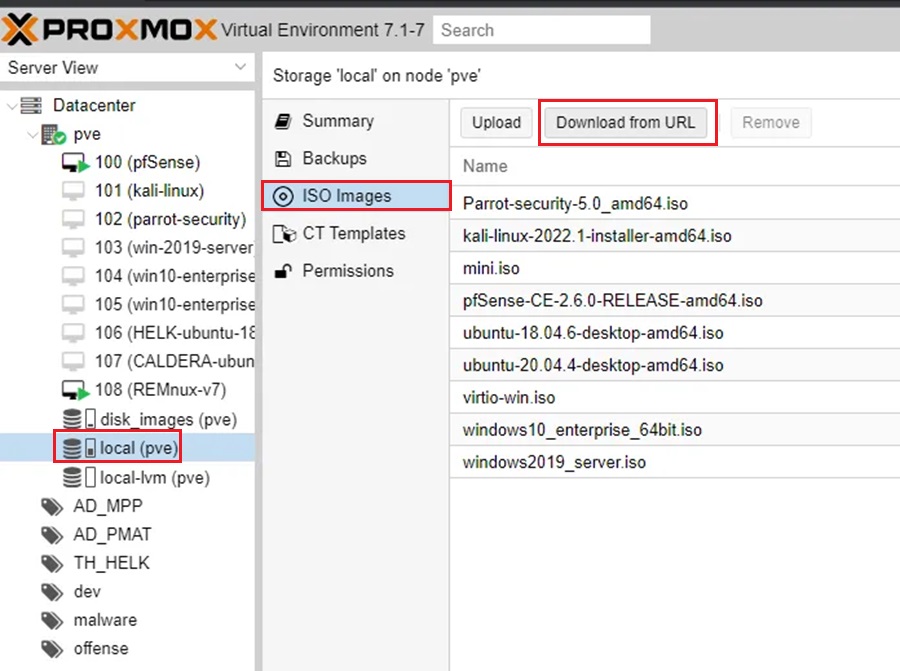
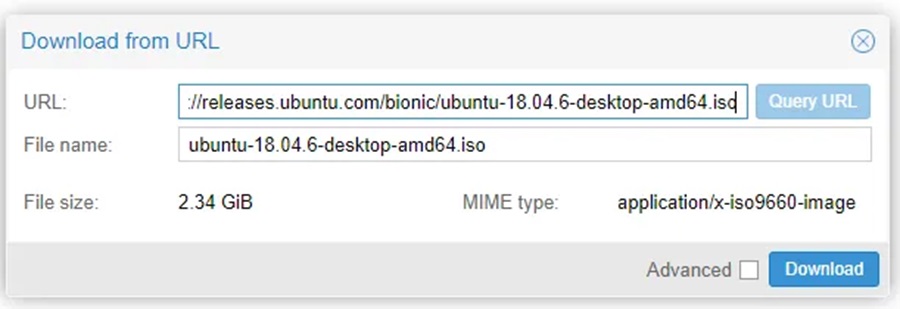
Step 2: Fill in the URL with the download link, press Query URL, and make any changes to the filename
Sometimes ISO images could compressed so you may need to download to a Linux machine, extract the ISO image, host a Python web server, and download from there.
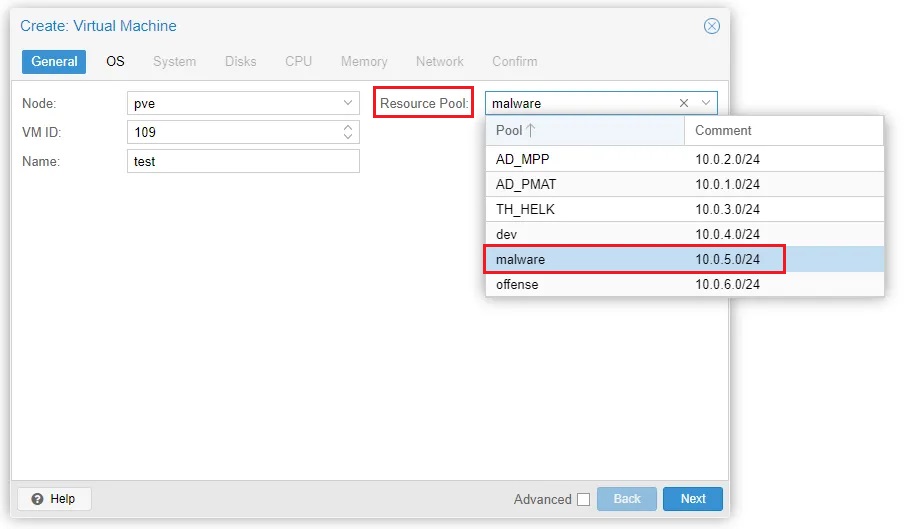
Step 3: Select Create VM at the top of the Proxmox web GUI and follow the wizard. Step 4: Select the pool you want this VM to be a member of.
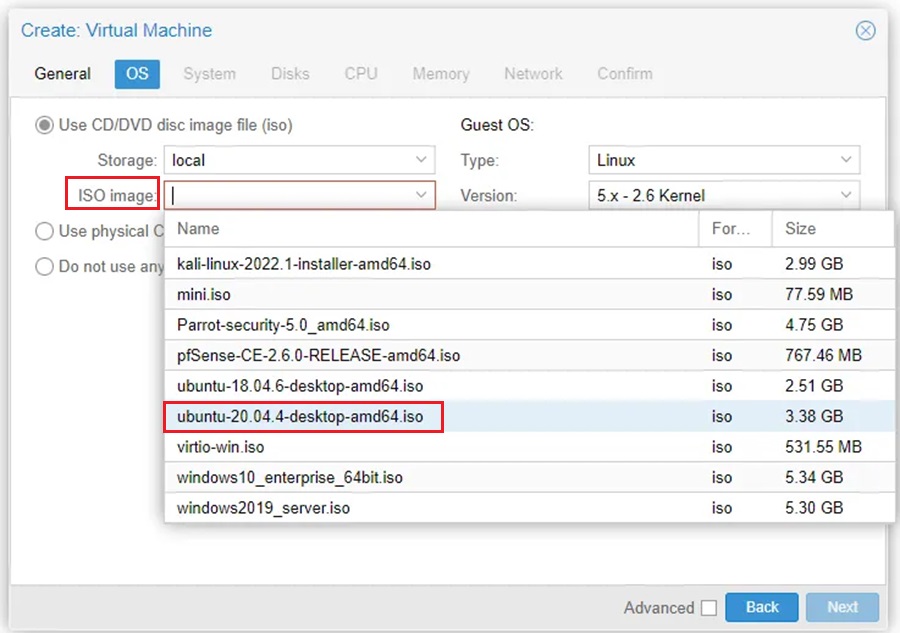
Step 5: Select the ISO image you want to use.
Step 6: Provision the machine according to recommendations found in the OS documentation and then once your reach Network, select the bridge you want to attach this VM to.
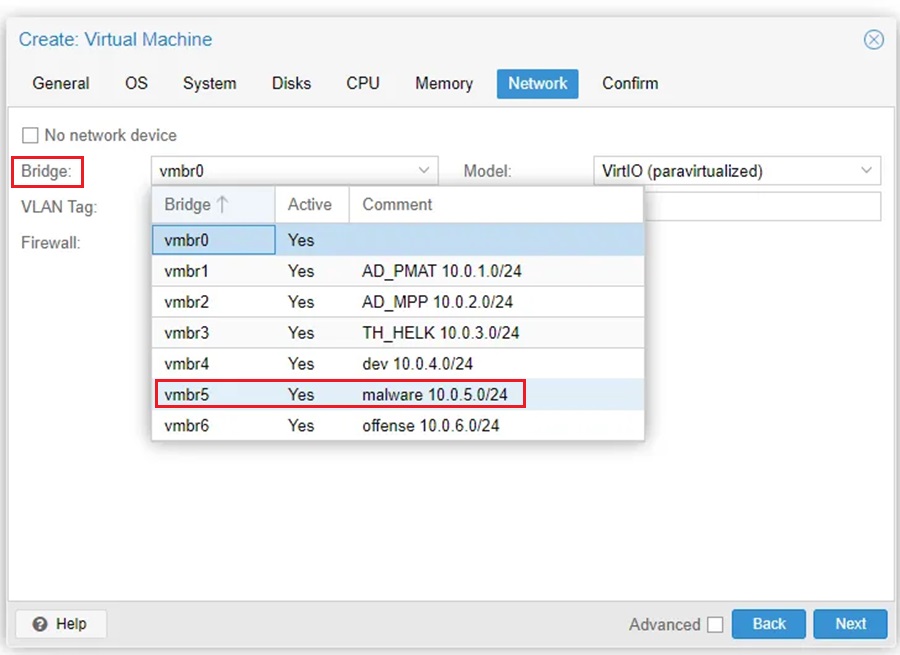
This will ensure this VM is part of the specified environment and attached to pfSense via the appropriate interface.
Once this is complete you can start the machine and use the Console interface to install the OS and you are done!
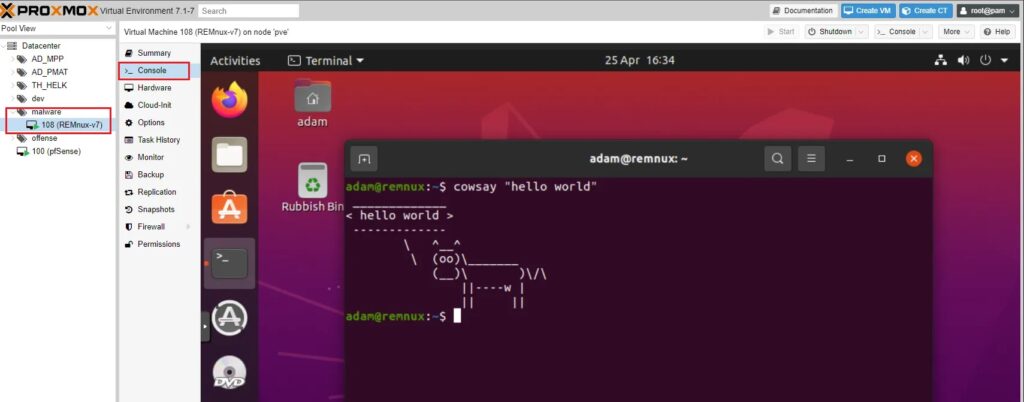
Now you can add VMs to any of the environments you created, configure firewall rules, and even have different environments talk to each other. You can see how we can use this virtualised setup to create a malware analysis environment.
Discover more in the Creating a Testing Environment series!


