Welcome back to this series on building threat hunting tools. In this series, I will be showcasing a variety of threat hunting tools that you can use to hunt for threats, automate tedious processes, and extend to create your own toolkit!
Most of these tools will be simple, focusing on being easy to understand and implement. This is so that you, the reader, can learn from these tools and begin to develop your own. There will be no cookie-cutter tutorial on programming fundamentals like data types, control structures, etc. This series will focus on the practical implementation of scripting through small projects.
You are encouraged to play with these scripts, figure out ways to break or extend them, and try to improve their basic design to fit your needs. I find this the best way to learn any new programming language/concept and, certainly, the best way to derive value!
In this installment, we create our own Python packages so others can easily use our threat hunting tools.
What is a Python Package?
Python, you can easily add functionality to your code by importing modules. For instance, in this series, you have previously used the requests module, json module, and csv module to interact with the web and file formats. Modules save you from having to reproduce complex code that handles common tasks.
In Python, files containing code are called modules.
A Python package is a way to bundle together a module with its meta-data (e.g., dependencies) so that other people can use it. They encapsulate all the functionality of your code and allow you to distribute it to other people or across your different projects.
You can publish your Python packages using package indexes like the Python Package Index (PyPI) or host them on version control platforms like GitHub. This allows others to install and use the package in their projects through a package manager like pip. Once installed, the user can import the modules and use the functions, classes, and variables provided by the package.
You have seen this with the Python packages that have helped us out previously. However, now it’s time to learn to create your own!
The Problem
You have made a great threat hunting tool and want to share it with friends and colleagues. You know how to turn your Python programs into executables to do this. However, this time you want to allow others to use your Python programs, classes, and functions from within their own Python programs. You want to allow them to build their own Python scripts around the tools you create.
The Solution
To solve this problem, you can turn your Python script into a Python package that others can import into their projects to use the functionality you have already coded. Let’s look at how to do this using the browser automation script we previously built.
Python packages typically include:
- Modules: These are individual Python files that contain your functions, classes, and variables. They provide reusable code and organize your code based on a specific purpose or functionality.
- A init.py file: This file is required for a directory (folder) to be recognized as a Python package. It can be empty or contain initialization code that is executed when the package is imported to set up things like environment variables or dependencies.
- Sub-packages: Python packages can have sub-packages (nested packages within a main package) that allow the author to better organize and structure their codebase.
- Package meta-data: Python packages often include additional files (e.g.,
README,LICENSE, orsetup.py) that provide information about the package, documentation, licensing, and installation instructions.
Cloning the browser automation script
Let’s start by cloning the browser automation script we previously built and creating a few directories for our project (named my-project here).
Now copy the browser_automation directory to your my-project directory and create a new file named __init__.py in browser_automation. This will turn the directory into a Python module.
The -r option is used with the cp (copy) command to perform a recursive copy (copy everything in the specified directory).
Finally, rename the directory browser_automation to whatever you want your project to be called when you build and publish it later. Here I have renamed my my-automated-ioc-checker.
Installing Poetry
Now we are going to use the Poetry Python package manager. Poetry is a dependency and package management tool. It simplifies the process of managing project dependencies, creating virtual environments, and building and publishing packages. You can install it using pip.
pip install poetryOr with your chosen package manager (i.e. on Arch).
pacman -S python-poetrySetting up the Poetry Project
To create a Poetry environment to work on your project, run the command poetry init from inside your Python project’s root directory.

This command will allow you to interactively create a project.toml file. This is the file that Poetry uses to configure your Python project and it includes meta-data about your project. The poetry init command will start an interactive wizard in your terminal that guides you through creating this file. Here are the options I selected.
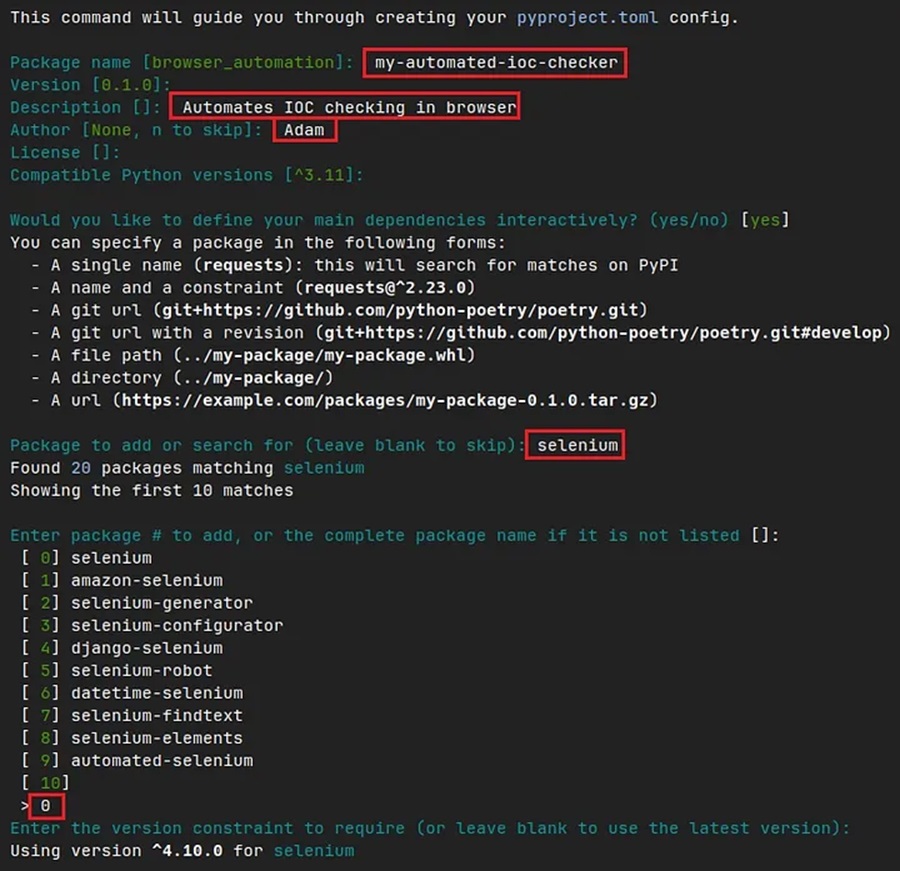
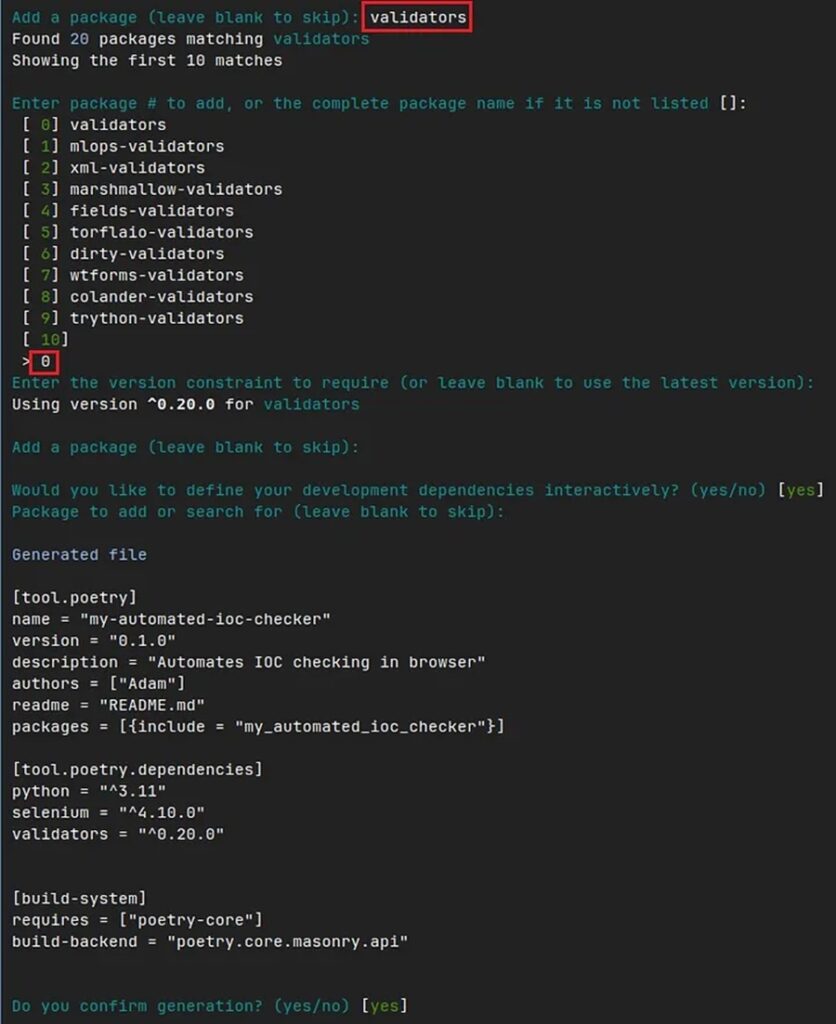
Feel free to change the name and description given. However, you need to specify selenium and validators as dependencies for your project as these are required by the Python script to function correctly.
Now you will have a pyproject.toml file in our working directory, you can tell Poetry to create a virtual environment and install the dependencies you specified with the command poetry install --no-root.
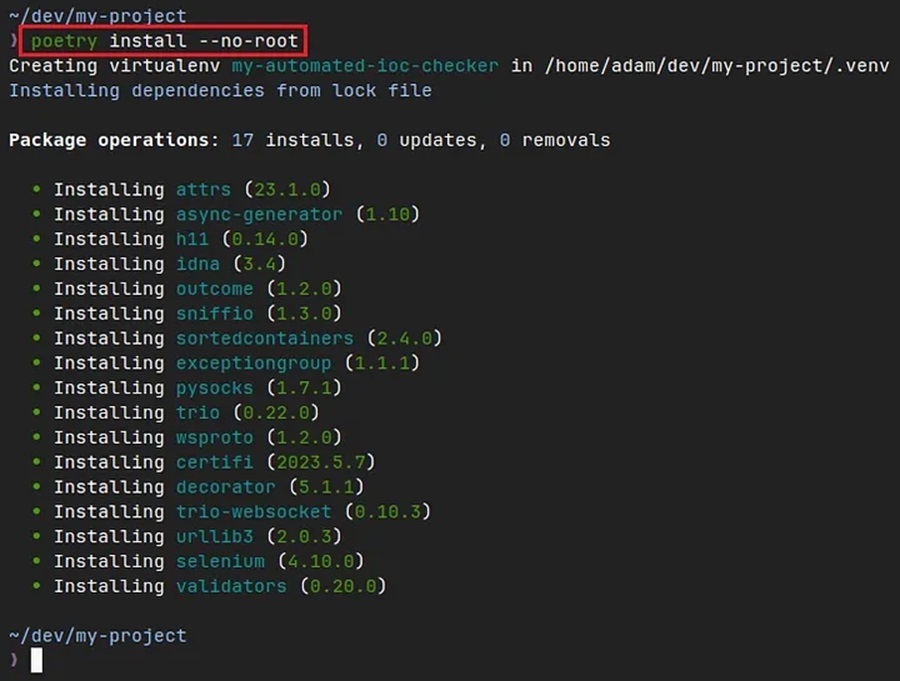
The --no-root option is used here to stop Poetry trying to install your project.
When working with Python you should use a virtual environment. These environments allow you to install Python packages your projects need without affecting your main operating system and easily keep track of your dependencies. They also allow you to destroy this environment when you are finished to free up system resources.
This will create a virtual environment. To find information about it run poetry env info.
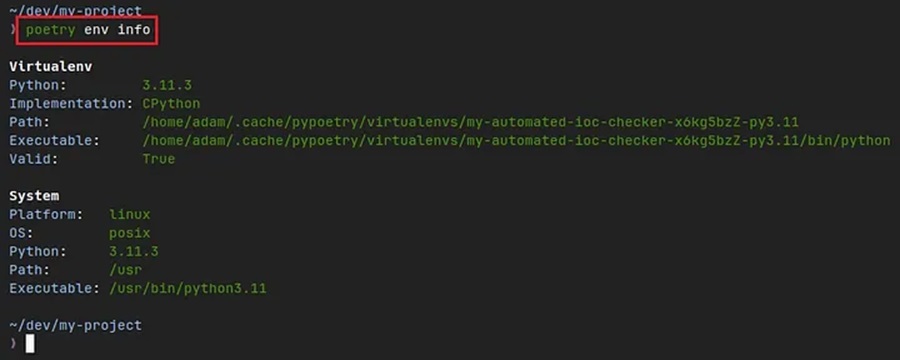
You can see the virtual environment has been created in some arcane temporary directory. This is not ideal and I like to have my virtual environment in my project directory. This can be done by specifying the following command before creating the virtual environment:
poetry config virtualenvs.in-project trueTo remove the old virtual environment run the command poetry env info -p and rm -rf </path/to/old/env>.
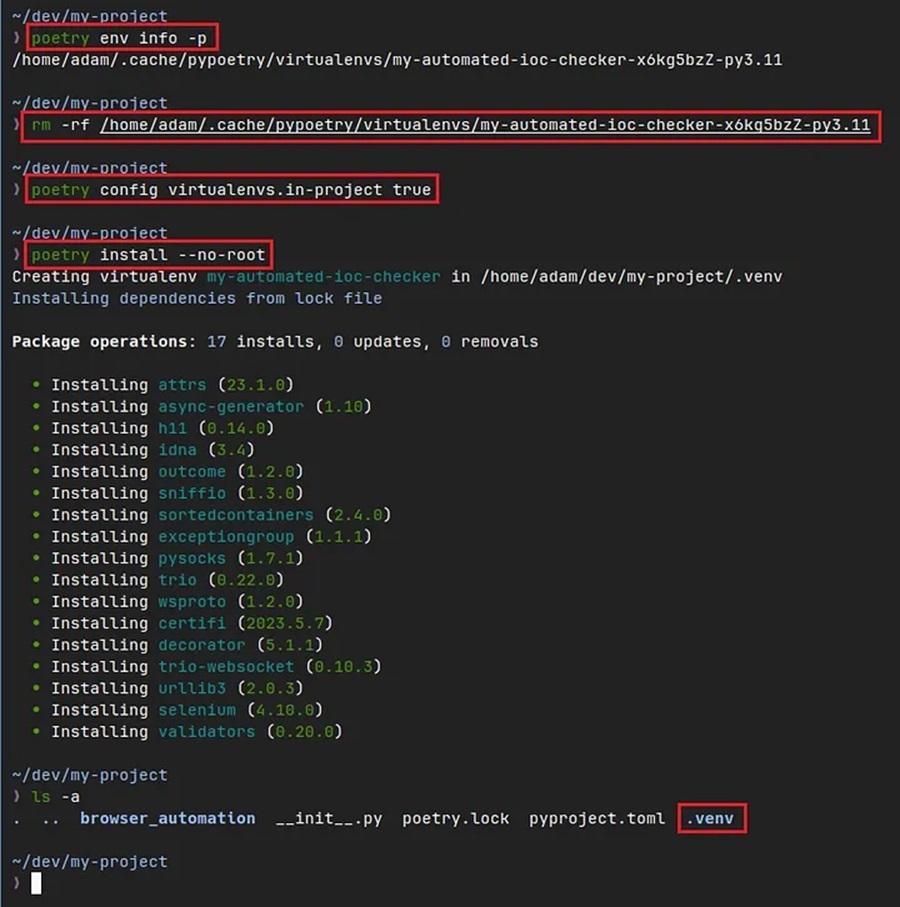
Now the virtual environment you created is in the .venv directory, within your project’s directory.
Running Python script
To enter the virtual environment you created, run the command poetry shell. Then you can execute the browser automation Python script.
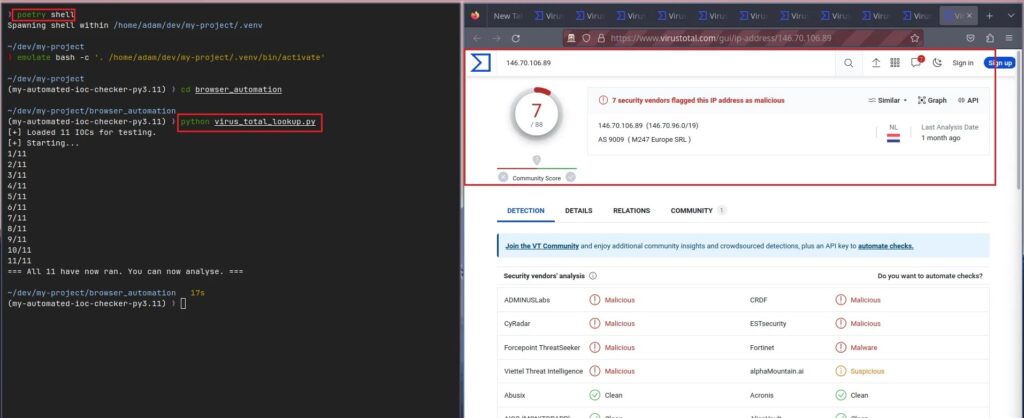
There are several commands you can run from within the virtual environment shell:
poetry add <package_name>will add a Python package to your list of dependencies and automatically update yourpyproject.tomlfile.poetry remove <package_name>will remove a Python package from your list of dependencies and automatically update yourpyproject.tomlfile.deactivatewill shut down the virtual environment and free up system resources.exitwill quit the virtual environment.
To completely remove the virtual environment, just delete the .venv folder.
Packaging and publishing using Poetry
With your Python script working, you can now move on to sharing it by packaging and publishing it using Poetry. This requires several steps:
- Add the local or remote repository you want to publish the package.
- Add your repository token to your configuration. This is the token that lets you push Python packages to your chosen repository and can usually be found in your chosen repository’s online account.
- Build the package using Poetry with the
buildcommand. - Publish the package with Poetry with the
publish -r <repostiory_name> command.
You can combine steps 3 and 4 with the command poetry publish --build -r <repository_name>.
Let’s take a look at doing this using the test PyPi repository. This is a repository that lets you practice deployment without affecting packages in the main PyPi repository.
First, go to https://test.pypi.org and register an account, then log in. Once you are logged in you go to Account settings and scroll down to API tokens.

Select Add API token and create an API token. Here I have allowed the token access to all my projects, this is not recommended in production.
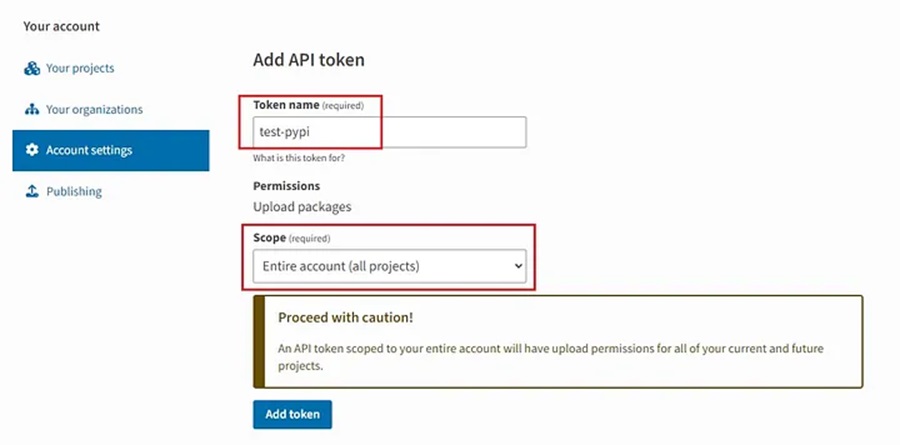
Once created, you need to copy the token and store it somewhere secure.
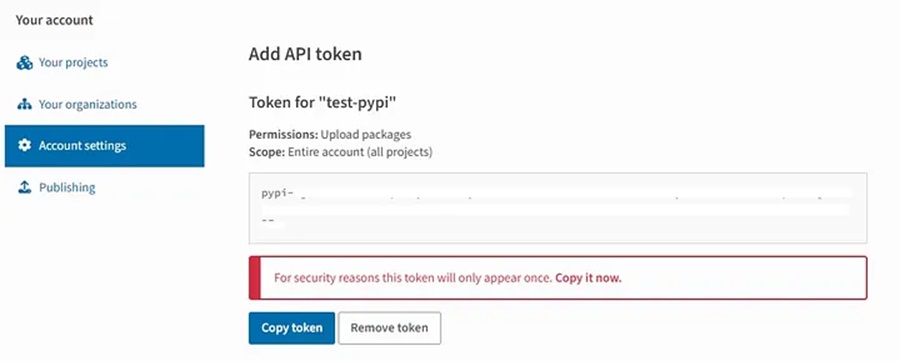
With your API token generated, you can now use it with Poetry. First, add the remote repository you want to publish your Python package to
poetry config repositories.test-pypi <https://test.pypi.org/legacy/>Then add your API token.
poetry config pypi-token.test-pypi <your_api_token>
Now you can build your package with poetry build and publish it with poetry publish -r test-pypi.
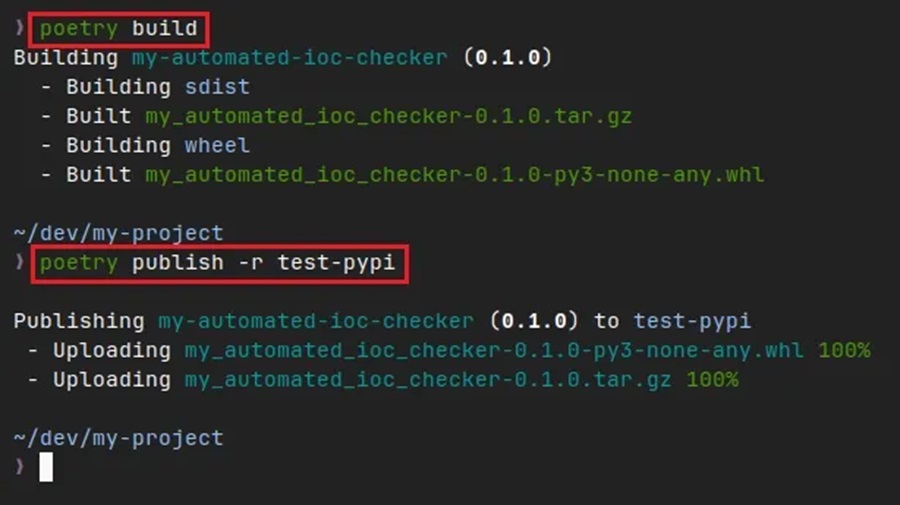
You should now have a built Python package (located in the newly created dist directory) and it should be published on the PyPi test repository. From here, others can download your Python package and try it out.
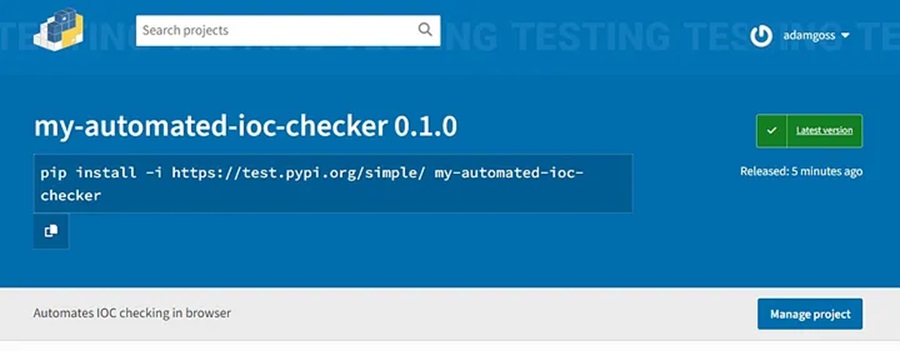
Complete!
You now know how to use Poetry to package and publish Python scripts. However, there are some common things to remember when using Poetry:
- Manage your dependencies properly. Make sure any dependencies you install are up-to-date and the version numbers are updated whenever you publish a new version of your package. Also, when you create the virtual environment, make sure you actually install the dependencies before working with it.
- Don’t forget to activate the virtual environment. Run the command
poetry shellbefore trying to execute any code. This is why it’s useful to keep track of where your virtual environment is and have it in the same place as your project. - Watch out for incompatibility issues. Some Python packages rely on system-level packages that might not be available in your virtual environment unless you install them.
- Don’t forget to deactivate and remove your virtual environments. Virtual environments can take up a lot of space and system resources. Remember to remove them once you are finished so they are not a drain on your system.
Overall, virtual environments are great for providing you with an isolated space where you can quickly package and publish your code. If you ever want to share your code, consider using them!
Discover more in the Python Threat Hunting Tools series!

