


Are you tired of juggling a dozen browser tabs and disparate tools during a cyber investigation? What if you could combine your documentation, code, and data analysis into a single, interactive environment? Enter the Jupyter Notebook, a game-changer for cyber security professionals.
As a threat intelligence analyst, you know the pain of trying to connect the dots between different data sources. Jupyter Notebooks offer a single-pane-of-glass solution to this problem! This isn’t just another tool; it’s a dynamic workspace that blends rich text, live code, and data visualizations to supercharge your workflow.
In this guide, we’ll walk you through what Jupyter Notebooks are, how to set them up, and how you can leverage them to interact with security APIs like VirusTotal, transforming your day-to-day tasks and making your analysis more efficient and powerful. Let’s jump in!
What Are Jupyter Notebooks?
So, what exactly are Jupyter Notebooks? Think of them as interactive, web-based documents that act as a digital lab for your projects.
They allow you to create and share “living” documents that contain live code (most popularly Python), equations, visualizations, and narrative text. Often described as a fusion of Markdown and code, they let you perform powerful operations all within a single pane of glass.
This blend is perfect for data-driven threat intelligence. Unlike a static report, a notebook is a dynamic environment where your analysis is repeatable, transparent, and easily shareable. Each step of your investigation, from initial data collection to final conclusion, is documented and executable.
Why is this so great for cyber security? The magic lies in the ability to mix rich documentation with executable code.
You can create detailed incident response playbooks with step-by-step instructions, and right below each step, embed a block of Python code that an analyst can execute. This code can pull data from your security tools (like your SIEM or EDR), enrich indicators using external APIs, and visualize the results without ever leaving the notebook.
Imagine building a threat actor profile where you can click a button to pull their latest tactics, techniques, and procedures from MITRE ATT&CK, or an investigation timeline that automatically plots Indicators of Compromise (IOCs) from a CSV file.
It’s the ultimate tool for automating tasks, documenting processes, and collaborating with your team in a seamless, integrated environment, ensuring that your analytical process is not just a one-off effort but a reproducible workflow.
Jupyter Notebook Setup
Getting started with Jupyter Notebooks is easier than you might think. We’ll walk through a quick setup using Visual Studio Code (VS Code), a popular and versatile code editor that offers excellent built-in support for notebooks.
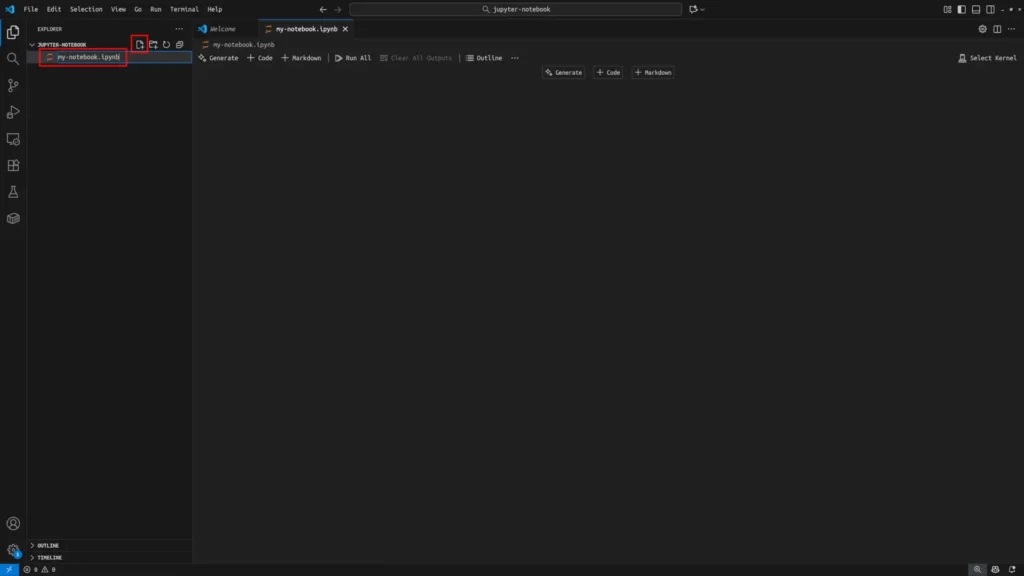
Step 1: Create Your Notebook File
In VS Code, create a new file with the extension .ipynb. VS Code will automatically recognize it as a Jupyter Notebook and may prompt you to install recommended extensions, like the official Python and Jupyter extensions from Microsoft. These provide a rich user interface for managing cells, selecting kernels, and viewing outputs.
Step 2: Select a Python Kernel & Virtual Environment
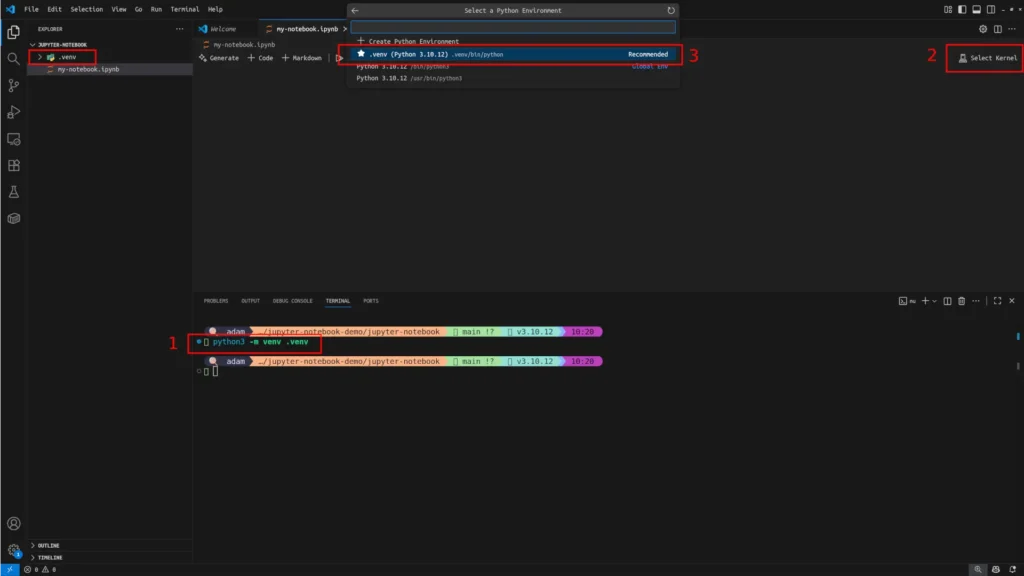
To run Python code, you need a “kernel,” which is the computational engine. It’s a critical best practice to create a dedicated virtual environment for each project. This isolates the Python packages (like requests or pandas) you’ll install for your notebook from your system’s global Python installation, preventing “dependency hell” where different projects need conflicting versions of the same library.
You can create one easily using venv right from the VS Code terminal: python3 -m venv .venv
Once created, VS Code will prompt you to select this environment’s kernel for your notebook.
Step 3: Add Markdown and Code Cells
Notebooks are composed of individual “cells.” You can set a cell’s type to either “Markdown” for rich text or “Code” for Python.
- Use Markdown cells to structure your analysis with headings (
# My Title), lists, bold text, and detailed notes. - Use code cells to write and execute Python.
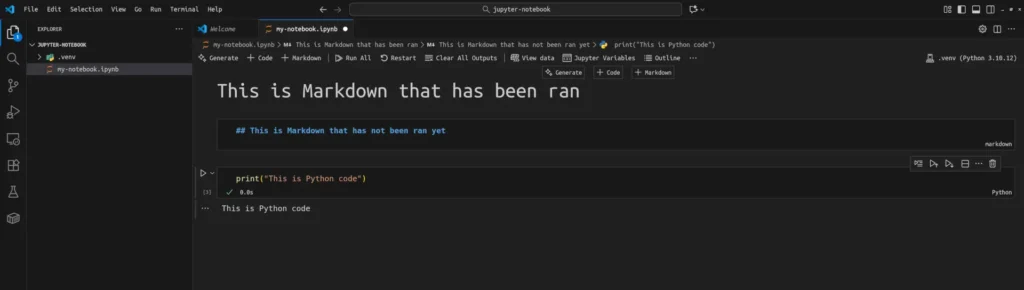
To run a cell, you can press <Control> + <Enter> to execute it in place or <Shift> + <Enter> to execute it and move to the next cell.
A key feature is that the notebook maintains a state; any variables or functions defined in one cell are available for use in all subsequent cells you run. The output of your code—be it a simple print statement, a data table, or a complex chart—will appear directly below the cell that generated it.
Step 4: Embrace Version Control
As with any coding project, using version control is crucial. A .ipynb file is actually a structured JSON file, which means you can track its changes with Git. Initialize a Git repository in your project folder (git init) and publish it to a platform like GitHub or GitLab.

This not only backs up your work but also allows you to collaborate effectively with your team. While merging complex changes in notebook files can sometimes be tricky, tools like nbdime are specifically designed to help you visually diff and merge notebooks, making teamwork much smoother.
Using the VirusTotal API
One of the most powerful and immediate uses for a Jupyter Notebook in cyber threat intelligence is automating the enrichment of IOCs by interacting with security APIs. Let’s walk through a practical example using the fantastic VirusTotal API.
VirusTotal aggregates data from over 70 antivirus scanners and numerous other tools, making it an indispensable resource for quickly assessing whether a file hash, domain, IP address, or URL is malicious.
First, you’ll need to install the official VirusTotal Python library in your virtual environment with: pip install vt-py. With the library installed, you can write a script to look up an IOC.
However, a small “gotcha” is that the vt-py library is built to be asynchronous to handle network requests efficiently. This can cause runtime errors in a standard Jupyter Notebook environment. To handle this, you need to use Python’s built-in asyncio library to properly create and call an asynchronous function.
Here’s what a simple function to look up a SHA256 hash would look like in a code cell:
import vt

import asyncio

from pprint import pprint

VT_API_KEY = "your_actual_key_here"

ioc = "3e55bf8ecaeec65871e6fca4cb2d4ff2586f83a20c12977858348492d2d0dec4"

async def get_vt_result(ioc):

    async with vt.Client(VT_API_KEY) as client:

        result = await client.get_object_async(f"/files/{ioc}")

        return result

result = await get_vt_result(ioc)

pprint(result.last_analysis_stats) When you run this cell, the notebook will reach out to VirusTotal and pull back a rich JSON object. You can then inspect key fields like last_analysis_stats (to see malicious, suspicious, and harmless counts) and last_analysis_results (to see which specific vendors flagged the file).
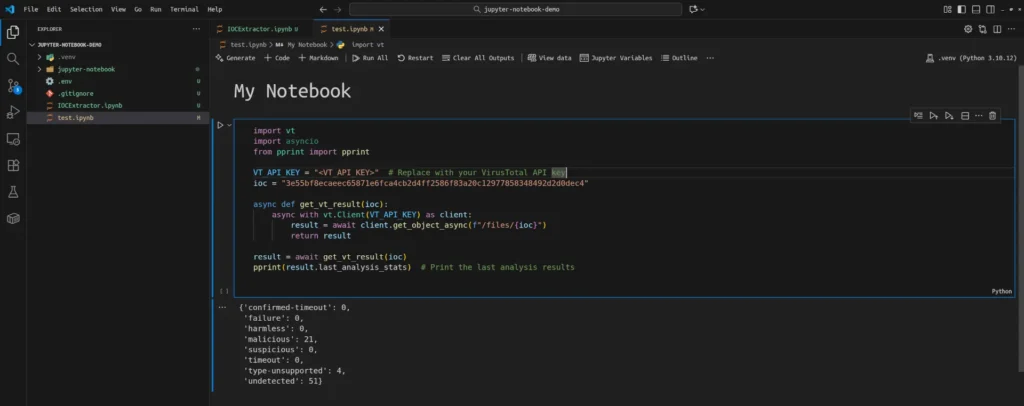
This gives you instant, actionable enrichment data right within your investigation notes.
Storing API Credentials
A critical note on security: you should never hardcode credentials like API keys directly in your code, especially if you plan to share the notebook or use version control. An attacker could find them and abuse your access. Here are a few progressively more secure ways to handle them.
Environment Variables
The most common and straightforward method. Store the key in a .env file in your project directory (and make sure to add .env to your .gitignore file!). You can then use a library like python-dotenv to load it.
- Install it:
pip install python-dotenv - Add your API keys to your
.envfile:VT_API_KEY="your_actual_key_here" - In your notebook, use the following code to load your API key from your local environment file:
from dotenv import load_dotenv
import os
load_dotenv()
API_KEY = os.getenv("VT_API_KEY")Python Config File
You can create a separate config.py file to store credentials.
- In your
config.pyfile:API_KEY = "your_actual_key_here" - At the top of your notebook, add:
from config import API_KEY - This is simple but carries the same risk as hardcoding if you accidentally commit
config.pyto your repository.
Password Manager/Secrets Vault
This is the most secure and enterprise-ready method. Use a dedicated service like AWS Secrets Manager or HashiCorp Vault. Your code doesn’t store the secret at all; instead, it uses a library like boto3 to authenticate with the service and dynamically pull the credential at runtime.
This approach provides centralized management, access control, audit trails, and secret rotation capabilities—all essential for a mature CTI team.
Jupyter Notebook Examples
The possibilities for using Jupyter Notebooks are nearly endless, and you don’t have to build every workflow from scratch. There’s a fantastic open-source project called Jupyter Universe (Juniverse), created by cyber security researcher Thomas Roccia, which serves as a gateway for exploring community-created cyber security notebooks.
Juniverse isn’t just a repository; it’s a curated collection showcasing the practical application of code in security. It’s built on the principle of “standing on the shoulders of giants,” allowing analysts to adopt and adapt powerful tools without reinventing the wheel.
The project is a one-stop shop for notebooks covering everything from threat intelligence and incident response to malware analysis and digital forensics.
We tested out the IOC Extractor notebook, a perfect example of a common CTI task that’s ripe for automation. Under the hood, this notebook uses Python libraries like requests to fetch the content of a threat intelligence blog post and BeautifulSoup4 to parse the HTML. It then uses carefully crafted regular expressions (regex) to find and extract patterns matching common IOC formats like IP addresses, domains, and file hashes.
After downloading the notebook and installing a few dependencies, we could simply paste the URL of a threat intelligence article from Unit 42 into a variable. Running the cells executed the script, which scraped the page and presented the extracted IOCs in a clean pandas DataFrame—essentially a programmable spreadsheet.
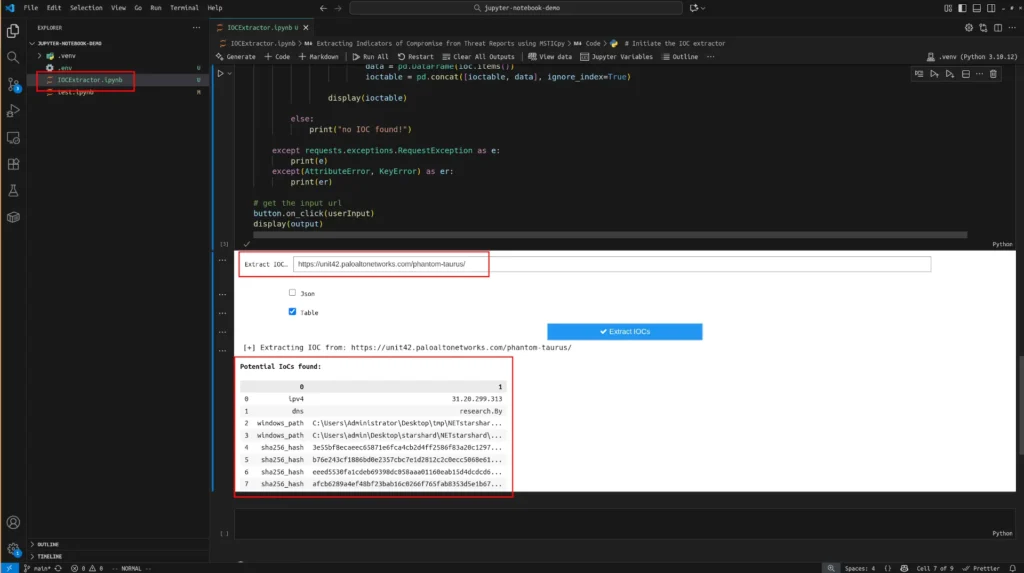
This is where the real power becomes apparent. That final step—extending the script—is where the magic happens. You could add another code cell that takes the DataFrame of IOCs and iterates through it.
For each IOC, the notebook could:
- Call the VirusTotal API function we built earlier to get immediate enrichment.
- Use the MISP (Malware Information Sharing Platform) API (
pymisp) to upload the indicators to your Threat Intelligence Platform, tagging them with the relevant threat actor and report source. - Connect to your SIEM’s API (e.g., Splunk, Sentinel) to run a historical search for these IOCs in your logs.
- Push high-confidence malicious domains or IPs to a blocklist via an EDR or firewall API.
This workflow transforms a manual, error-prone task of copy-pasting indicators into a fully automated CTI pipeline, turning a two-hour job into a two-minute process. This is the power of automation that notebooks unlock.
Summary
Jupyter Notebooks are an incredibly versatile tool that should be in every cybersecurity professional’s arsenal. They bridge the gap between documentation and execution, allowing you to create powerful, interactive playbooks for threat hunting, incident response, and threat intelligence analysis.
By integrating with the APIs of your favorite security tools, you can automate repetitive tasks, enrich data on the fly, and keep your entire investigation in one cohesive document. Whether you’re building your own tools from scratch or leveraging amazing community projects like Juniverse, embracing the Jupyter Notebook will save you time and elevate your analysis.




Frequently Asked Questions
What Languages Can I Use in a Jupyter Notebook?
While Python is the most popular language used in Jupyter Notebooks, especially in data science and cyber security, it supports many other languages through different kernels. You can find kernels for R, Julia, Scala, and even bash.
Are Jupyter Notebooks Secure?
Jupyter Notebooks themselves are just files. The security risk comes from the code you run within them. You should never run a notebook from an untrusted source without carefully reviewing the code first, as it can execute any command on your machine. Always be cautious, especially when dealing with notebooks that handle sensitive data or API keys.
How Are Jupyter Notebooks Different From a Regular Python Script?
A Python script (.py) is a plain text file containing code that is typically executed from top to bottom. A Jupyter Notebook (.ipynb) is a JSON document that contains a list of cells. These cells can contain code, text, or images, and you can execute the code cells in any order you like. This makes notebooks ideal for exploratory analysis, data visualization, and creating reports where the narrative context is just as important as the code itself.
Can I Collaborate With My Team Using a Jupyter Notebook?
Absolutely! Since notebooks are just files, you can share them and use version control systems like Git to collaborate. Multiple team members can work on the same notebook, making tweaks and running analyses. When you spin up a Jupyter server, your colleagues can connect and work from the exact same notebook, ensuring everyone is on the same page. This makes it a fantastic tool for team-based intrusion analysis.